Notebook
In this quickstart, you'll use the SQLMesh notebook interface to get up and running with SQLMesh's scaffold generator. This example project will run locally on your computer using DuckDB as an embedded SQL engine.
Before beginning, ensure that you meet all the prerequisites for using SQLMesh.
The notebook interface works with both Jupyter and Databricks notebooks. Learn more about configuring a Databricks connection at the Execution Engines page.
Learn more about the quickstart project structure
This project demonstrates key SQLMesh features by walking through the SQLMesh workflow on a simple data pipeline. This section describes the project structure and the SQLMesh concepts you will encounter as you work through it.
The project contains three models with a CSV file as the only data source:
┌─────────────┐
│seed_data.csv│
└────────────┬┘
             │
            ┌▼─────────────┐
            │seed_model.sql│
            └─────────────┬┘
                          │
                         ┌▼────────────────────┐
                         │incremental_model.sql│
                         └────────────────────┬┘
                                              │
                                             ┌▼─────────────┐
                                             │full_model.sql│
                                             └──────────────┘
Although the project is simple, it touches on all the primary concepts needed to use SQLMesh productively.
1. Create the SQLMesh project
First, create a SQLMesh project directory with your operating system's graphical or command-line tools. Next, create a Jupyter or Databricks notebook file - it does not need to be in the SQLMesh project directory.
If using a python virtual environment, ensure it's activated first by running the source .venv/bin/activate command from the folder used during installation.
Import the SQLMesh library to load the notebook magic commands:

Next, create a SQLMesh scaffold with the %init notebook magic, specifying a default SQL dialect for your models. The dialect should correspond to the dialect most of your models are written in; it can be overridden for specific models in the model's MODEL specification. All SQL dialects supported by the SQLGlot library are allowed.
In this example, we specify the duckdb dialect:

If the scaffold is successfully created, it will return SQLMesh project scaffold created.
The scaffold will include a SQLMesh configuration file for the example project.
Learn more about the project's configuration
SQLMesh project-level configuration parameters are specified in the config.yaml file in the project directory.
This example project uses the embedded DuckDB SQL engine, so its configuration specifies duckdb as the local gateway's connection and the local gateway as the default.
The command to run the scaffold generator requires a default SQL dialect for your models, which it places in the config model_defaults dialect key. In this example, we specified the duckdb SQL dialect as the default:
Learn more about SQLMesh project configuration here.
The scaffold will also include multiple directories where SQLMesh project files are stored and multiple files that constitute the example project (e.g., SQL models).
Learn more about the project directories and files
SQLMesh uses a scaffold generator to initiate a new project. The generator will create multiple sub-directories and files for organizing your SQLMesh project code.
The scaffold generator will create the following configuration file and directories:
- config.yaml
- The file for project configuration. Refer to configuration.
- ./models
- SQL and Python models. Refer to models.
- ./seeds
- Seed files. Refer to seeds.
- ./audits
- Shared audit files. Refer to auditing.
- ./tests
- Unit test files. Refer to testing.
- ./macros
- Macro files. Refer to macros.
It will also create the files needed for this quickstart example:
- ./models
- full_model.sql
- incremental_model.sql
- seed_model.sql
- ./seeds
- seed_data.csv
- ./audits
- assert_positive_order_ids.sql
- ./tests
- test_full_model.yaml
Finally, the scaffold will include data for the example project to use.
Learn more about the project's data
The data used in this example project is contained in the seed_data.csv file in the /seeds project directory. The data reflects sales of 3 items over 7 days in January 2020.
The file contains three columns, id, item_id, and event_date, which correspond to each row's unique ID, the sold item's ID number, and the date the item was sold, respectively.
This is the complete dataset:
| id | item_id | event_date |
|---|---|---|
| 1 | 2 | 2020-01-01 |
| 2 | 1 | 2020-01-01 |
| 3 | 3 | 2020-01-03 |
| 4 | 1 | 2020-01-04 |
| 5 | 1 | 2020-01-05 |
| 6 | 1 | 2020-01-06 |
| 7 | 1 | 2020-01-07 |
Inform SQLMesh of the project location by setting a context with the %context notebook magic. If the context is set successfully, it will return a message including the repository or list of repositories:

You can specify multiple directories in one call to %context if your SQLMesh project has multiple repositories.
2. Create a prod environment
SQLMesh's key actions are creating and applying plans to environments. At this point, the only environment is the empty prod environment.
Learn more about SQLMesh plans and environments
SQLMesh's key actions are creating and applying plans to environments.
A SQLMesh environment is an isolated namespace containing models and the data they generated. The most important environment is prod ("production"), which consists of the databases behind the applications your business uses to operate each day. Environments other than prod provide a place where you can test and preview changes to model code before they go live and affect business operations.
A SQLMesh plan contains a comparison of one environment to another and the set of changes needed to bring them into alignment. For example, if a new SQL model was added, tested, and run in the dev environment, it would need to be added and run in the prod environment to bring them into alignment. SQLMesh identifies all such changes and classifies them as either breaking or non-breaking.
Breaking changes are those that invalidate data already existing in an environment. For example, if a WHERE clause was added to a model in the dev environment, existing data created by that model in the prod environment are now invalid because they may contain rows that would be filtered out by the new WHERE clause. Other changes, like adding a new column to a model in dev, are non-breaking because all the existing data in prod are still valid to use - only new data must be added to align the environments.
After SQLMesh creates a plan, it summarizes the breaking and non-breaking changes so you can understand what will happen if you apply the plan. It will prompt you to "backfill" data to apply the plan - in this context, backfill is a generic term for updating or adding to a table's data (including an initial load or full refresh).
The first SQLMesh plan must execute every model to populate the production environment. Running the notebook magic %plan will generate the plan and the following output:
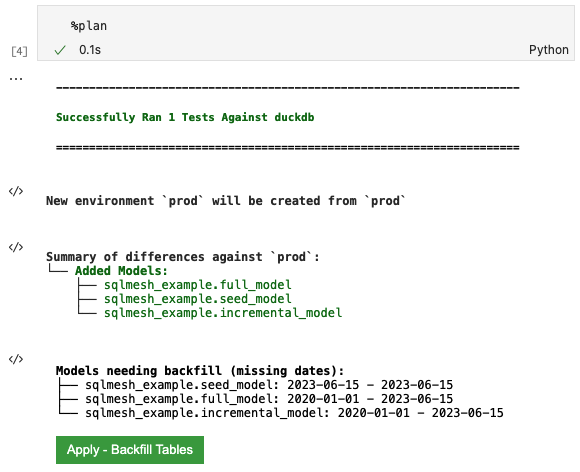
The first block of output notes that %plan successfully executed the project's test tests/test_full_model.yaml with duckdb.
The New environment line describes what environments the plan will affect when applied - a new prod environment in this case.
The Summary of differences section shows that SQLMesh detected three new models relative to the current empty environment.
The Models needing backfill section lists each model that will be executed by the plan, along with the date intervals that will be run. Both full_model and incremental_model show 2020-01-01 as their start date because:
- The incremental model specifies that date in the
startproperty of itsMODELstatement and - The full model depends on the incremental model.
The seed_model date range begins on the same day the plan was made because SEED models have no temporality associated with them other than whether they have been modified since the previous SQLMesh plan.
Learn more about the project's models
A plan's actions are determined by the kinds of models the project uses. This example project uses three model kinds:
SEEDmodels read data from CSV files stored in the SQLMesh project directory.FULLmodels fully refresh (rewrite) the data associated with the model every time the model is run.INCREMENTAL_BY_TIME_RANGEmodels use a date/time data column to track which time intervals are affected by a plan and process only the affected intervals when a model is run.
We now briefly review each model in the project.
The first model is a SEED model that imports seed_data.csv. This model consists of only a MODEL statement because SEED models do not query a database.
In addition to specifying the model name and CSV path relative to the model file, it includes the column names and data types of the columns in the CSV. It also sets the grain of the model to the columns that collectively form the model's unique identifier, id and event_date.
The second model is an INCREMENTAL_BY_TIME_RANGE model that includes both a MODEL statement and a SQL query selecting from the first seed model.
The MODEL statement's kind property includes the required specification of the data column containing each record's timestamp. It also includes the optional start property specifying the earliest date/time for which the model should process data and the cron property specifying that the model should run daily. It sets the model's grain to columns id and event_date.
The SQL query includes a WHERE clause that SQLMesh uses to filter the data to a specific date/time interval when loading data incrementally:
The final model in the project is a FULL model. In addition to properties used in the other models, its MODEL statement includes the audits property. The project includes a custom assert_positive_order_ids audit in the project audits directory; it verifies that all item_id values are positive numbers. It will be run every time the model is executed.
Click the green button labeled Apply - Backfill Tables to apply the plan and initiate backfill. The following output will be displayed:

The first output block shows the completion percentage and run time for each model (very fast in this simple example). The following line shows that the prod environment now points to the tables created during model execution.
You've now created a new production environment with all of history backfilled.
3. Update a model
Now that we have have populated the prod environment, let's modify one of the SQL models.
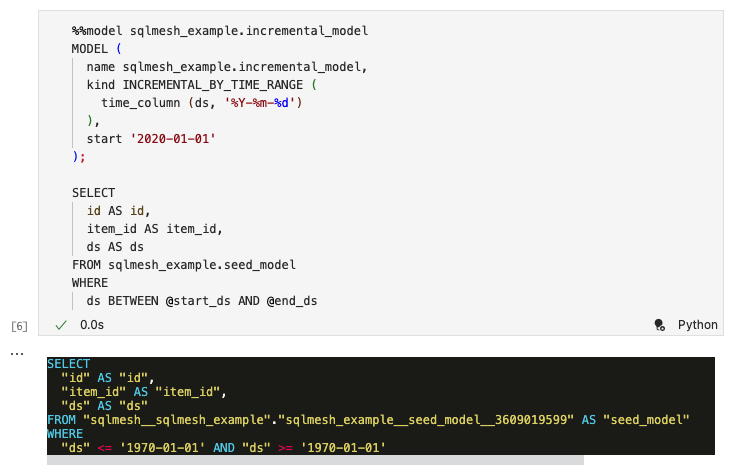
We can modify the incremental SQL model using the %model line notebook magic (note the single %) and the model name:

After we execute the cell, the contents will be replaced by the %%model cell notebook magic (note the double %%) and the model contents, along with a rendered version of the model SQL query. SQLMesh has automatically added explicit column aliases to the query (e.g., id AS id):
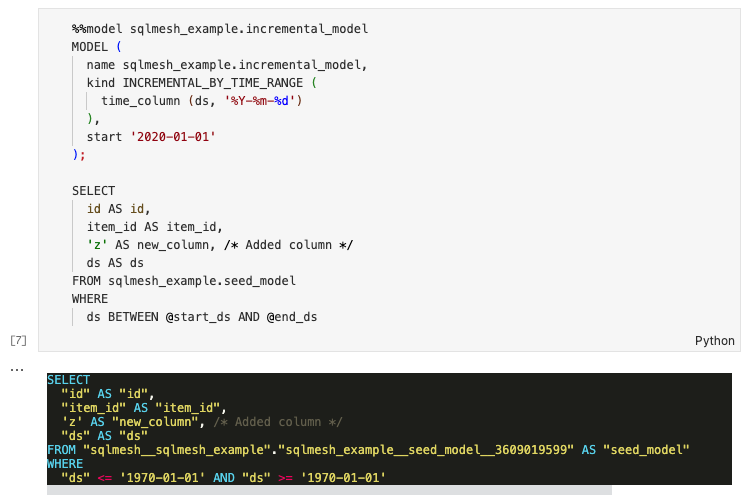
We modify the incremental SQL model by adding a new column to the query. When we execute the cell it will write the updated model contents to the file and update the rendered version of the query:
4. Work with a development environment
4.1 Create a dev environment
Now that you've modified a model, it's time to create a development environment so that you can validate the model change without affecting production.
Run %plan dev to create a development environment called dev. The following output will be displayed:
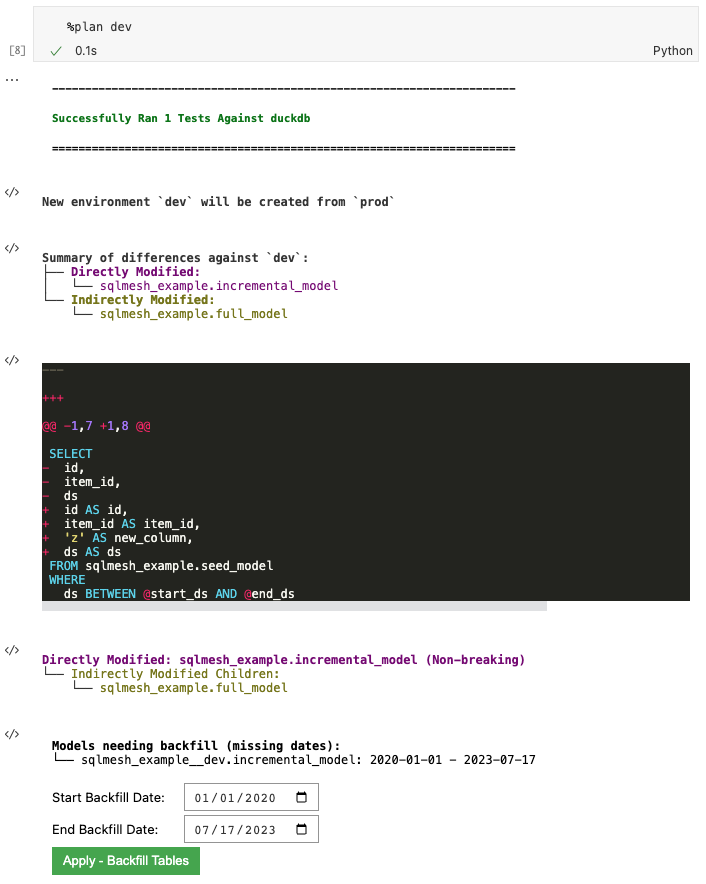
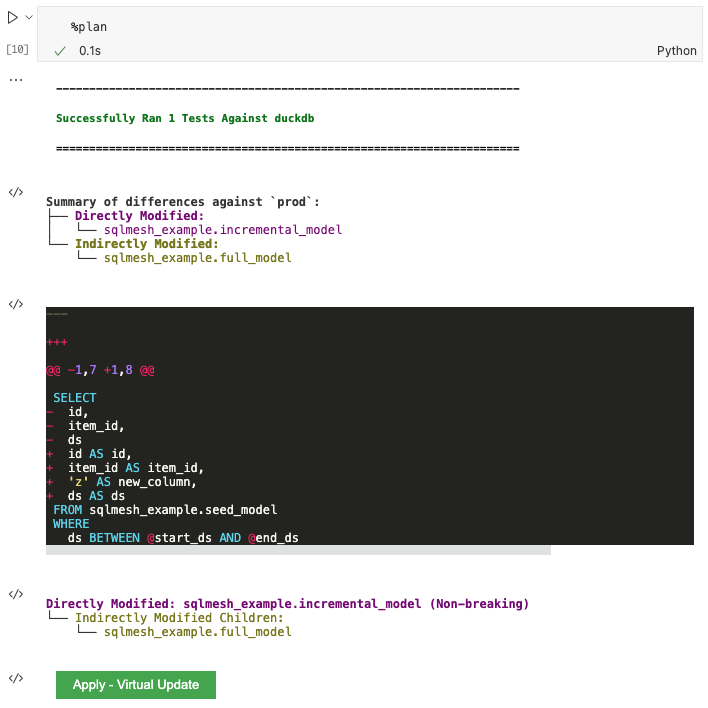
The first block of output notes that %plan successfully executed the project's test tests/test_full_model.yaml with duckdb.
The New environment line describes what environments the plan will affect when applied - a new dev environment will be created from the existing prod environment.
The Summary of differences section summarizes the differences between the modified model and the new dev environment (right now just a copy of prod), detecting that we directly modified incremental_model and that full_model was indirectly modified because it selects from the incremental model. It shows a diff between the existing and updated model.
SQLMesh automatically classified the change as Non-breaking because understood that the change was additive (added a column not used by full_model) and did not invalidate any data already in prod.
The Models needing backfill section shows that only the directly modified incremental_model needs backfill and provides a date picker to specify the start and end dates for the backfill.
Click the green button to perform the backfill:
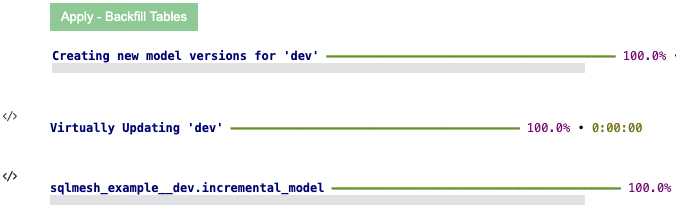
The output shows that SQLMesh created a new model version in dev. The last line of the output shows that SQLMesh applied the change to sqlmesh_example__dev.incremental_model. In the model schema, the suffix "__dev" indicates that it is in the dev environment.
SQLMesh did not need to backfill anything for the full_model since the change was Non-breaking.
4.2 Validate updates in dev
You can now view this change by querying data from incremental_model with the %%fetchdf cell magic (note the two % symbols) and the SQL query select * from sqlmesh_example__dev.incremental_model.
Note that the environment name __dev is appended to the schema namespace sqlmesh_example in the query:
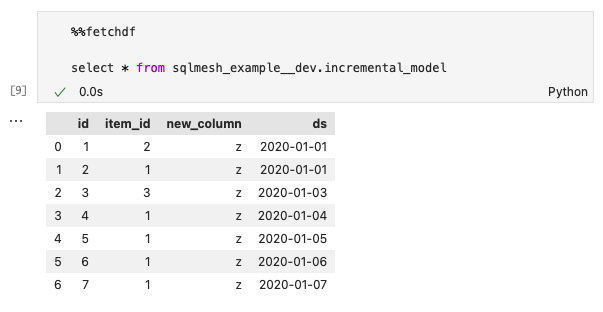
You can see that new_column was added to the dataset.
The production table was not modified; you can validate this by querying the production table using %%fetchdf and the query select * from sqlmesh_example.incremental_model.
Note that nothing has been appended to the schema namespace sqlmesh_example because prod is the default environment:
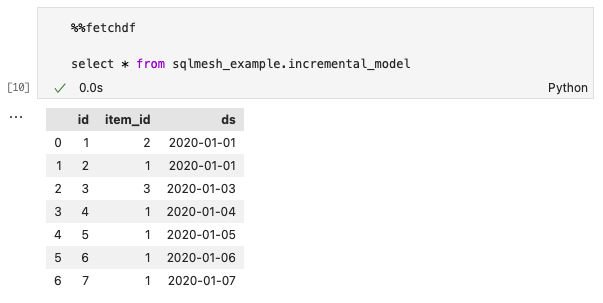
The production table does not have new_column because the changes to dev have not yet been applied to prod.
5. Update the prod environment
Now that we've tested the changes in dev, it's time to move them to production. Run %plan to plan and apply your changes to the prod environment:
Click the green Apply - Virtual Update button to apply the plan and execute the backfill:

Note that a backfill was not necessary and only a Virtual Update occurred.
5.2 Validate updates in prod
Double-check that the data updated in prod by running %%fetchdf with the SQL query select * from sqlmesh_example.incremental_model:

new_column is now present in the prod incremental model.
6. Next steps
Congratulations, you've now conquered the basics of using SQLMesh!
From here, you can: