Browser UI
Warning
Browser UI is deprecated. Please use the VSCode extension instead.
In this quickstart, you'll use the SQLMesh browser user interface to get up and running with SQLMesh's scaffold generator. This example project will run locally on your computer using DuckDB as an embedded SQL engine.
Learn more about the quickstart project structure
This project demonstrates key SQLMesh features by walking through the SQLMesh workflow on a simple data pipeline. This section describes the project structure and the SQLMesh concepts you will encounter as you work through it.
The project contains three models with a CSV file as the only data source:
┌─────────────┐
│seed_data.csv│
└────────────┬┘
             │
            ┌▼─────────────┐
            │seed_model.sql│
            └─────────────┬┘
                          │
                        ┌─▼───────────────────┐
                        │incremental_model.sql│
                        └────────────────────┬┘
                                             │
                                            ┌▼─────────────┐
                                            │full_model.sql│
                                            └──────────────┘
Although the project is simple, it touches on all the primary concepts needed to use SQLMesh productively.
Setup
Before beginning, ensure that you meet all the prerequisites for using SQLMesh. The SQLMesh browser UI requires additional Python libraries not included in the base SQLMesh installation.
To use the UI, install SQLMesh with the web add-on. First, if using a python virtual environment, ensure it's activated by running source .venv/bin/activate command from the folder used during installation.
Next, install the UI with pip:
1. Create the SQLMesh project
Before working in the SQLMesh browser UI, create a project directory with your operating system's graphical interface or from the command line:
Navigate to the directory on the command line:
If using a python virtual environment, ensure it's activated by running source .venv/bin/activate from the folder used during installation.
Create a SQLMesh scaffold with the following command, specifying a default SQL dialect for your models. The dialect should correspond to the dialect most of your models are written in; it can be overridden for specific models in the model's MODEL specification. All SQL dialects supported by the SQLGlot library are allowed.
In this example, we specify the duckdb dialect:
The scaffold will include a SQLMesh configuration file for the example project.
Learn more about the project's configuration
SQLMesh project-level configuration parameters are specified in the config.yaml file in the project directory.
This example project uses the embedded DuckDB SQL engine, so its configuration specifies duckdb as the local gateway's connection and the local gateway as the default.
The command to run the scaffold generator requires a default SQL dialect for your models, which it places in the config model_defaults dialect key. In this example, we specified the duckdb SQL dialect as the default:
Learn more about SQLMesh project configuration here.
The scaffold will also include multiple directories where SQLMesh project files are stored and multiple files that constitute the example project (e.g., SQL models).
Learn more about the project directories and files
SQLMesh uses a scaffold generator to initiate a new project. The generator will create multiple sub-directories and files for organizing your SQLMesh project code.
The scaffold generator will create the following configuration file and directories:
- config.yaml
- The file for project configuration. Refer to configuration.
- ./models
- SQL and Python models. Refer to models.
- ./seeds
- Seed files. Refer to seeds.
- ./audits
- Shared audit files. Refer to auditing.
- ./tests
- Unit test files. Refer to testing.
- ./macros
- Macro files. Refer to macros.
It will also create the files needed for this quickstart example:
- ./models
- full_model.sql
- incremental_model.sql
- seed_model.sql
- ./seeds
- seed_data.csv
- ./audits
- assert_positive_order_ids.sql
- ./tests
- test_full_model.yaml
Finally, the scaffold will include data for the example project to use.
Learn more about the project's data
The data used in this example project is contained in the seed_data.csv file in the /seeds project directory. The data reflects sales of 3 items over 7 days in January 2020.
The file contains three columns, id, item_id, and event_date, which correspond to each row's unique ID, the sold item's ID number, and the date the item was sold, respectively.
This is the complete dataset:
| id | item_id | event_date |
|---|---|---|
| 1 | 2 | 2020-01-01 |
| 2 | 1 | 2020-01-01 |
| 3 | 3 | 2020-01-03 |
| 4 | 1 | 2020-01-04 |
| 5 | 1 | 2020-01-05 |
| 6 | 1 | 2020-01-06 |
| 7 | 1 | 2020-01-07 |
2. Open the SQLMesh web UI
Open the UI by running the sqlmesh ui command from within the project directory:
After starting up, the SQLMesh web UI is served at http://127.0.0.1:8000 by default:

Navigate to the URL by clicking the link in your terminal (if supported) or copy-pasting it into your web browser:

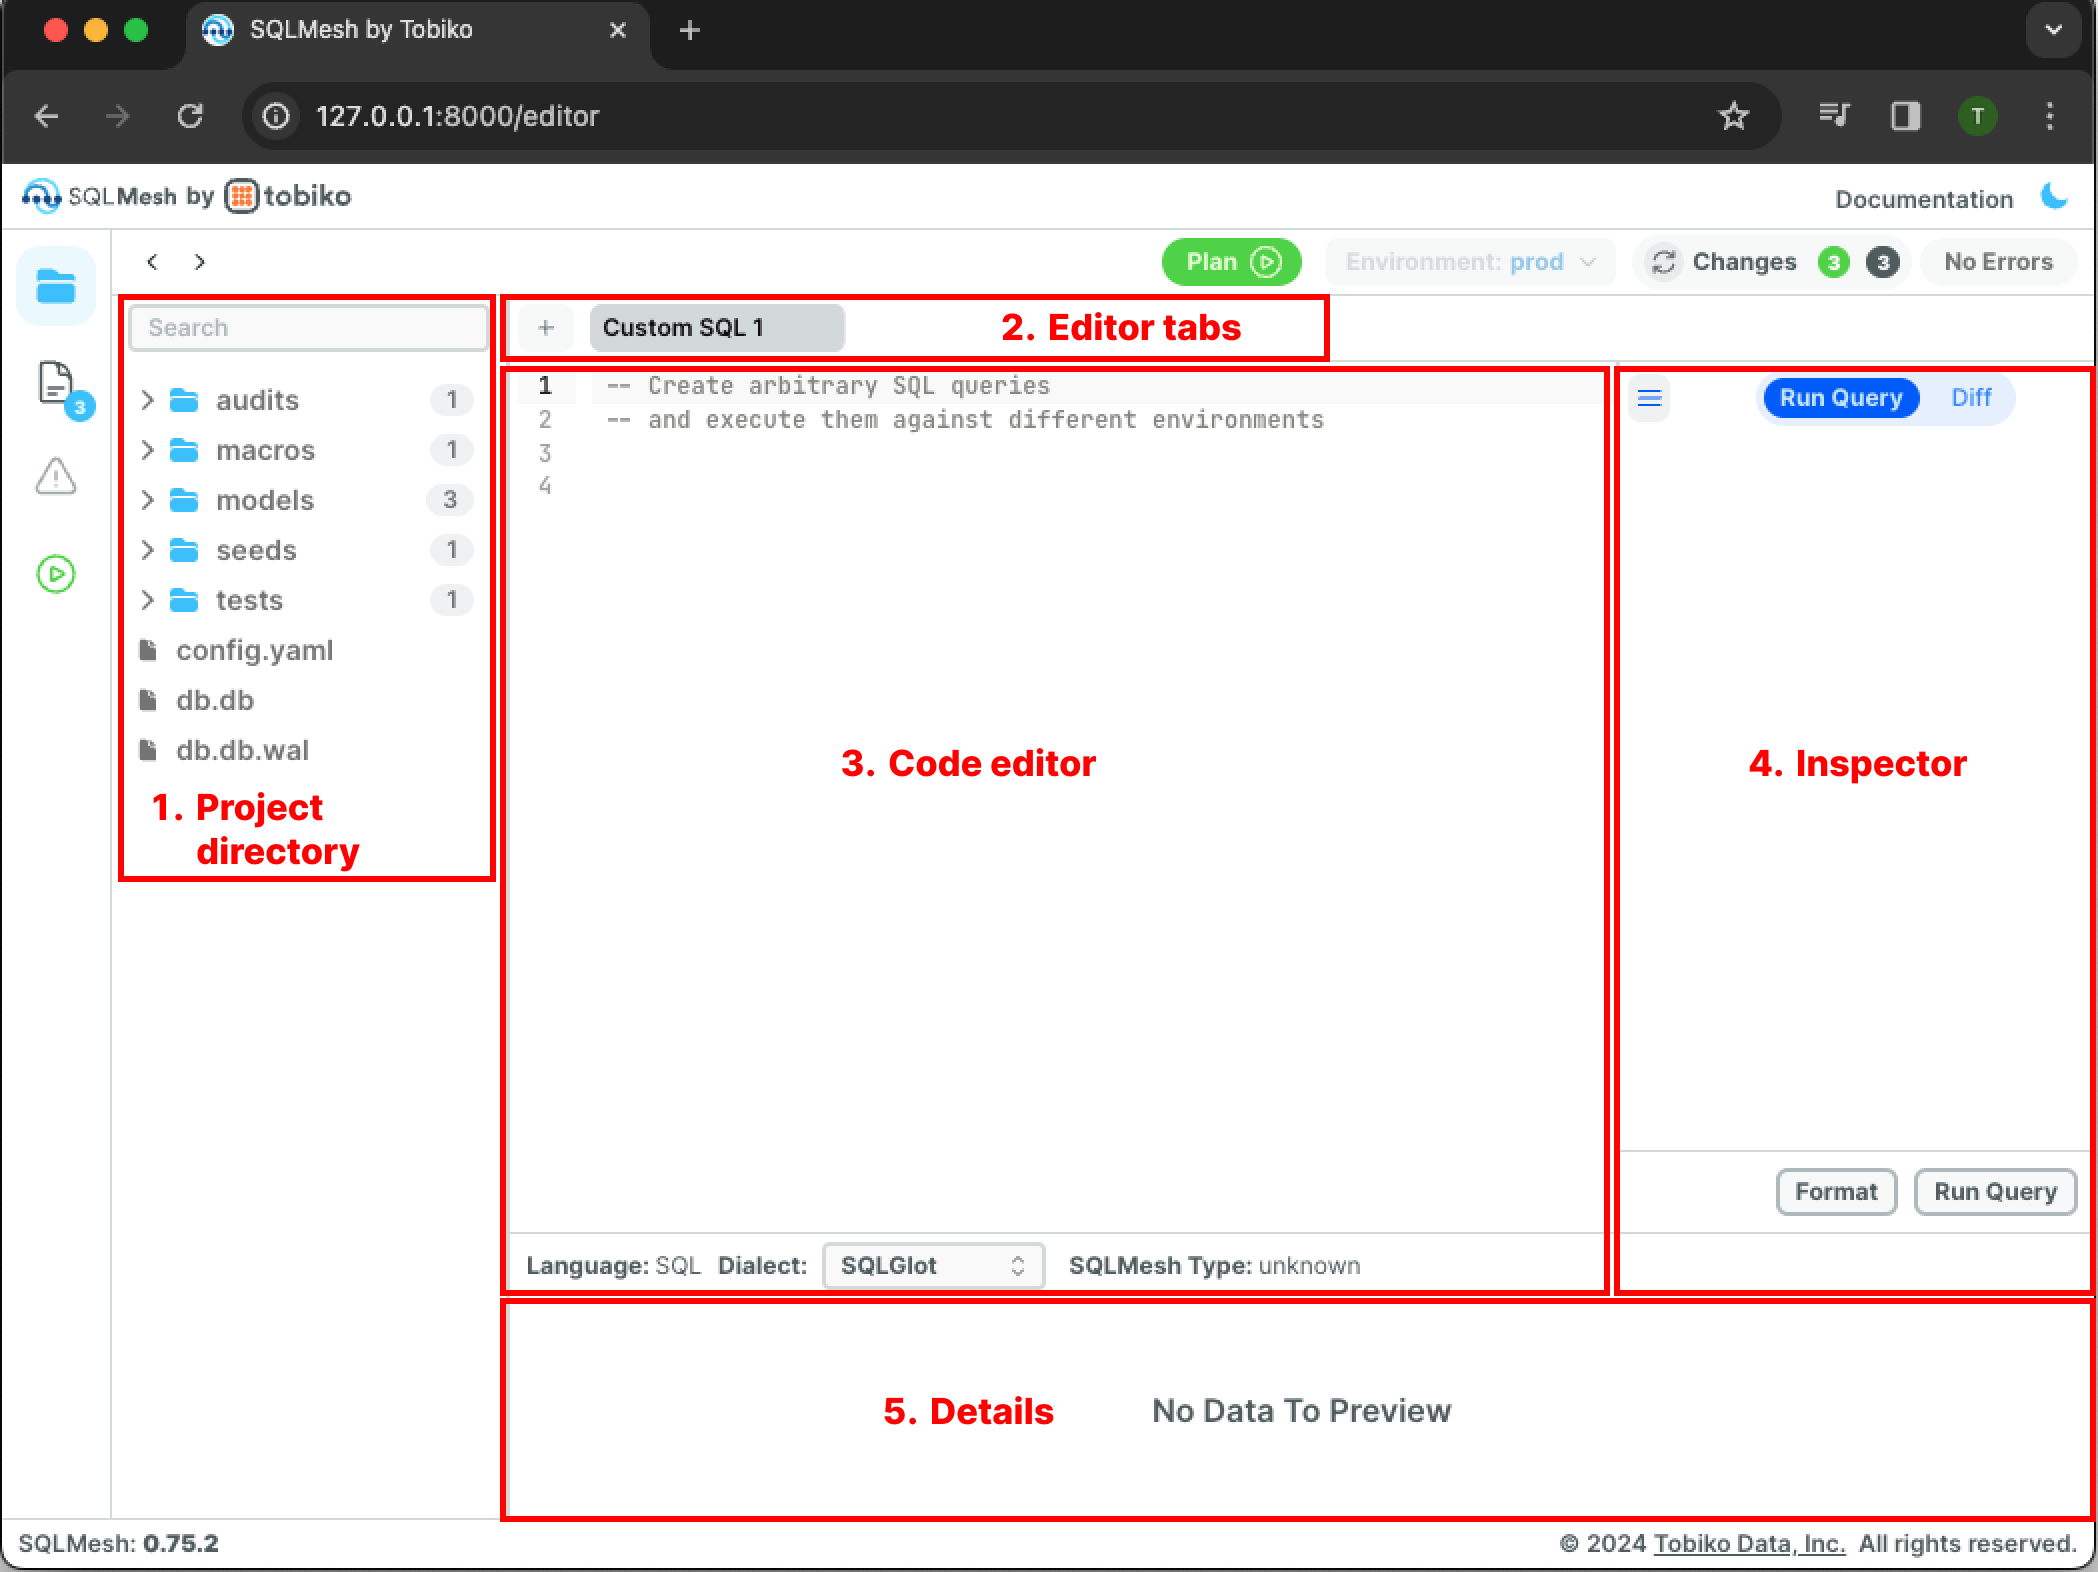
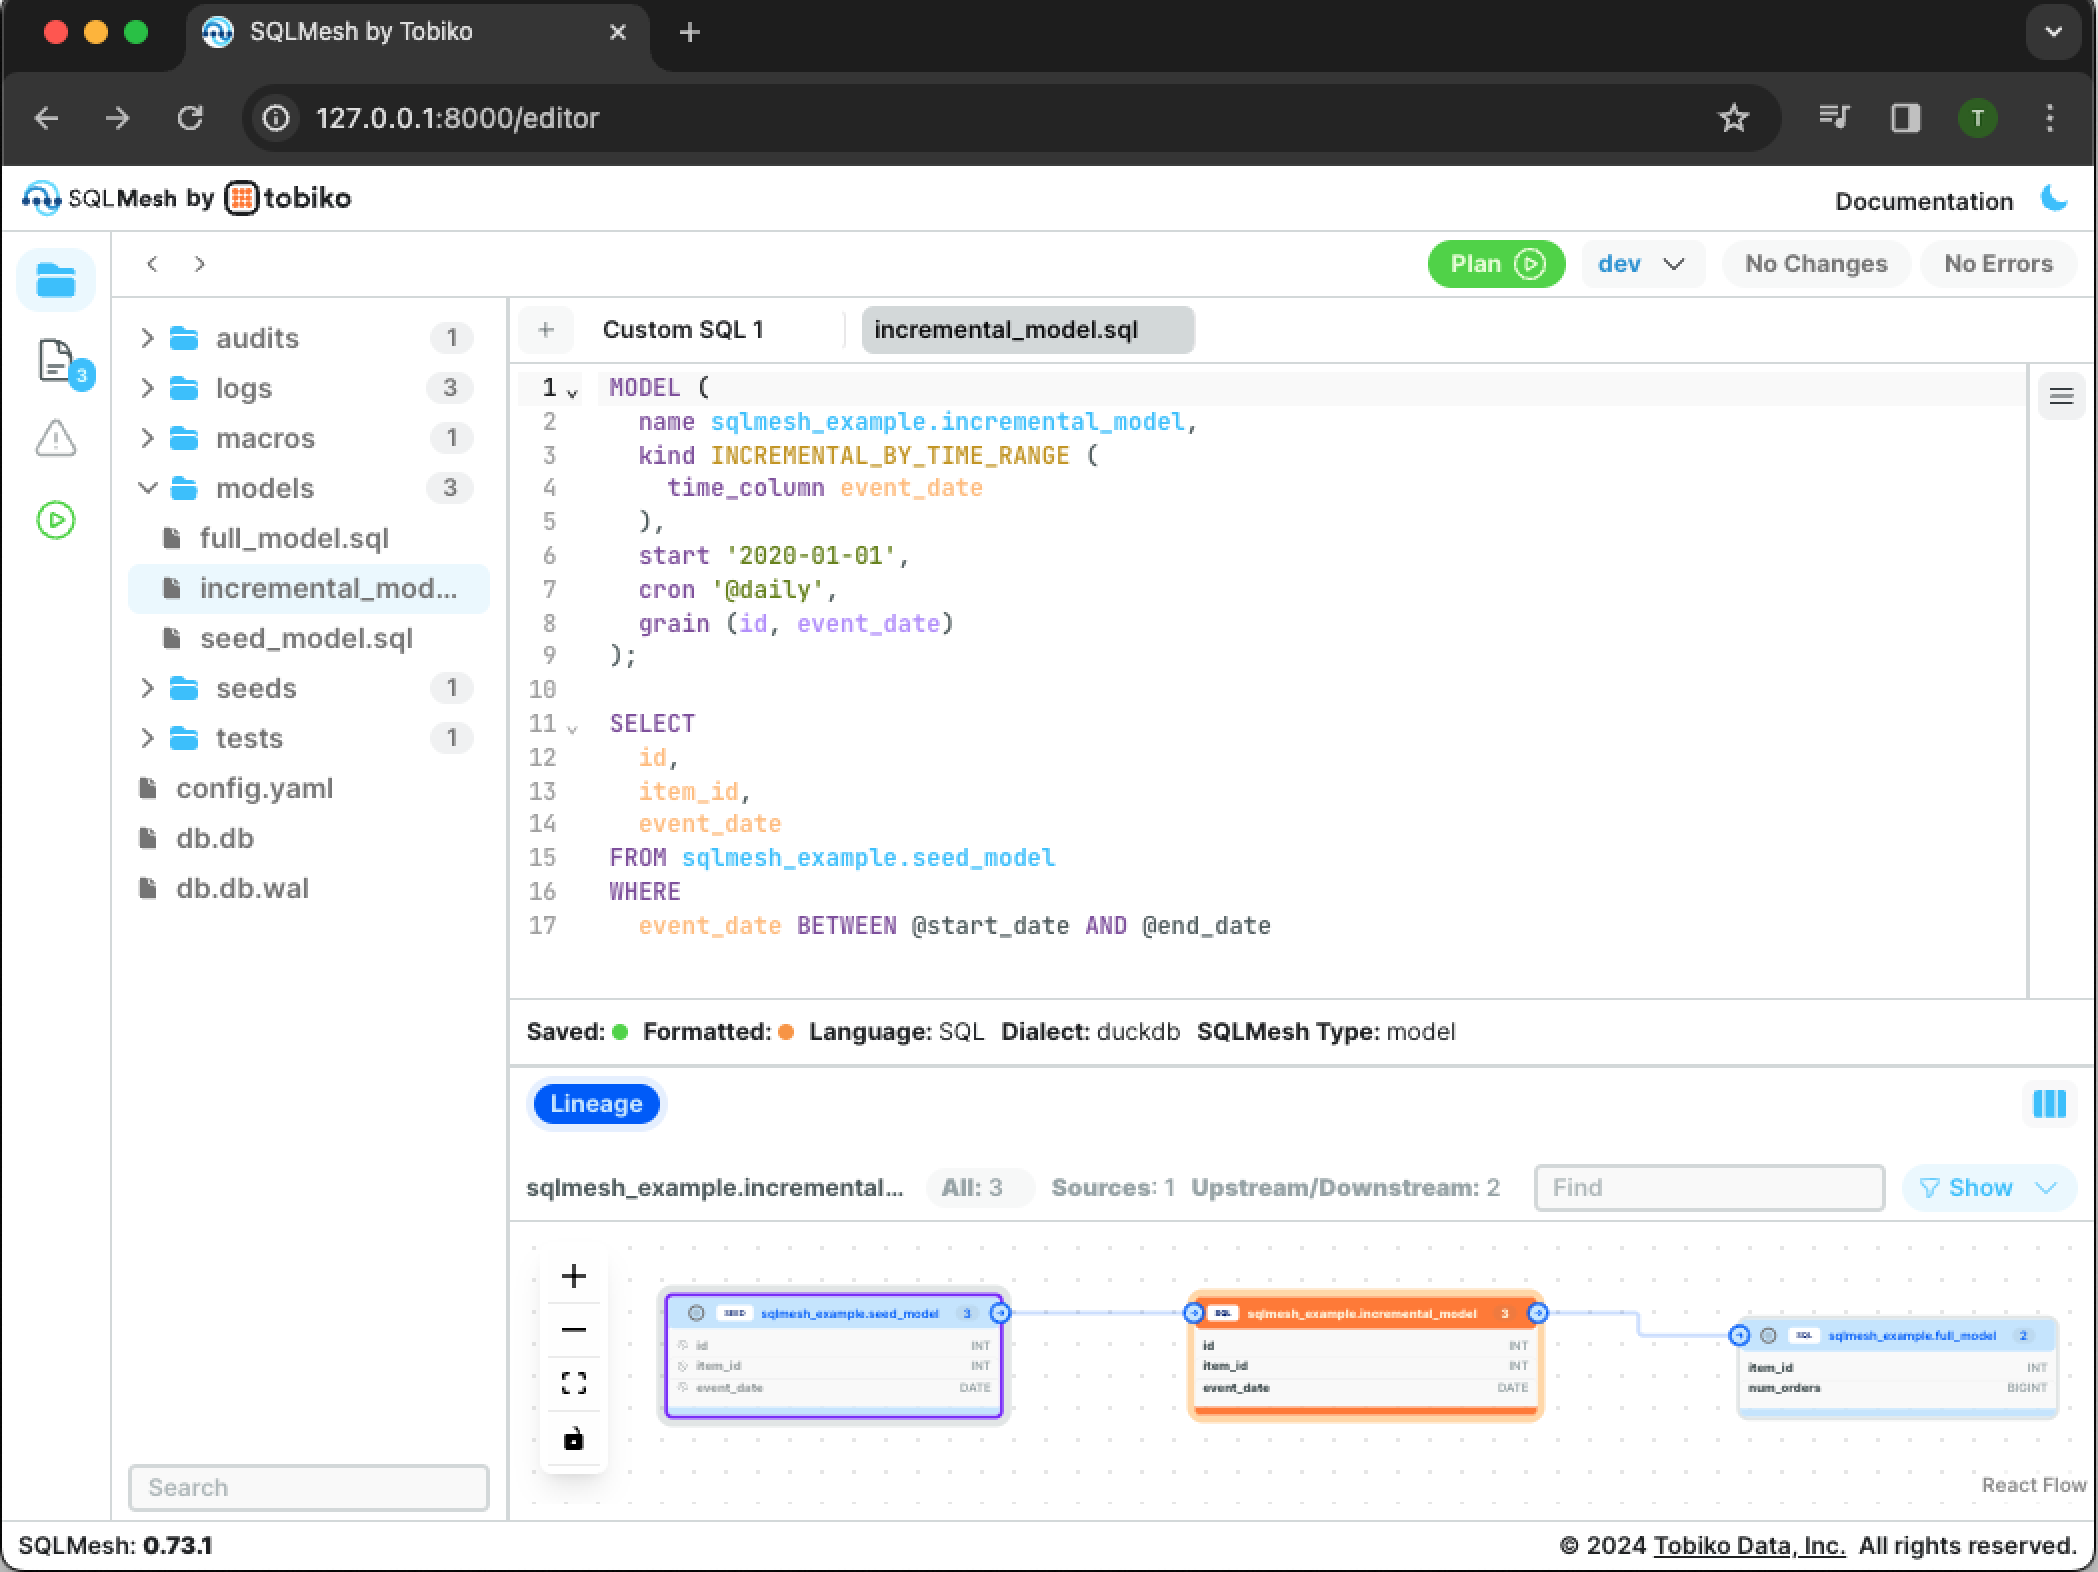
The SQLMesh UI default view contains five panes:
- Project directory allows navigation of project directories and files.
- Editor tabs displays open code editors.
- Code editor allows viewing and editing code files.
- Inspector provides settings and information based on recent actions and the currently active pane. (Note: inspector pane is collapsed by default. Expand it by clicking the hamburger button at the top of the collapsed pane - see previous image.)
- Details displays column-level lineage for models open in the editor and results of queries. (Note: details pane is collapsed by default. It will automatically expand upon opening a model in the editor or running a query.)
It also contains nine buttons:
- Toggle Editor/Data Catalog/Errors toggles among the Code Editor (default), Data Catalog, and Errors views. Errors view is only available if an error has occurred.
- History navigation returns to previous views, similar to the back button in a web browser.
- Add new tab opens a new code editor window.
- Run plan command executes the
sqlmesh plancommand. - Documentation links to the SQLMesh documentation website.
- The crescent moon toggles between page light and dark modes.
- Run SQL query executes the
sqlmesh fetchdfcommand. - Format SQL query reformats a SQL query using SQLGlot's pretty layout.
- Change SQL dialect specifies the SQL dialect of the current tab for custom SQL queries. It does not affect the SQL dialect for the project.

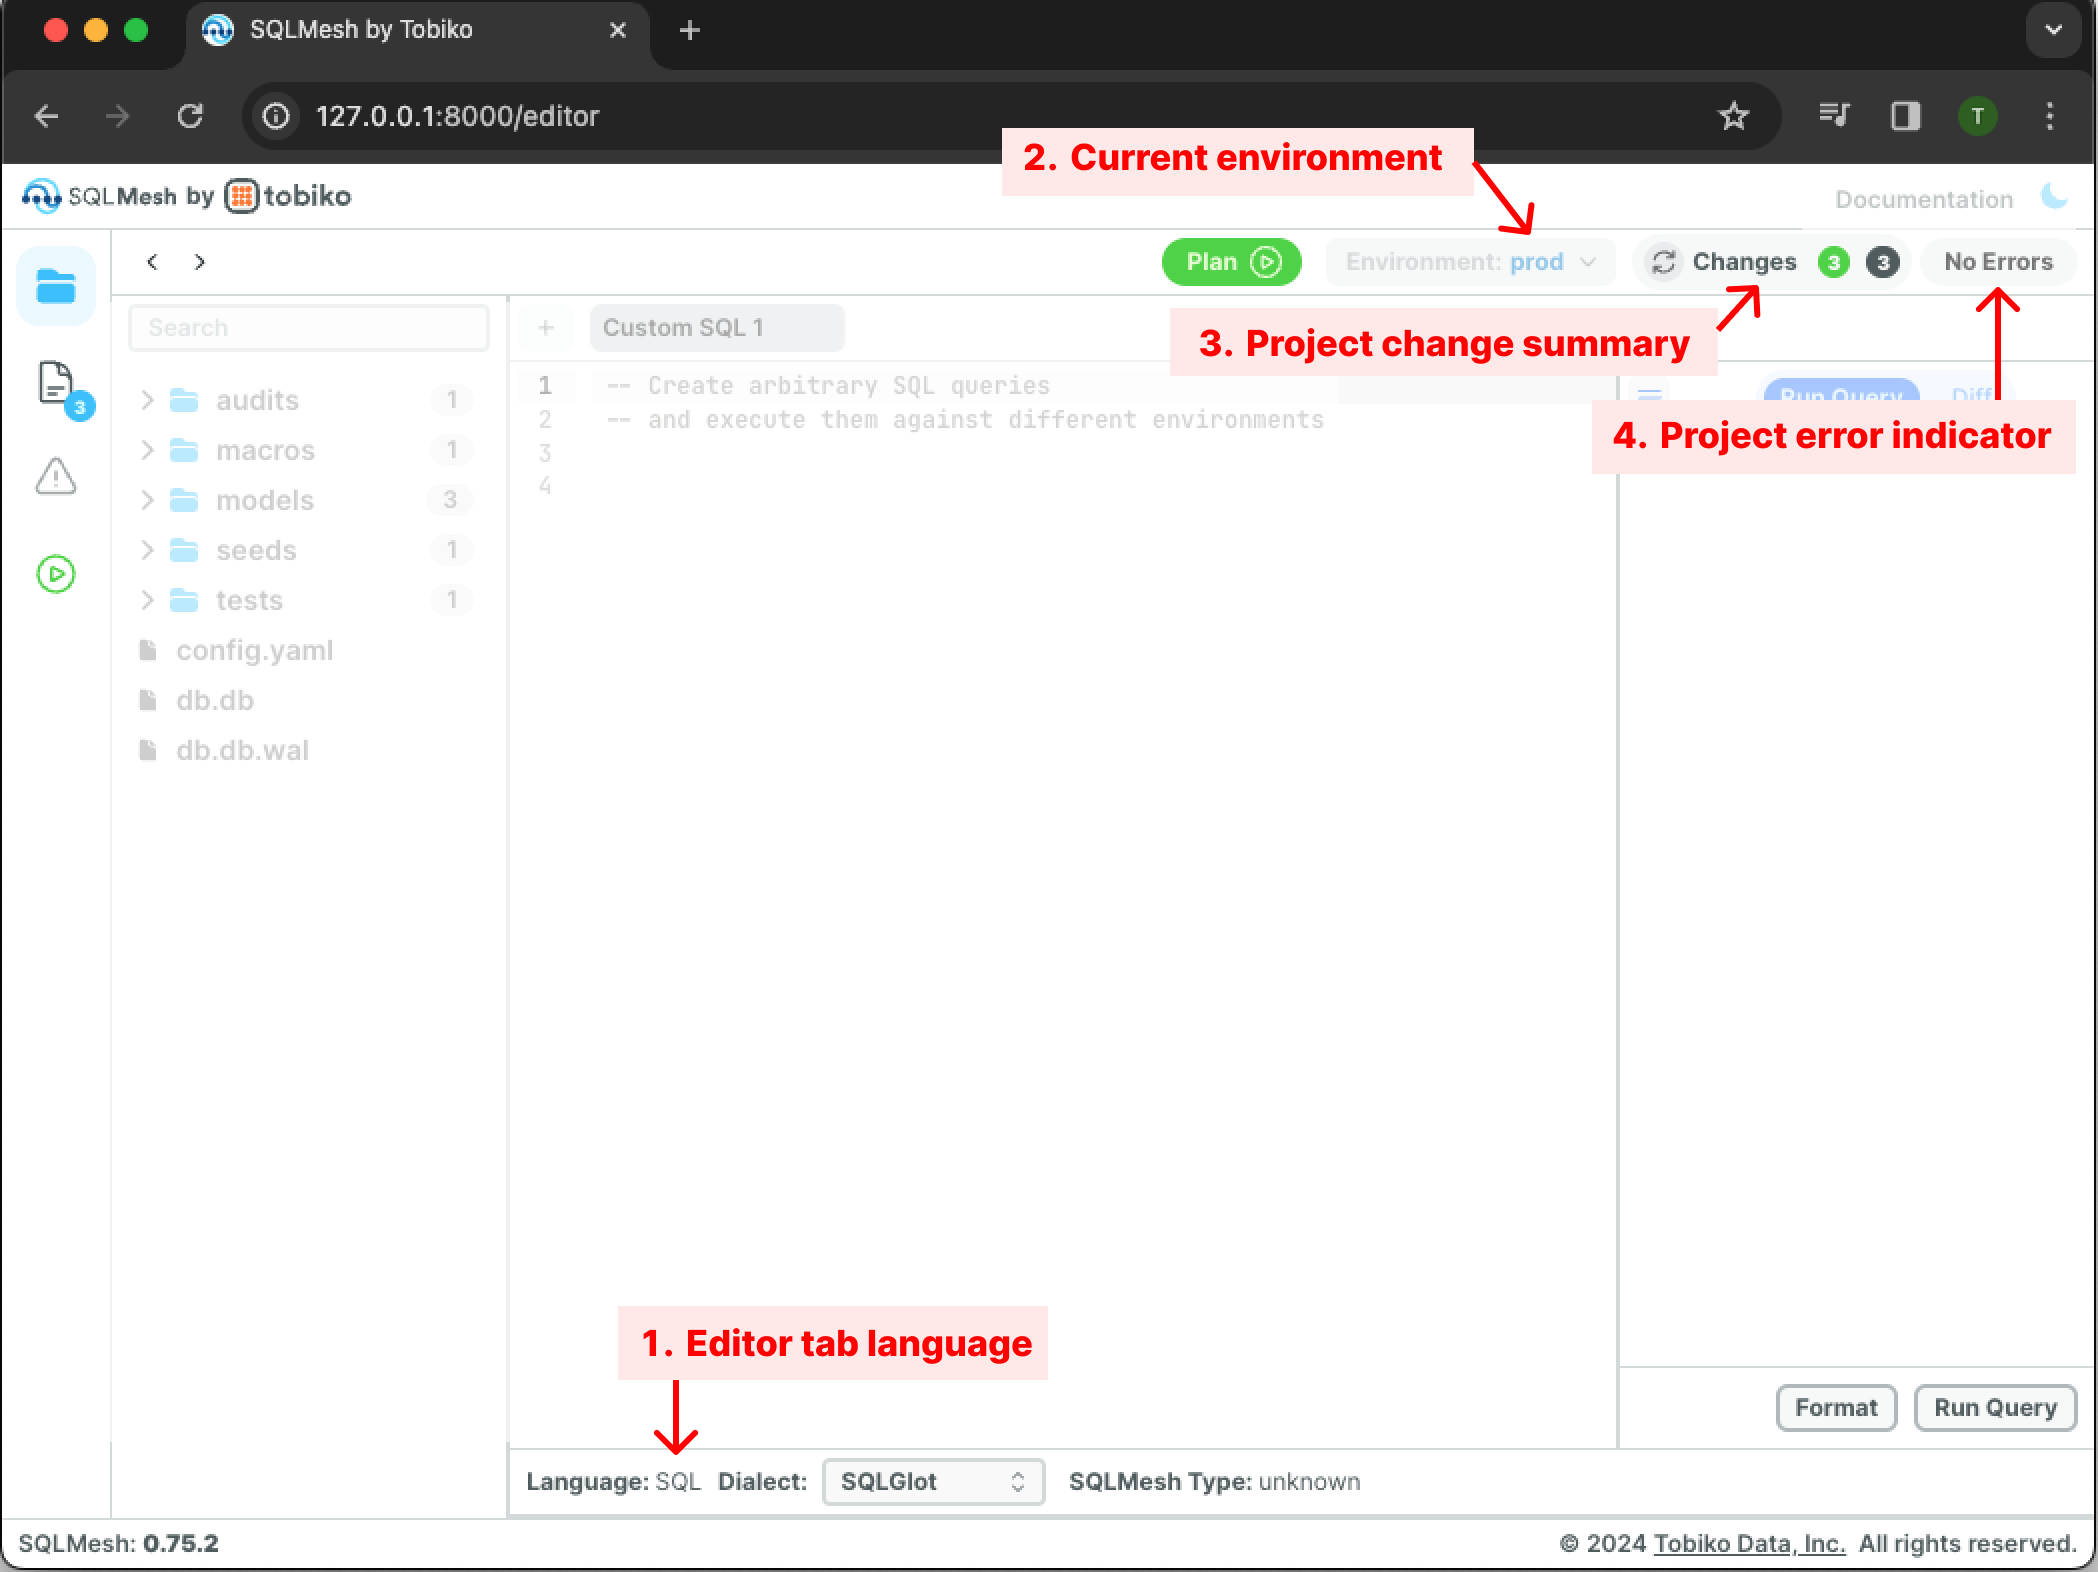
The default view contains four status indicators:
- Editor tab language displays the programming language of the current code editor tab (SQL or Python).
- Current environment displays the currently selected environment
- Change indicator displays a summary of the changes in the project files relative to the most recently run SQLMesh plan in the selected environment.
- Error indicator displays the count of errors in the project.
3. Plan and apply environments
3.1 Create a prod environment
SQLMesh's key actions are creating and applying plans to environments. At this point, the only environment is the empty prod environment.
Learn more about SQLMesh plans and environments
SQLMesh's key actions are creating and applying plans to environments.
A SQLMesh environment is an isolated namespace containing models and the data they generated. The most important environment is prod ("production"), which consists of the databases behind the applications your business uses to operate each day. Environments other than prod provide a place where you can test and preview changes to model code before they go live and affect business operations.
A SQLMesh plan contains a comparison of one environment to another and the set of changes needed to bring them into alignment. For example, if a new SQL model was added, tested, and run in the dev environment, it would need to be added and run in the prod environment to bring them into alignment. SQLMesh identifies all such changes and classifies them as either breaking or non-breaking.
Breaking changes are those that invalidate data already existing in an environment. For example, if a WHERE clause was added to a model in the dev environment, existing data created by that model in the prod environment are now invalid because they may contain rows that would be filtered out by the new WHERE clause. Other changes, like adding a new column to a model in dev, are non-breaking because all the existing data in prod are still valid to use - only new data must be added to align the environments.
After SQLMesh creates a plan, it summarizes the breaking and non-breaking changes so you can understand what will happen if you apply the plan. It will prompt you to "backfill" data to apply the plan - in this context, backfill is a generic term for updating or adding to a table's data (including an initial load or full refresh).
The first SQLMesh plan must execute every model to populate the production environment. Click the green Plan button in the top right, and a new pane will open.
The pane contains multiple pieces of information about the plan:
- The
Initializing Prod Environmentsection shows that the plan is initializing theprodenvironment. - The Start and End date sections are grayed out because they are not allowed when running a plan in the
prodenvironment. - The
Changessection shows that SQLMesh detected three models added relative to the current empty environment. - The
Backfillssection shows that backfills will occur for all three of the added models.
Learn more about the project's models
A plan's actions are determined by the kinds of models the project uses. This example project uses three model kinds:
SEEDmodels read data from CSV files stored in the SQLMesh project directory.FULLmodels fully refresh (rewrite) the data associated with the model every time the model is run.INCREMENTAL_BY_TIME_RANGEmodels use a date/time data column to track which time intervals are affected by a plan and process only the affected intervals when a model is run.
We now briefly review each model in the project.
The first model is a SEED model that imports seed_data.csv. This model consists of only a MODEL statement because SEED models do not query a database.
In addition to specifying the model name and CSV path relative to the model file, it includes the column names and data types of the columns in the CSV. It also sets the grain of the model to the columns that collectively form the model's unique identifier, id and ds.
The second model is an INCREMENTAL_BY_TIME_RANGE model that includes both a MODEL statement and a SQL query selecting from the first seed model.
The MODEL statement's kind property includes the required specification of the data column containing each record's timestamp. It also includes the optional start property specifying the earliest date/time for which the model should process data and the cron property specifying that the model should run daily. It sets the model's grain to columns id and event_date.
The SQL query includes a WHERE clause that SQLMesh uses to filter the data to a specific date/time interval when loading data incrementally:
The final model in the project is a FULL model. In addition to properties used in the other models, its MODEL statement includes the audits property. The project includes a custom assert_positive_order_ids audit in the project audits directory; it verifies that all item_id values are positive numbers. It will be run every time the model is executed.
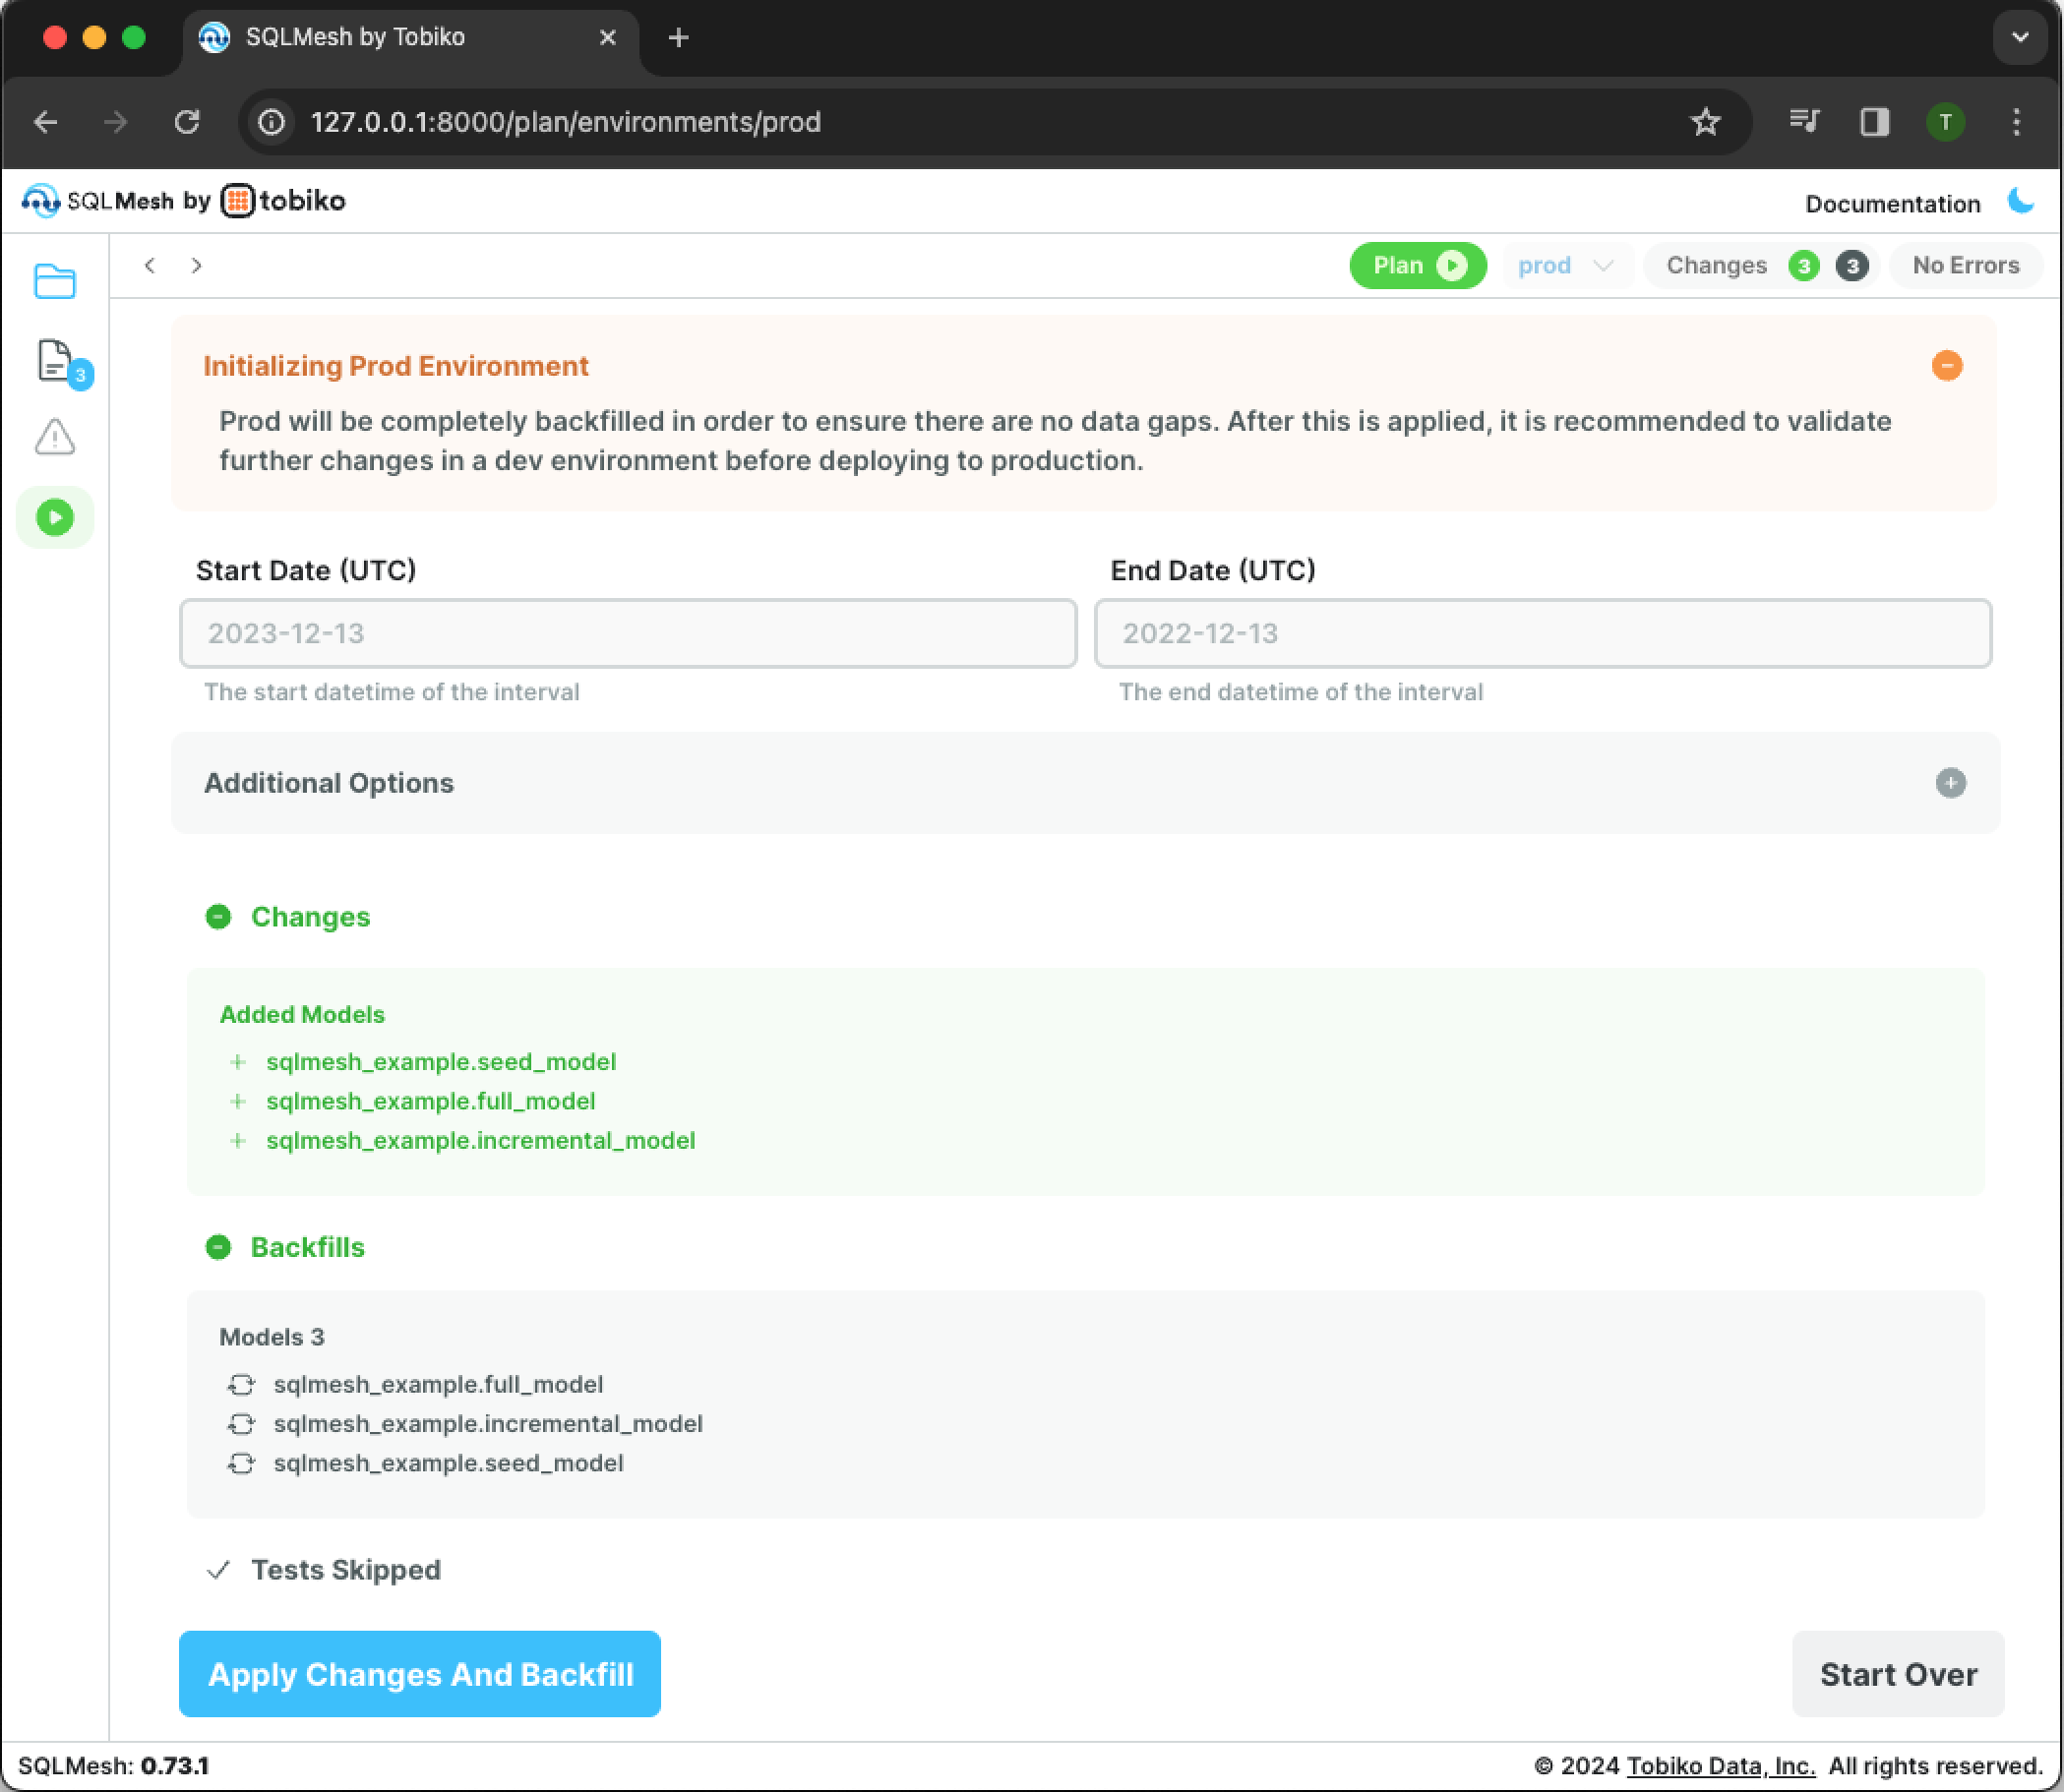
Click the blue button labeled Apply Changes And Backfill to apply the plan and initiate backfill.
The page will update and new output sections will appear. Each section reflects a stage in the plan application and will be green if the step succeeded.
The Tests Completed section indicates that the project's unit tests ran successfully.
The Snapshot Tables Created indicates that snapshots of the added and modified models were created successfully.
The Backfilled section shows progress indicators for the backfill operations. The first progress indicator shows the total number of tasks and completion percentage for the entire backfill operation. The remaining progress bars show completion percentage and run time for each model (very fast in this simple example).
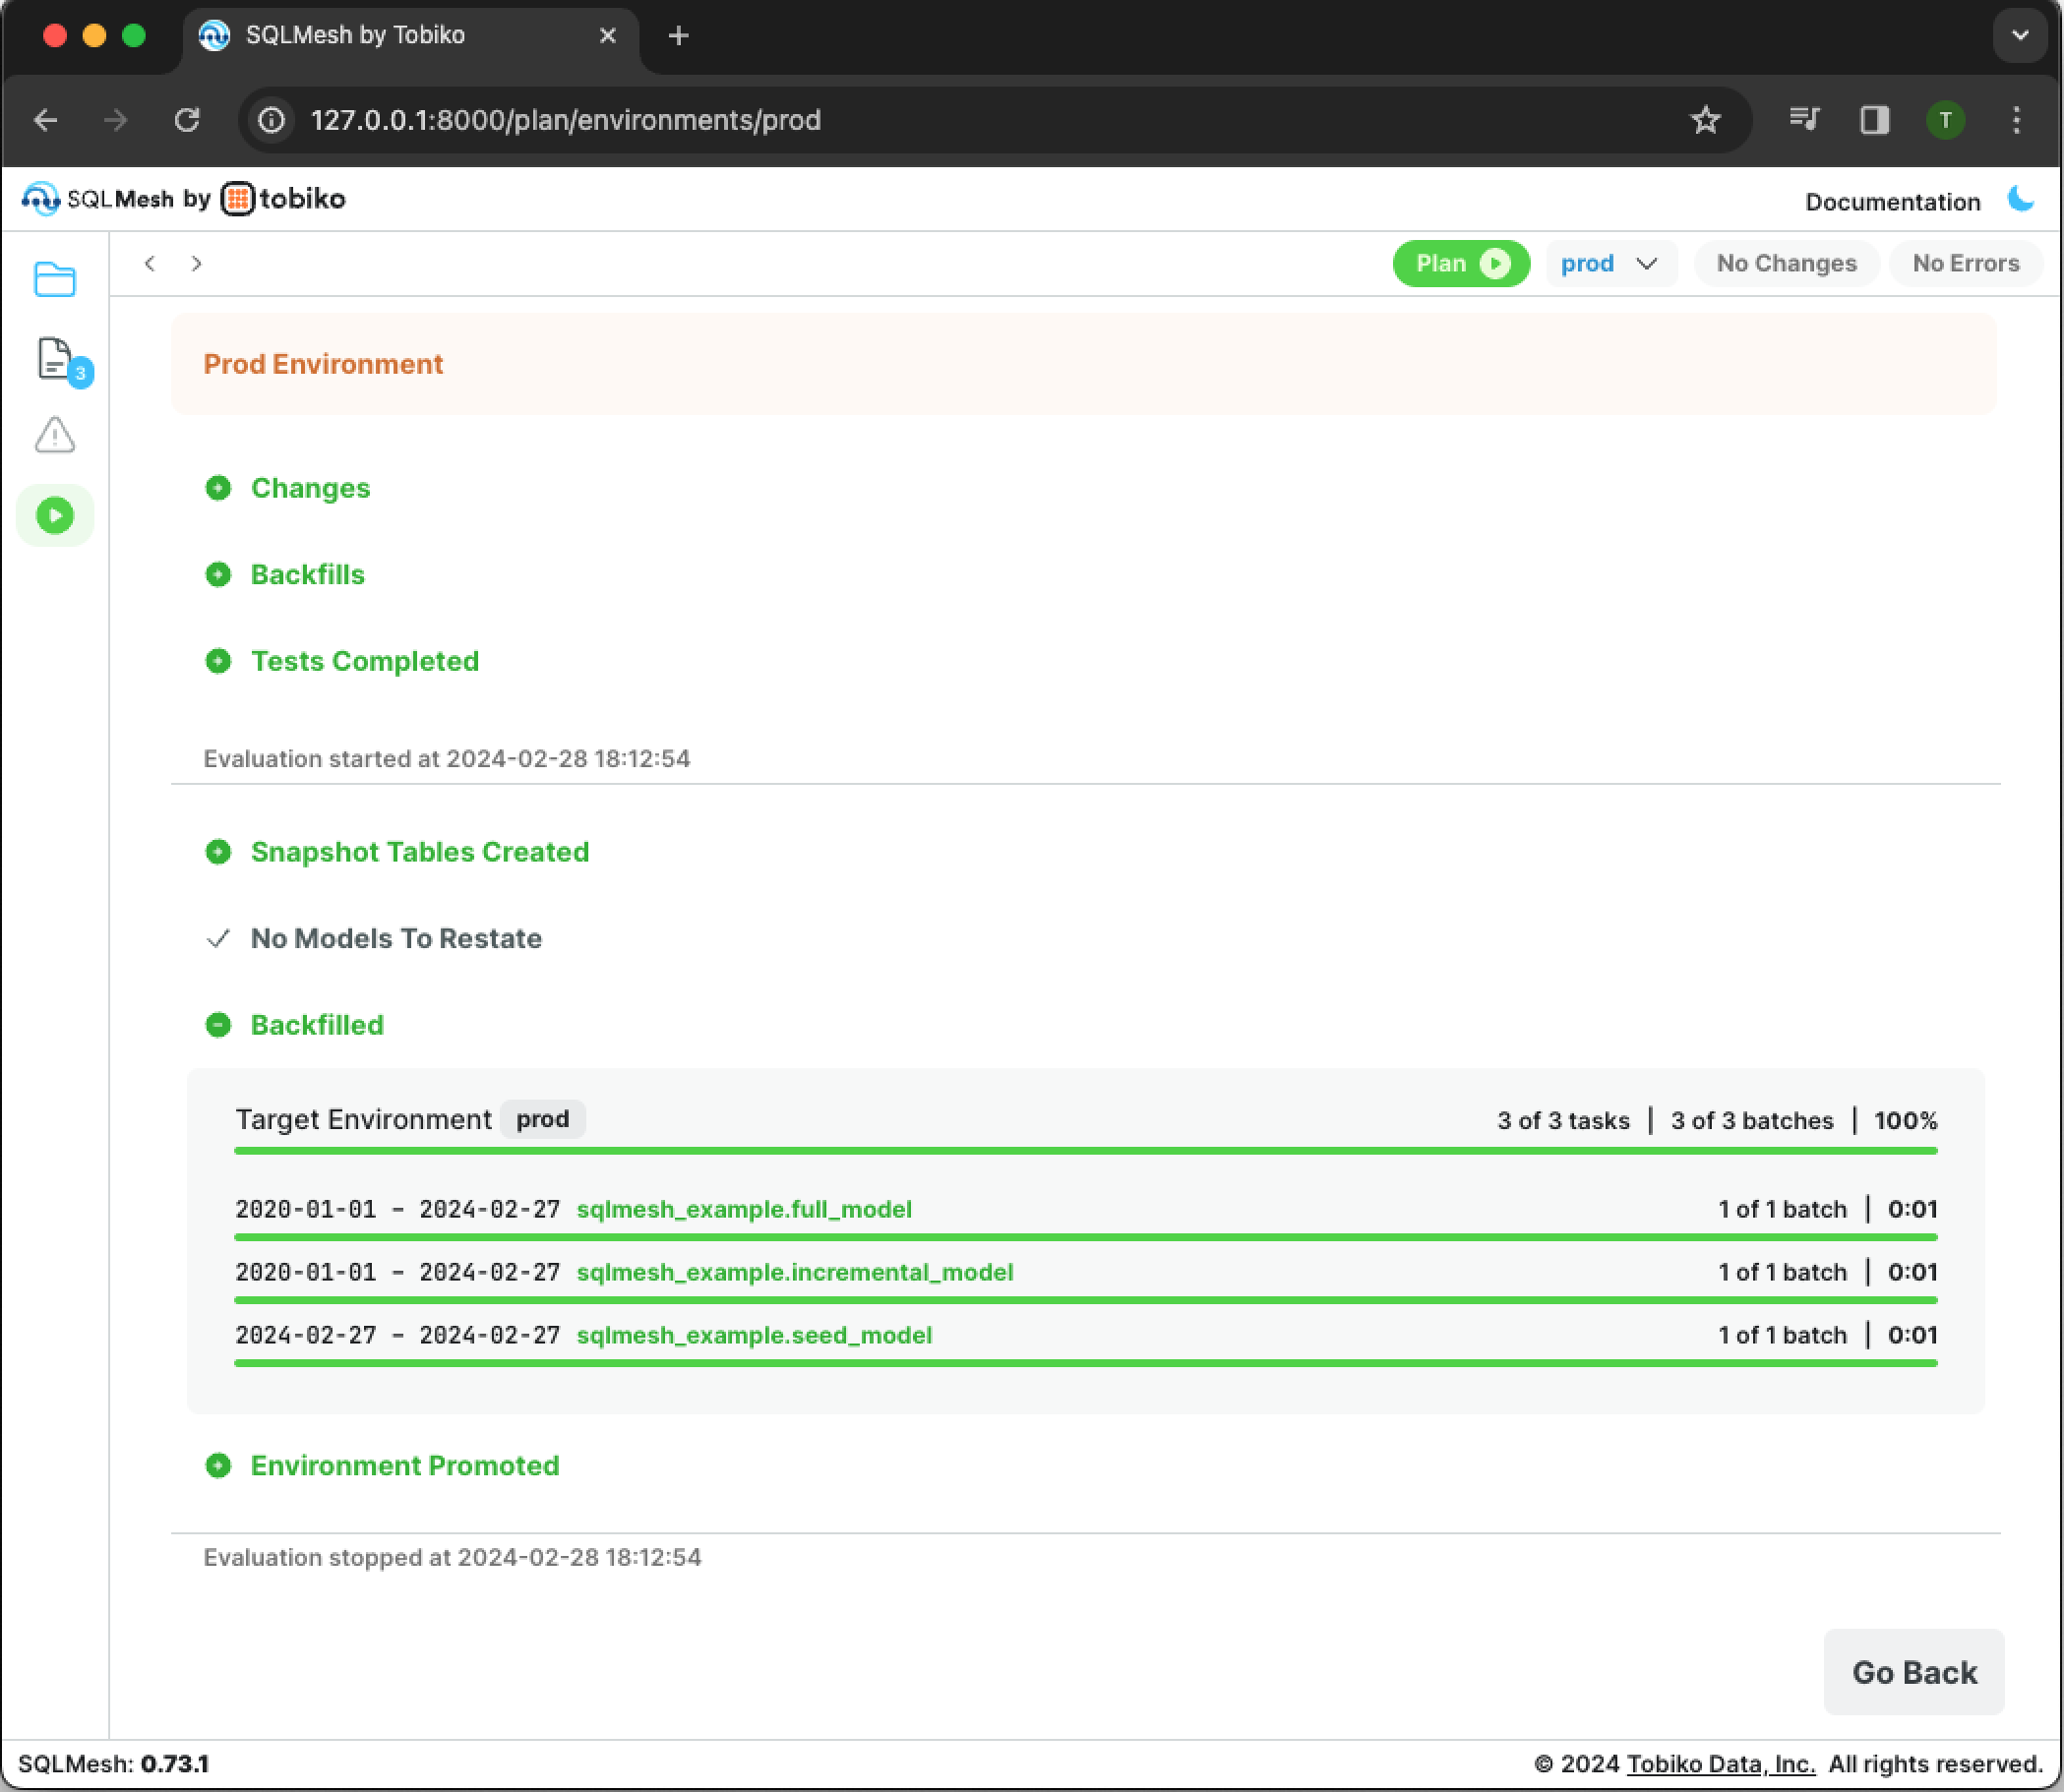
Click the Go Back button to close the pane.
You've now created a new production environment with all of history backfilled.
2.2 Create a dev environment
Now that you've created the production environment, it's time to create a development environment so you can modify models without affecting production.
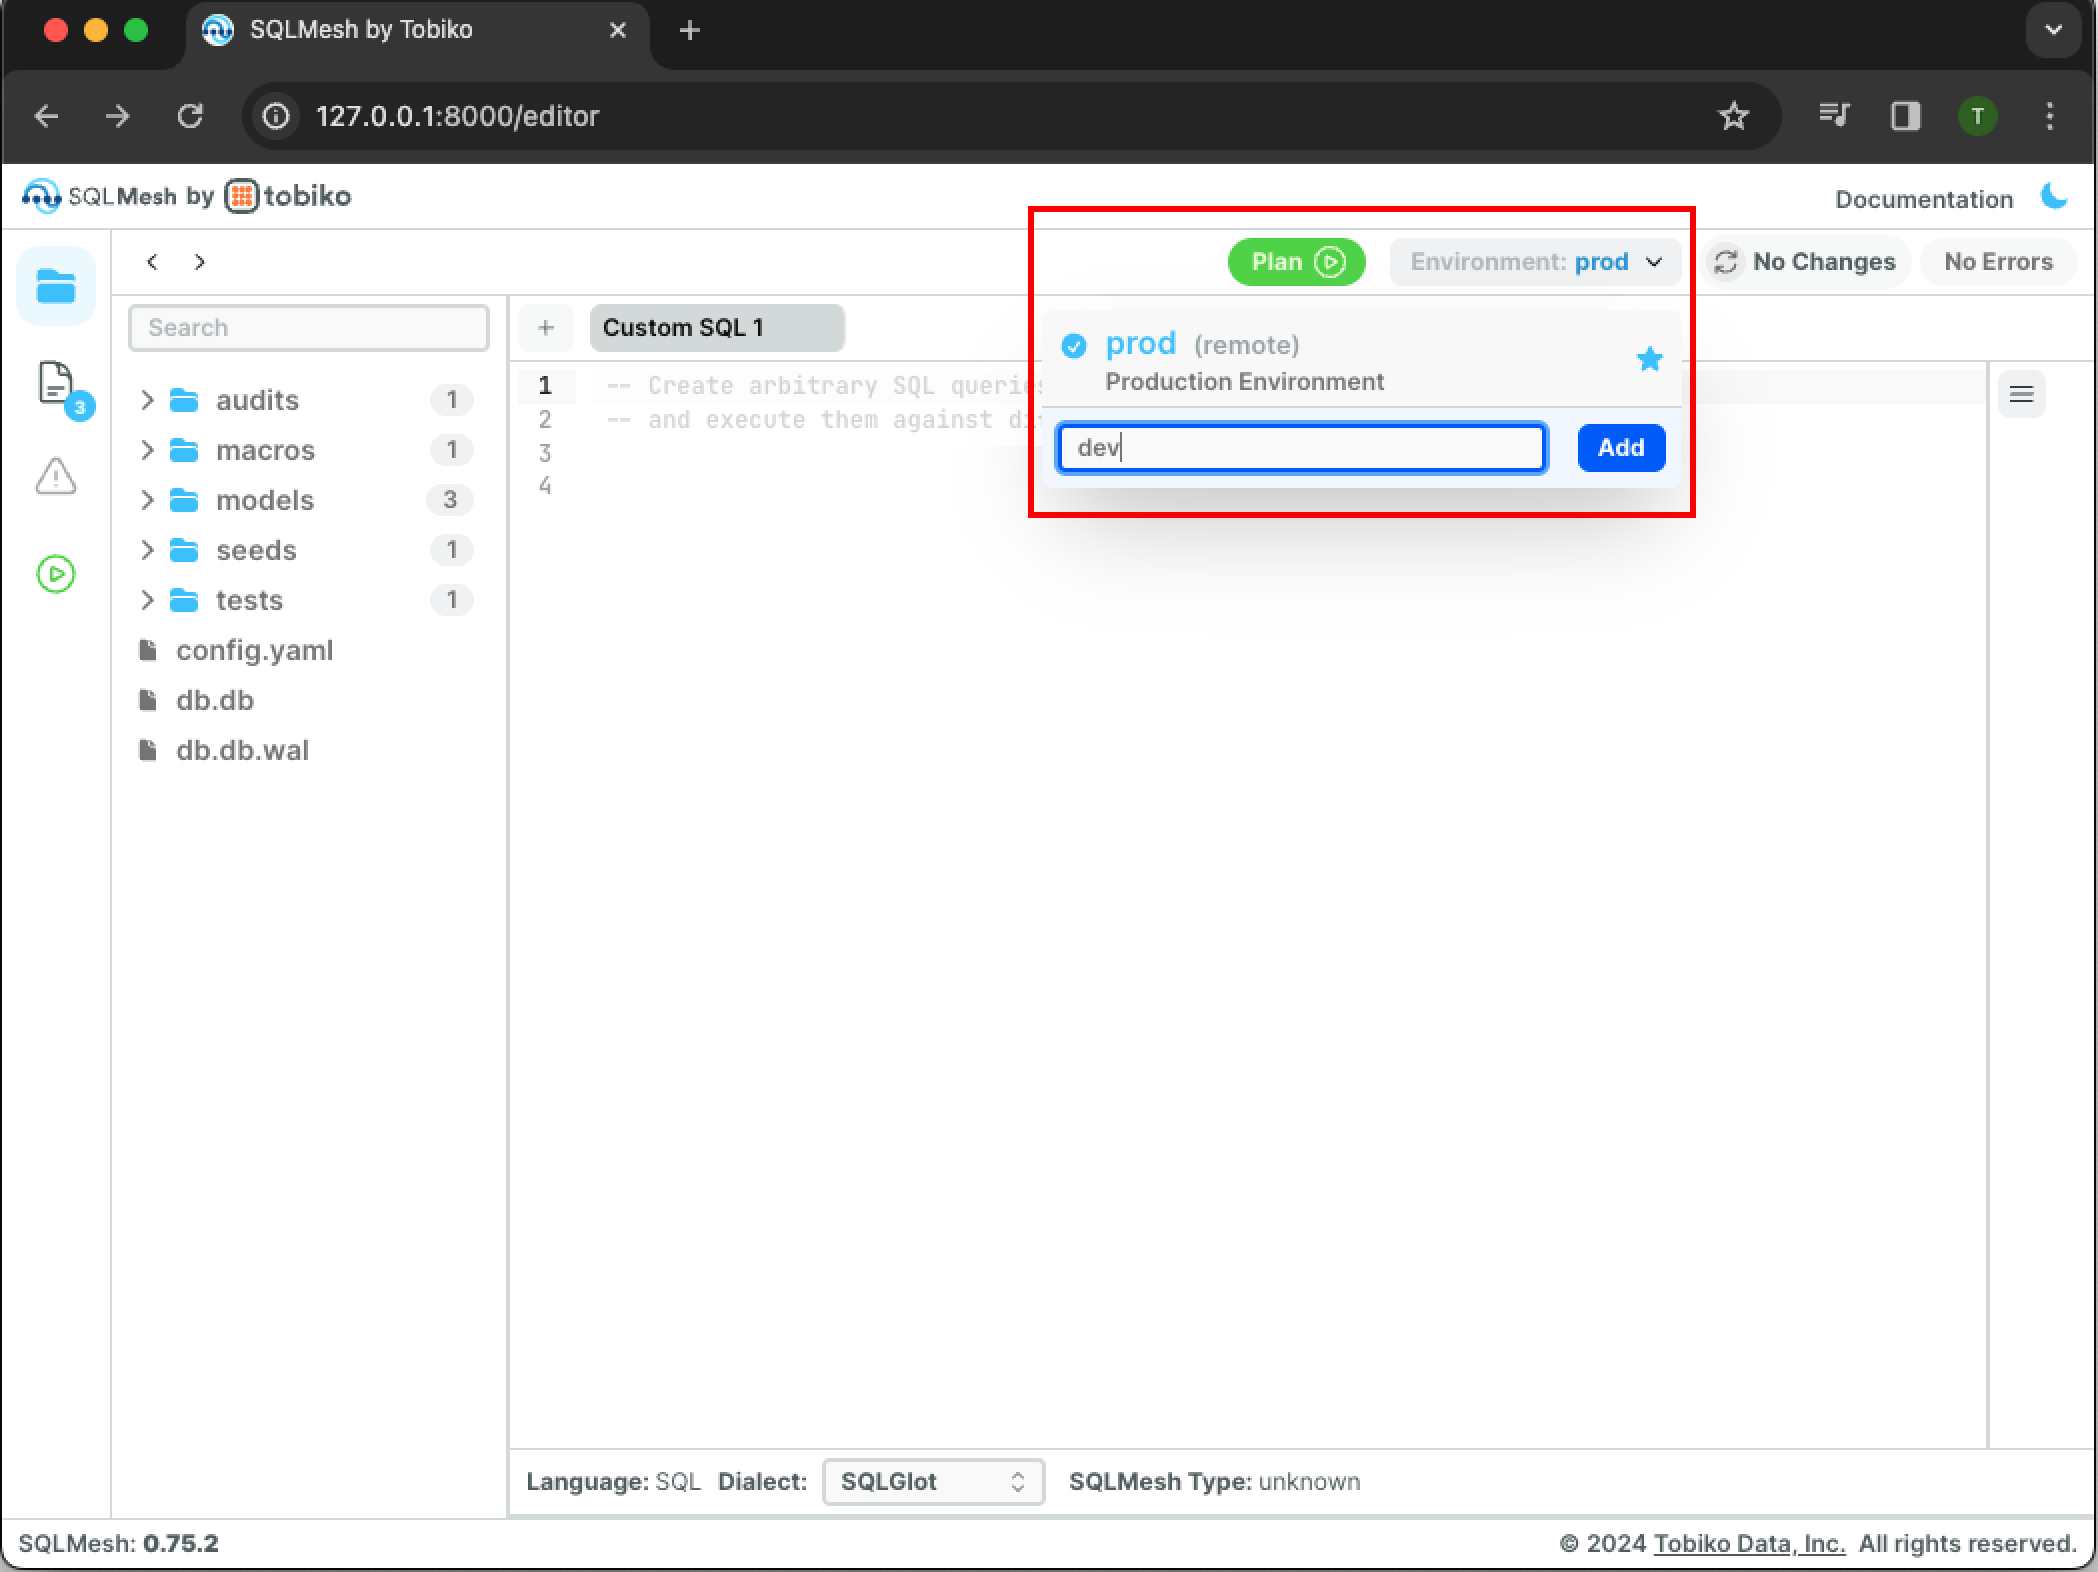
Open the environment menu by clicking the button labeled prod \/ next to the green Plan button on the top right. Type dev into the Environment field and click the blue Add button.
The button now shows that the SQLMesh UI is working in the dev environment:
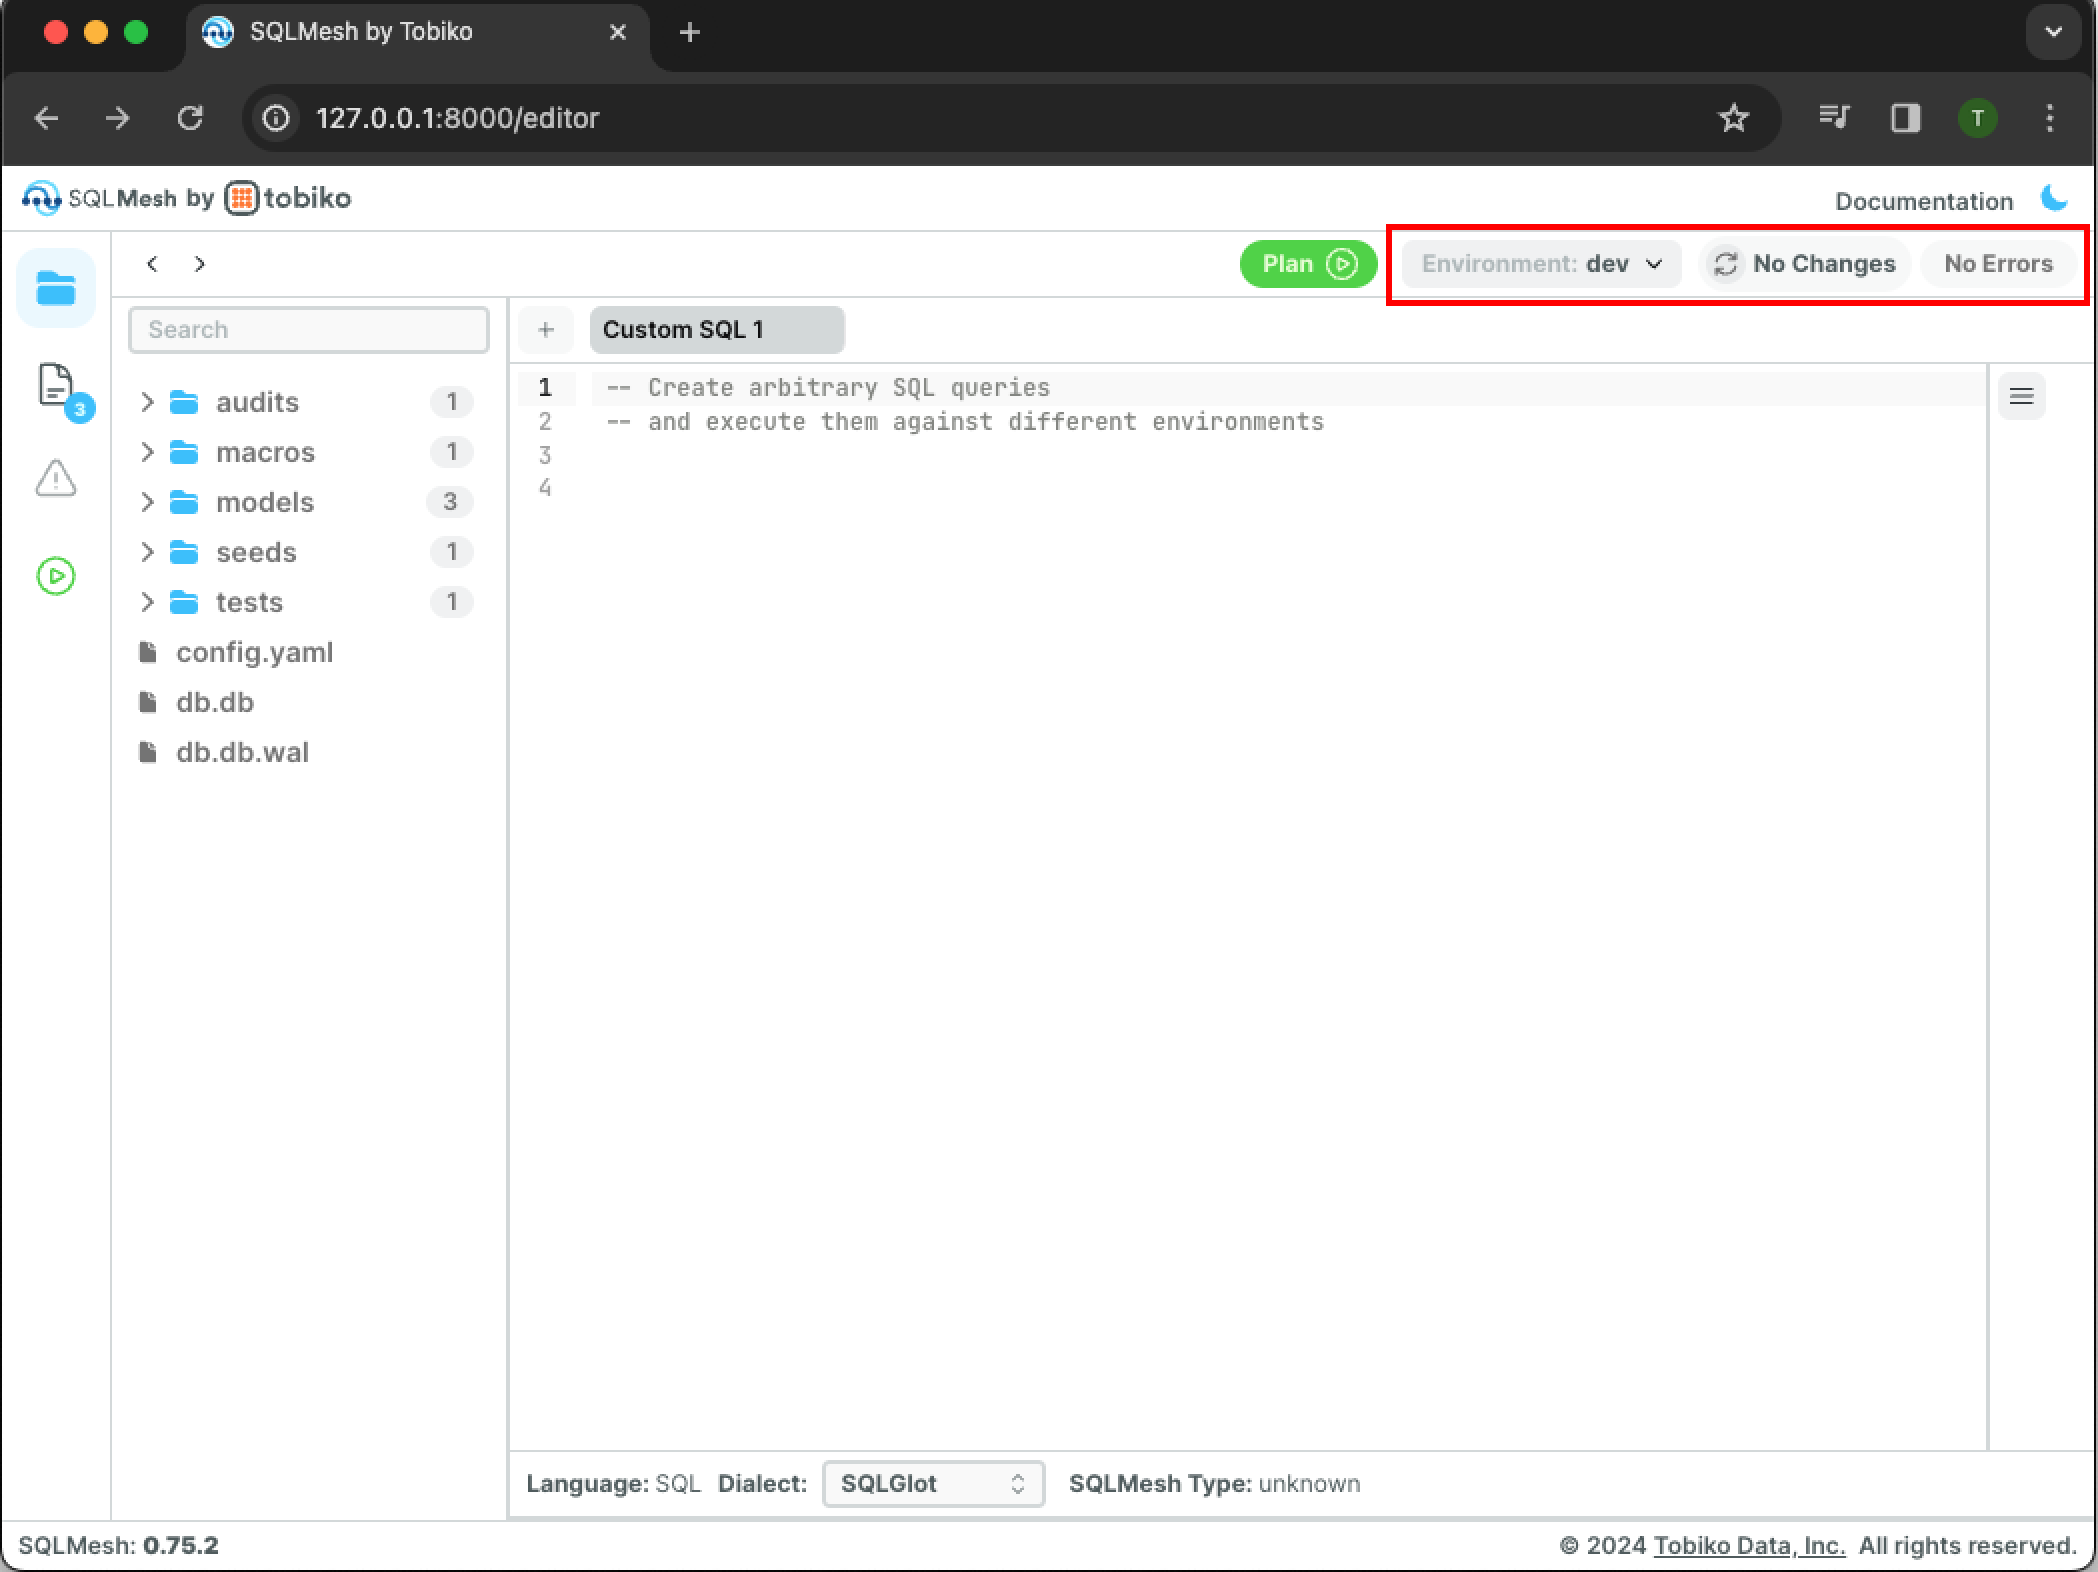
Click the green Plan button, and a new pane will open:
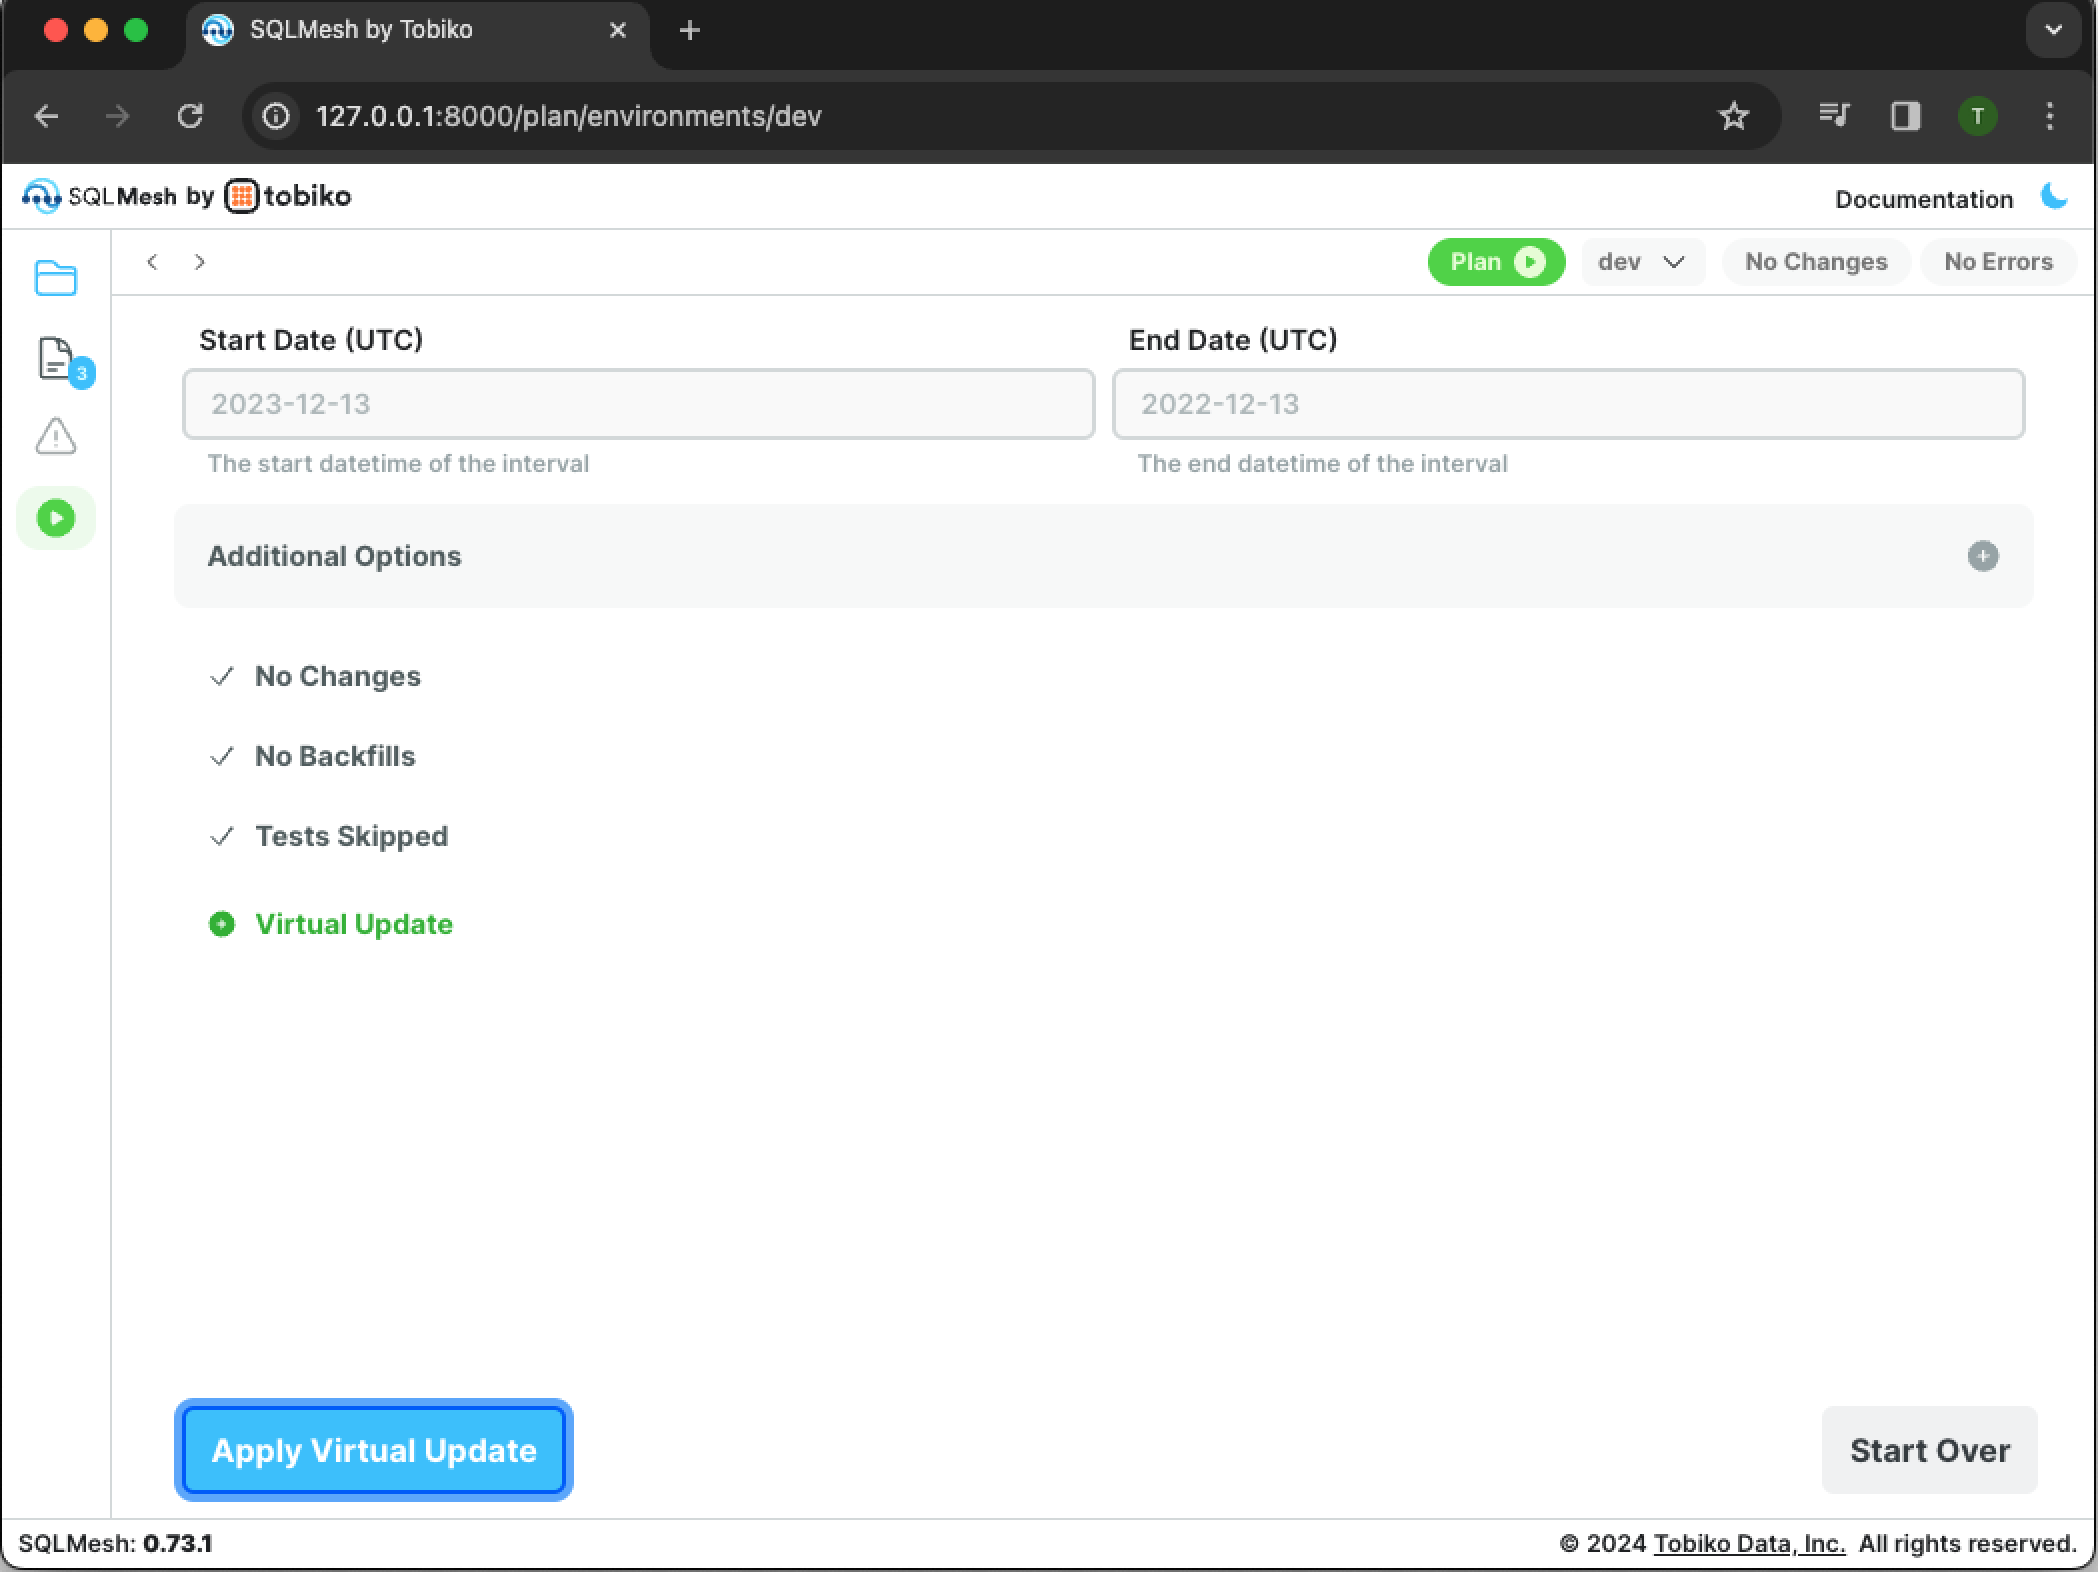
The output section does not list any added/modified models or backfills because dev is being created from the existing prod environment without modification. Because the project has not been modified, no new computations need to run and a virtual update occurs.
Click the blue Apply Virtual Update button to apply the new plan:
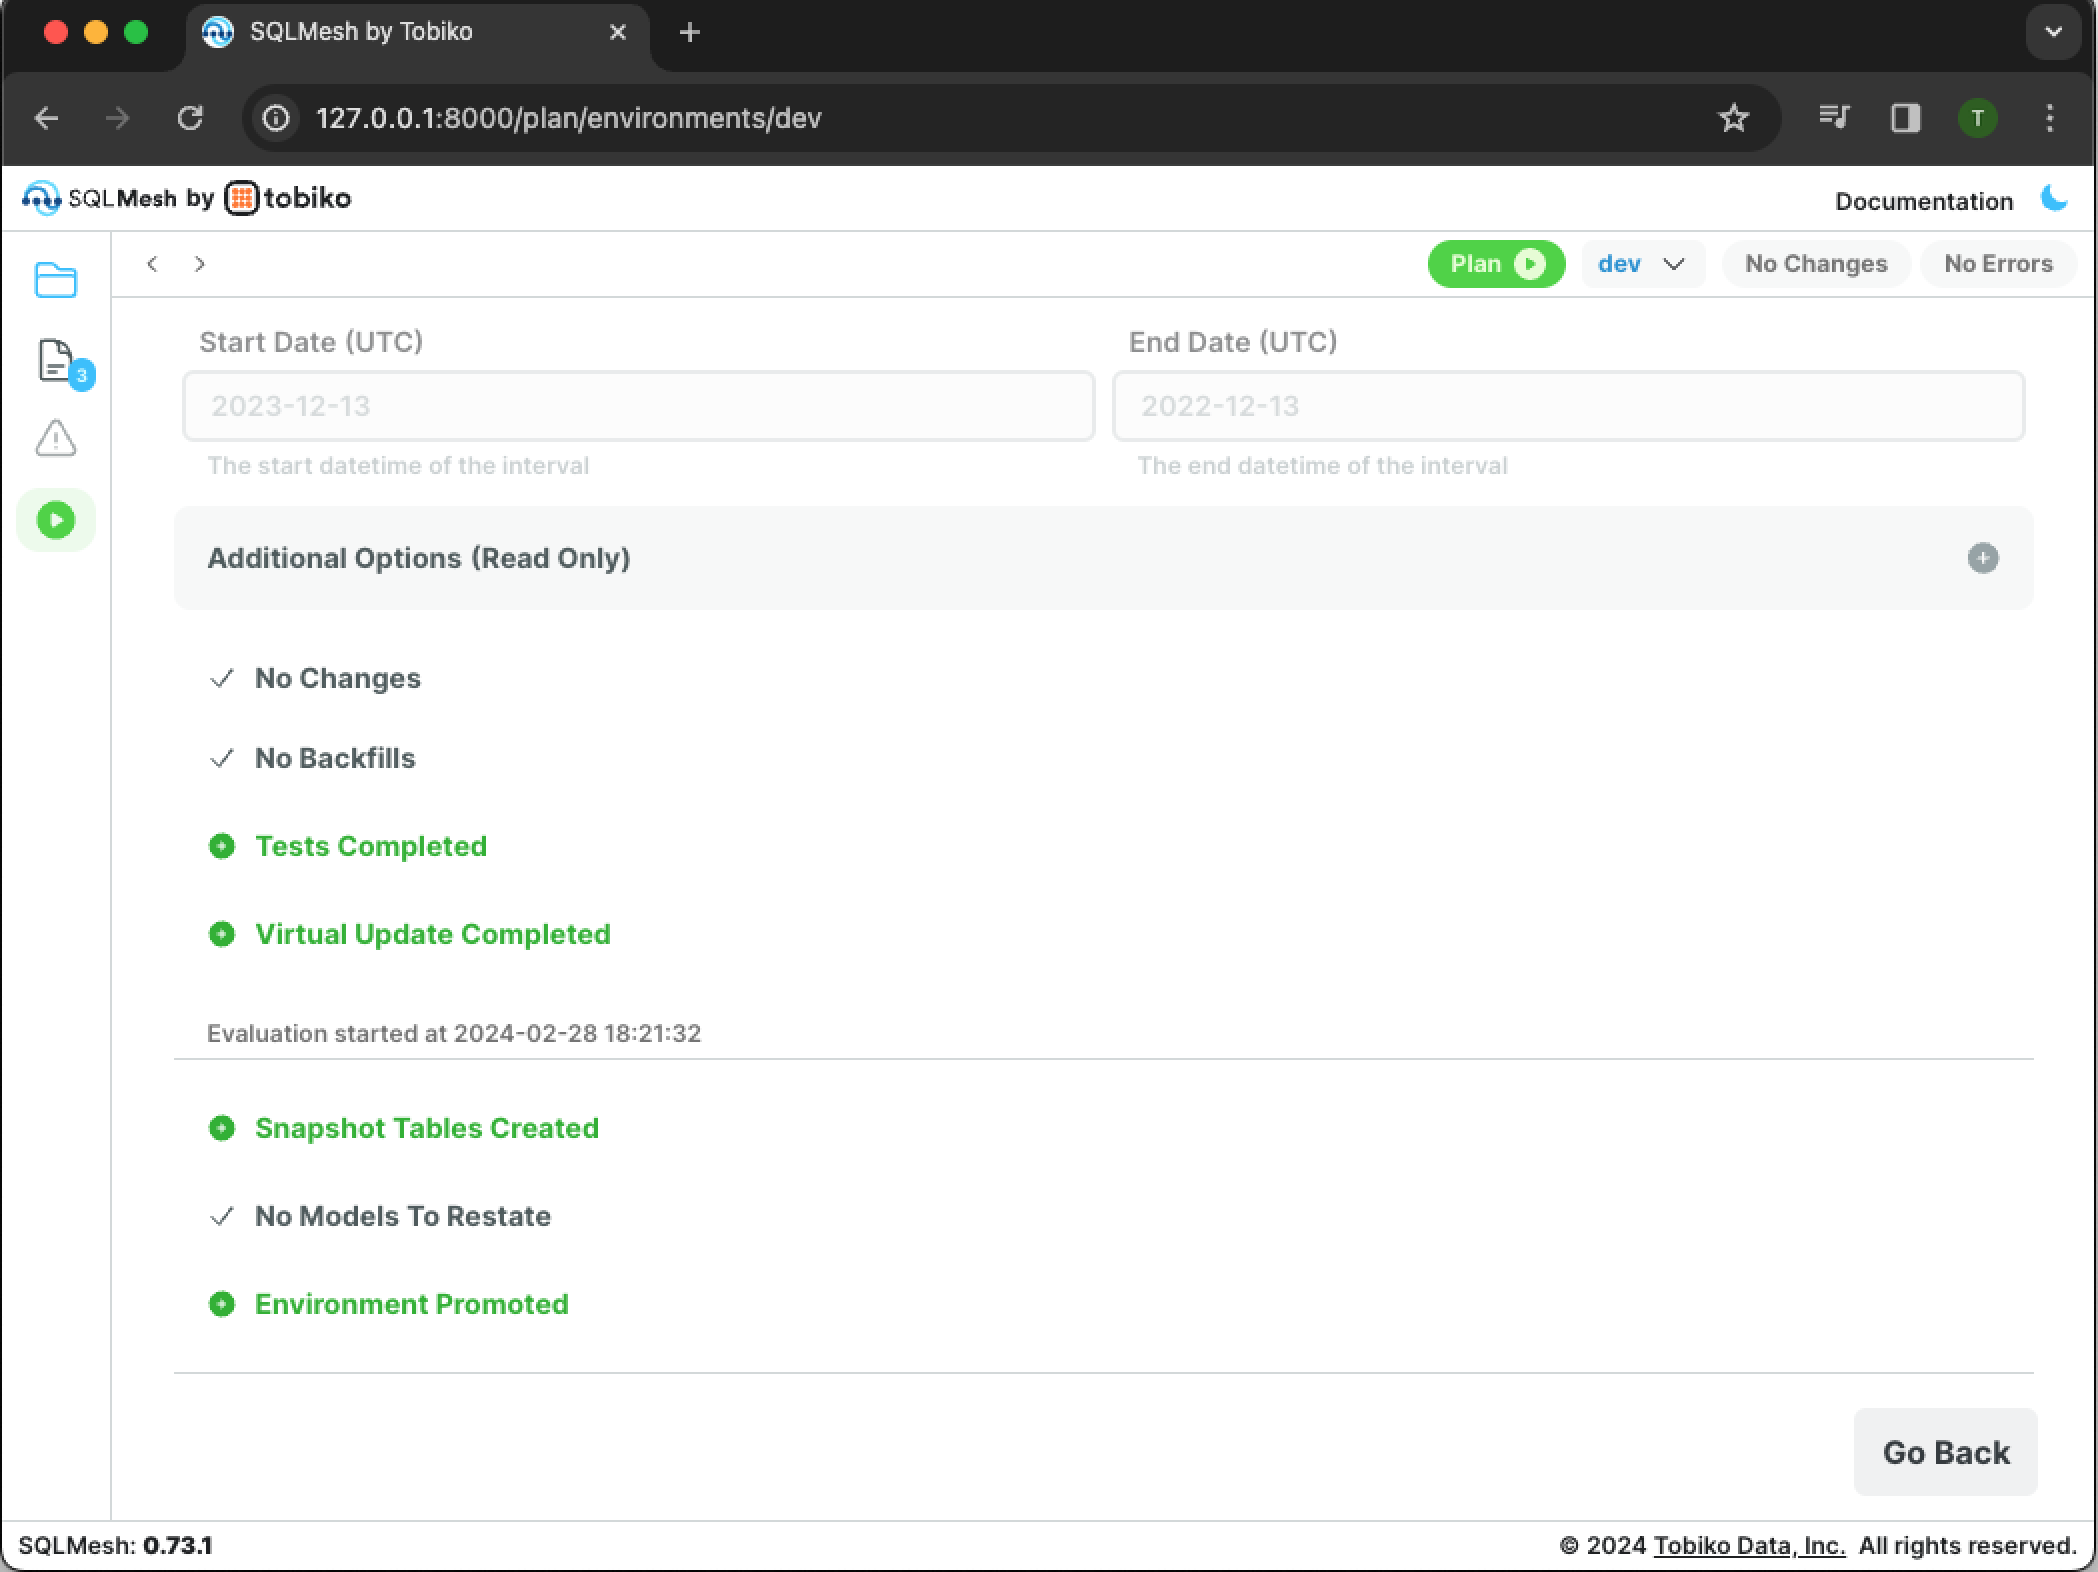
The output confirms that the tests, virtual update, snapshot table creation, and environment promotion steps have completed. Click the Go Back button to close the pane.
3. Make your first update
Now that we have populated both prod and dev environments, let's modify one of the SQL models, validate it in dev, and push it to prod.
3.1 Edit the model query
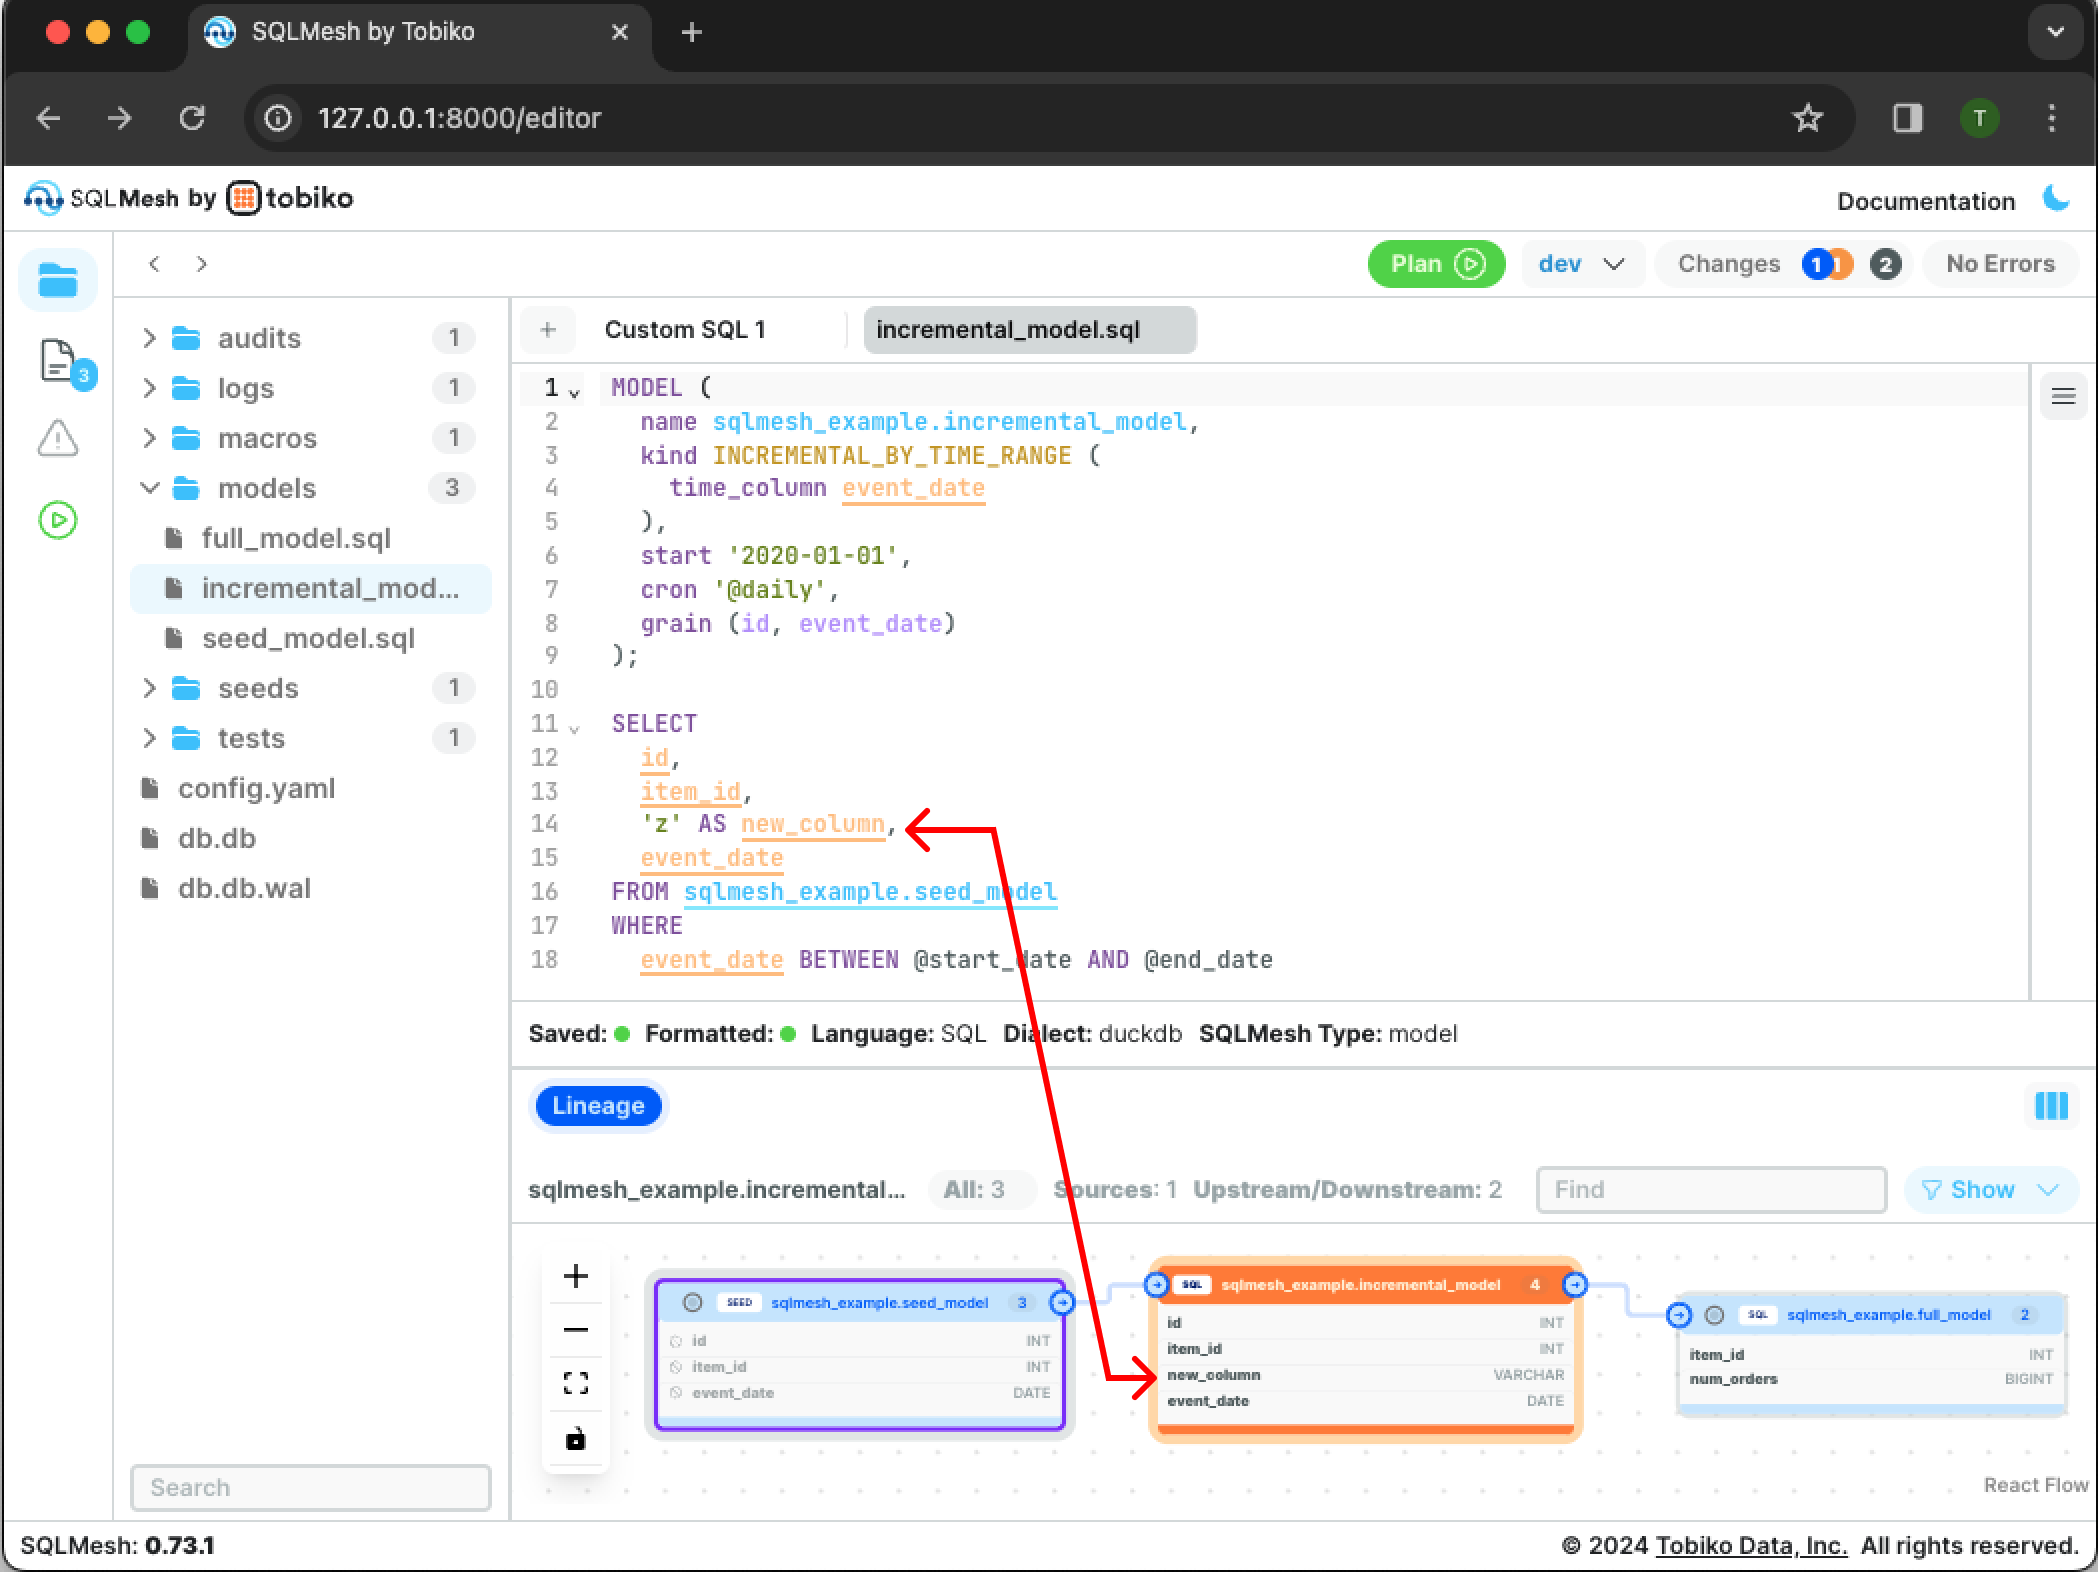
To modify the incremental SQL model, open it in the editor by clicking on it in the project directory pane on the left side of the window.
The Details pane at the bottom displays the project's table and column lineage.
Modify the incremental SQL model by adding a new column to the query. Press Cmd + S (Ctrl + S on Windows) to save the modified model file and display the updated lineage:
4. Plan and apply updates
Preview the impact of the change by clicking the green Plan button in the top right.
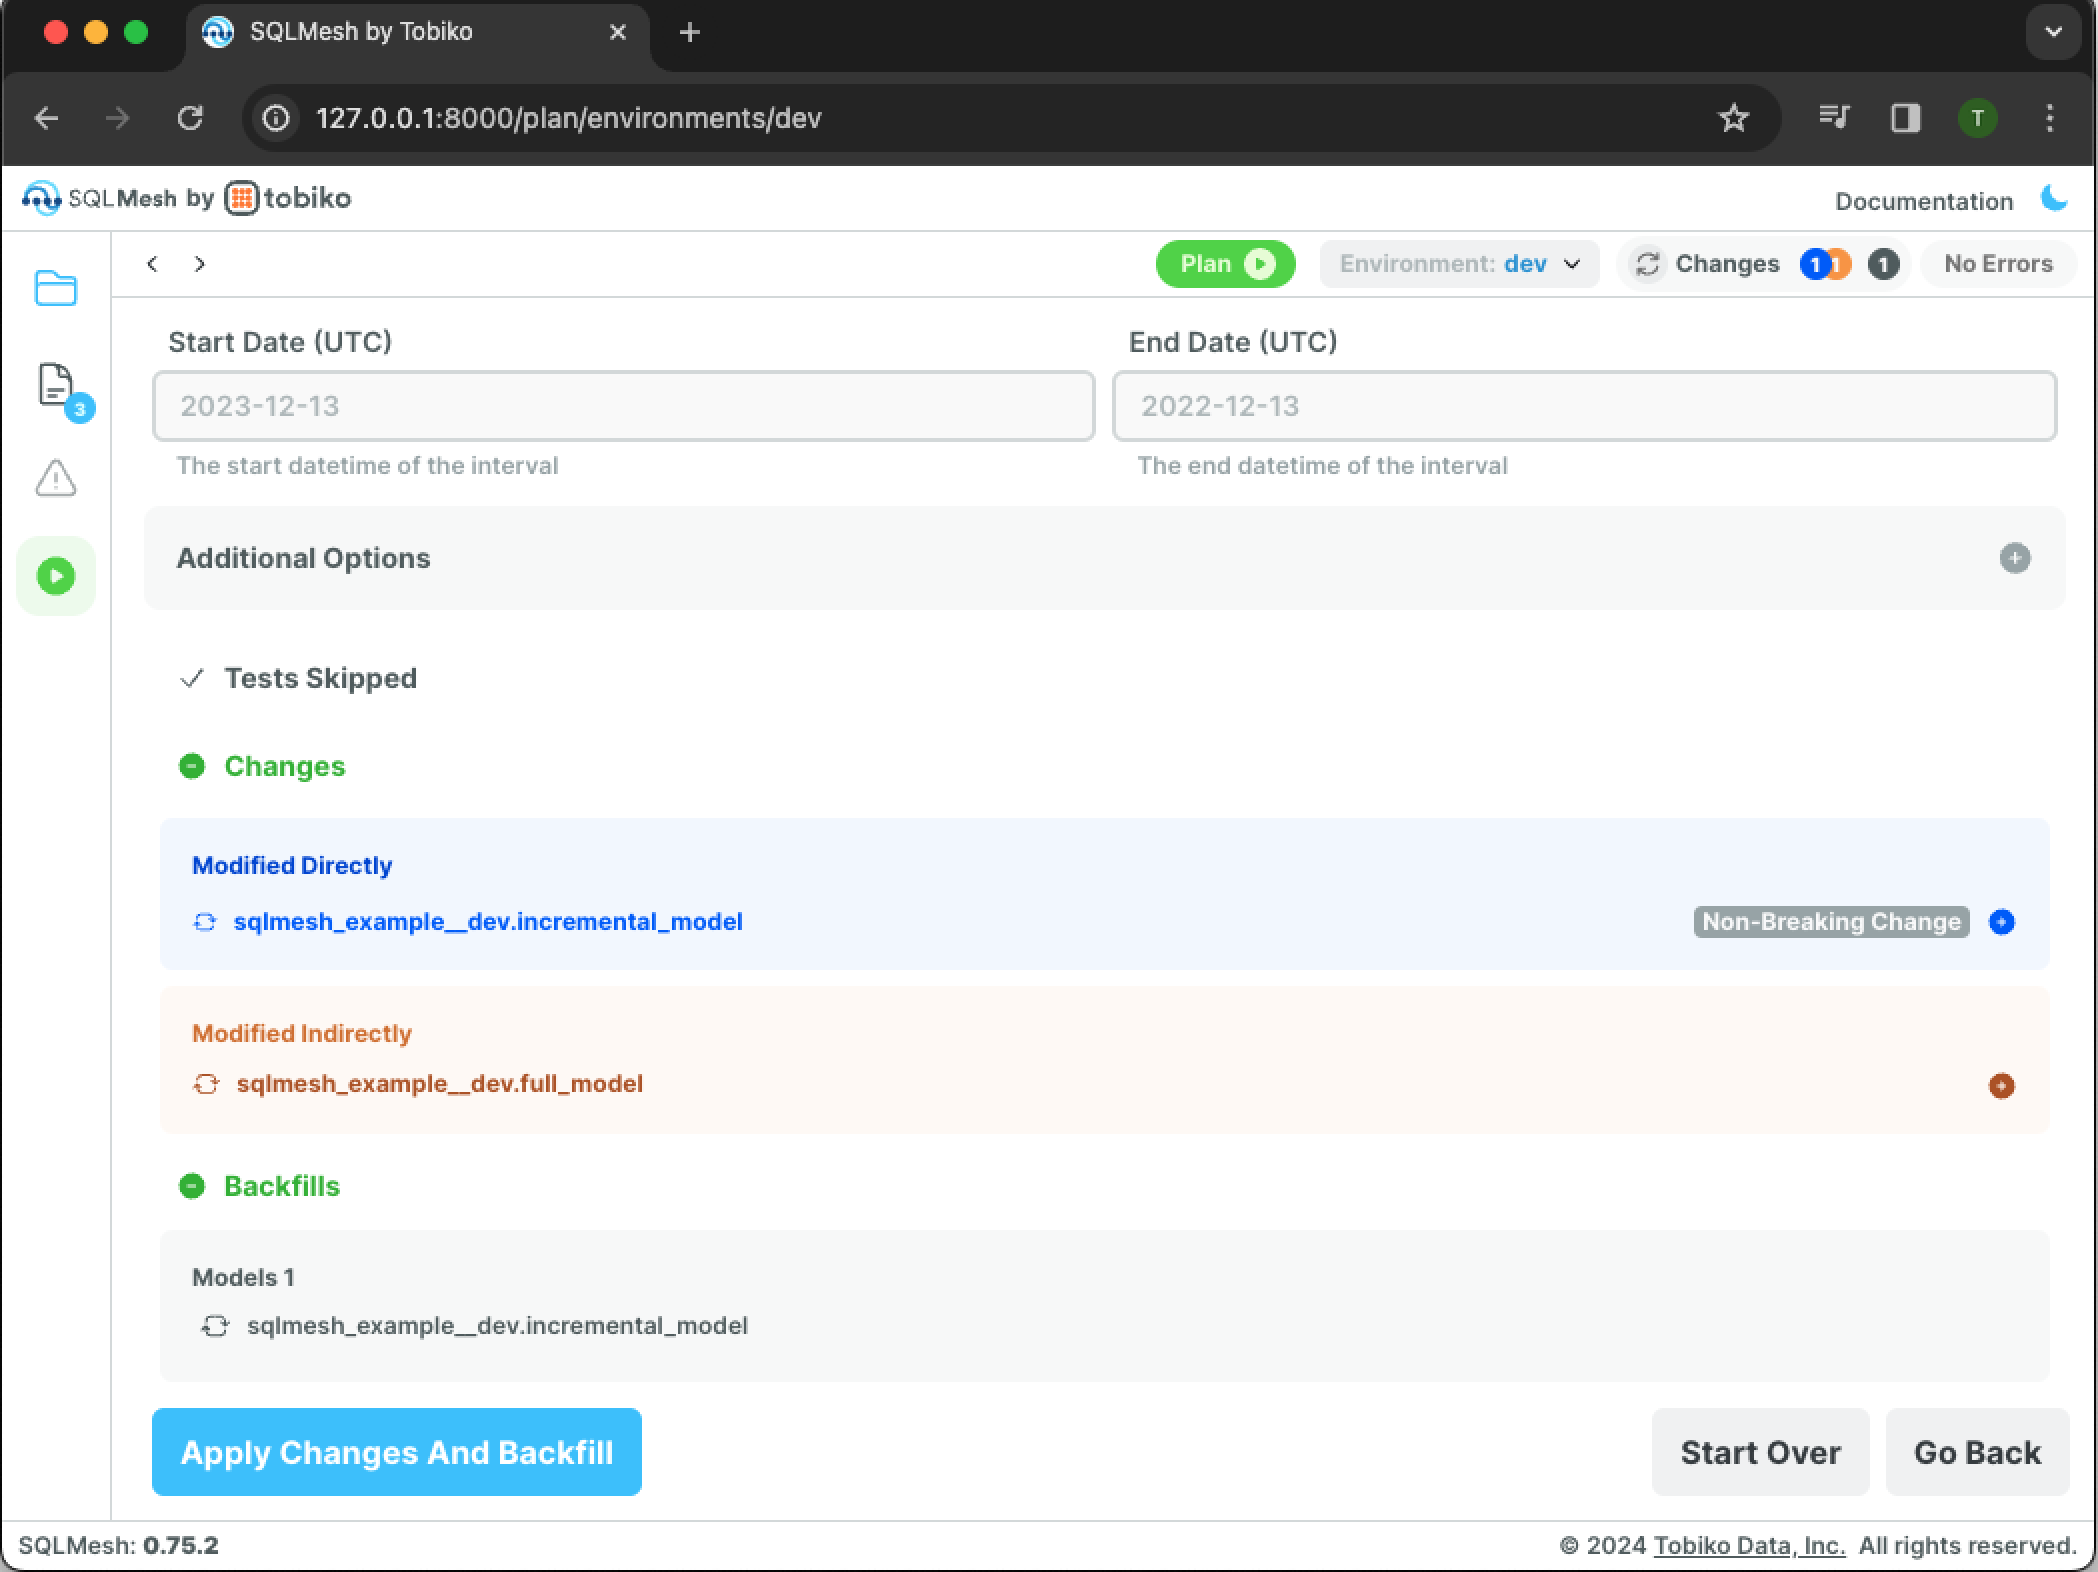
The Changes section detects that we directly modified incremental_model and that full_model was indirectly modified because it selects from the incremental model. SQLMesh understood that the change was additive (added a column not used by full_model) and was automatically classified as a non-breaking change.
The Backfill section shows that only incremental_model requires backfill. Click the blue Apply Changes And Backfill button to apply the plan and execute the backfill:
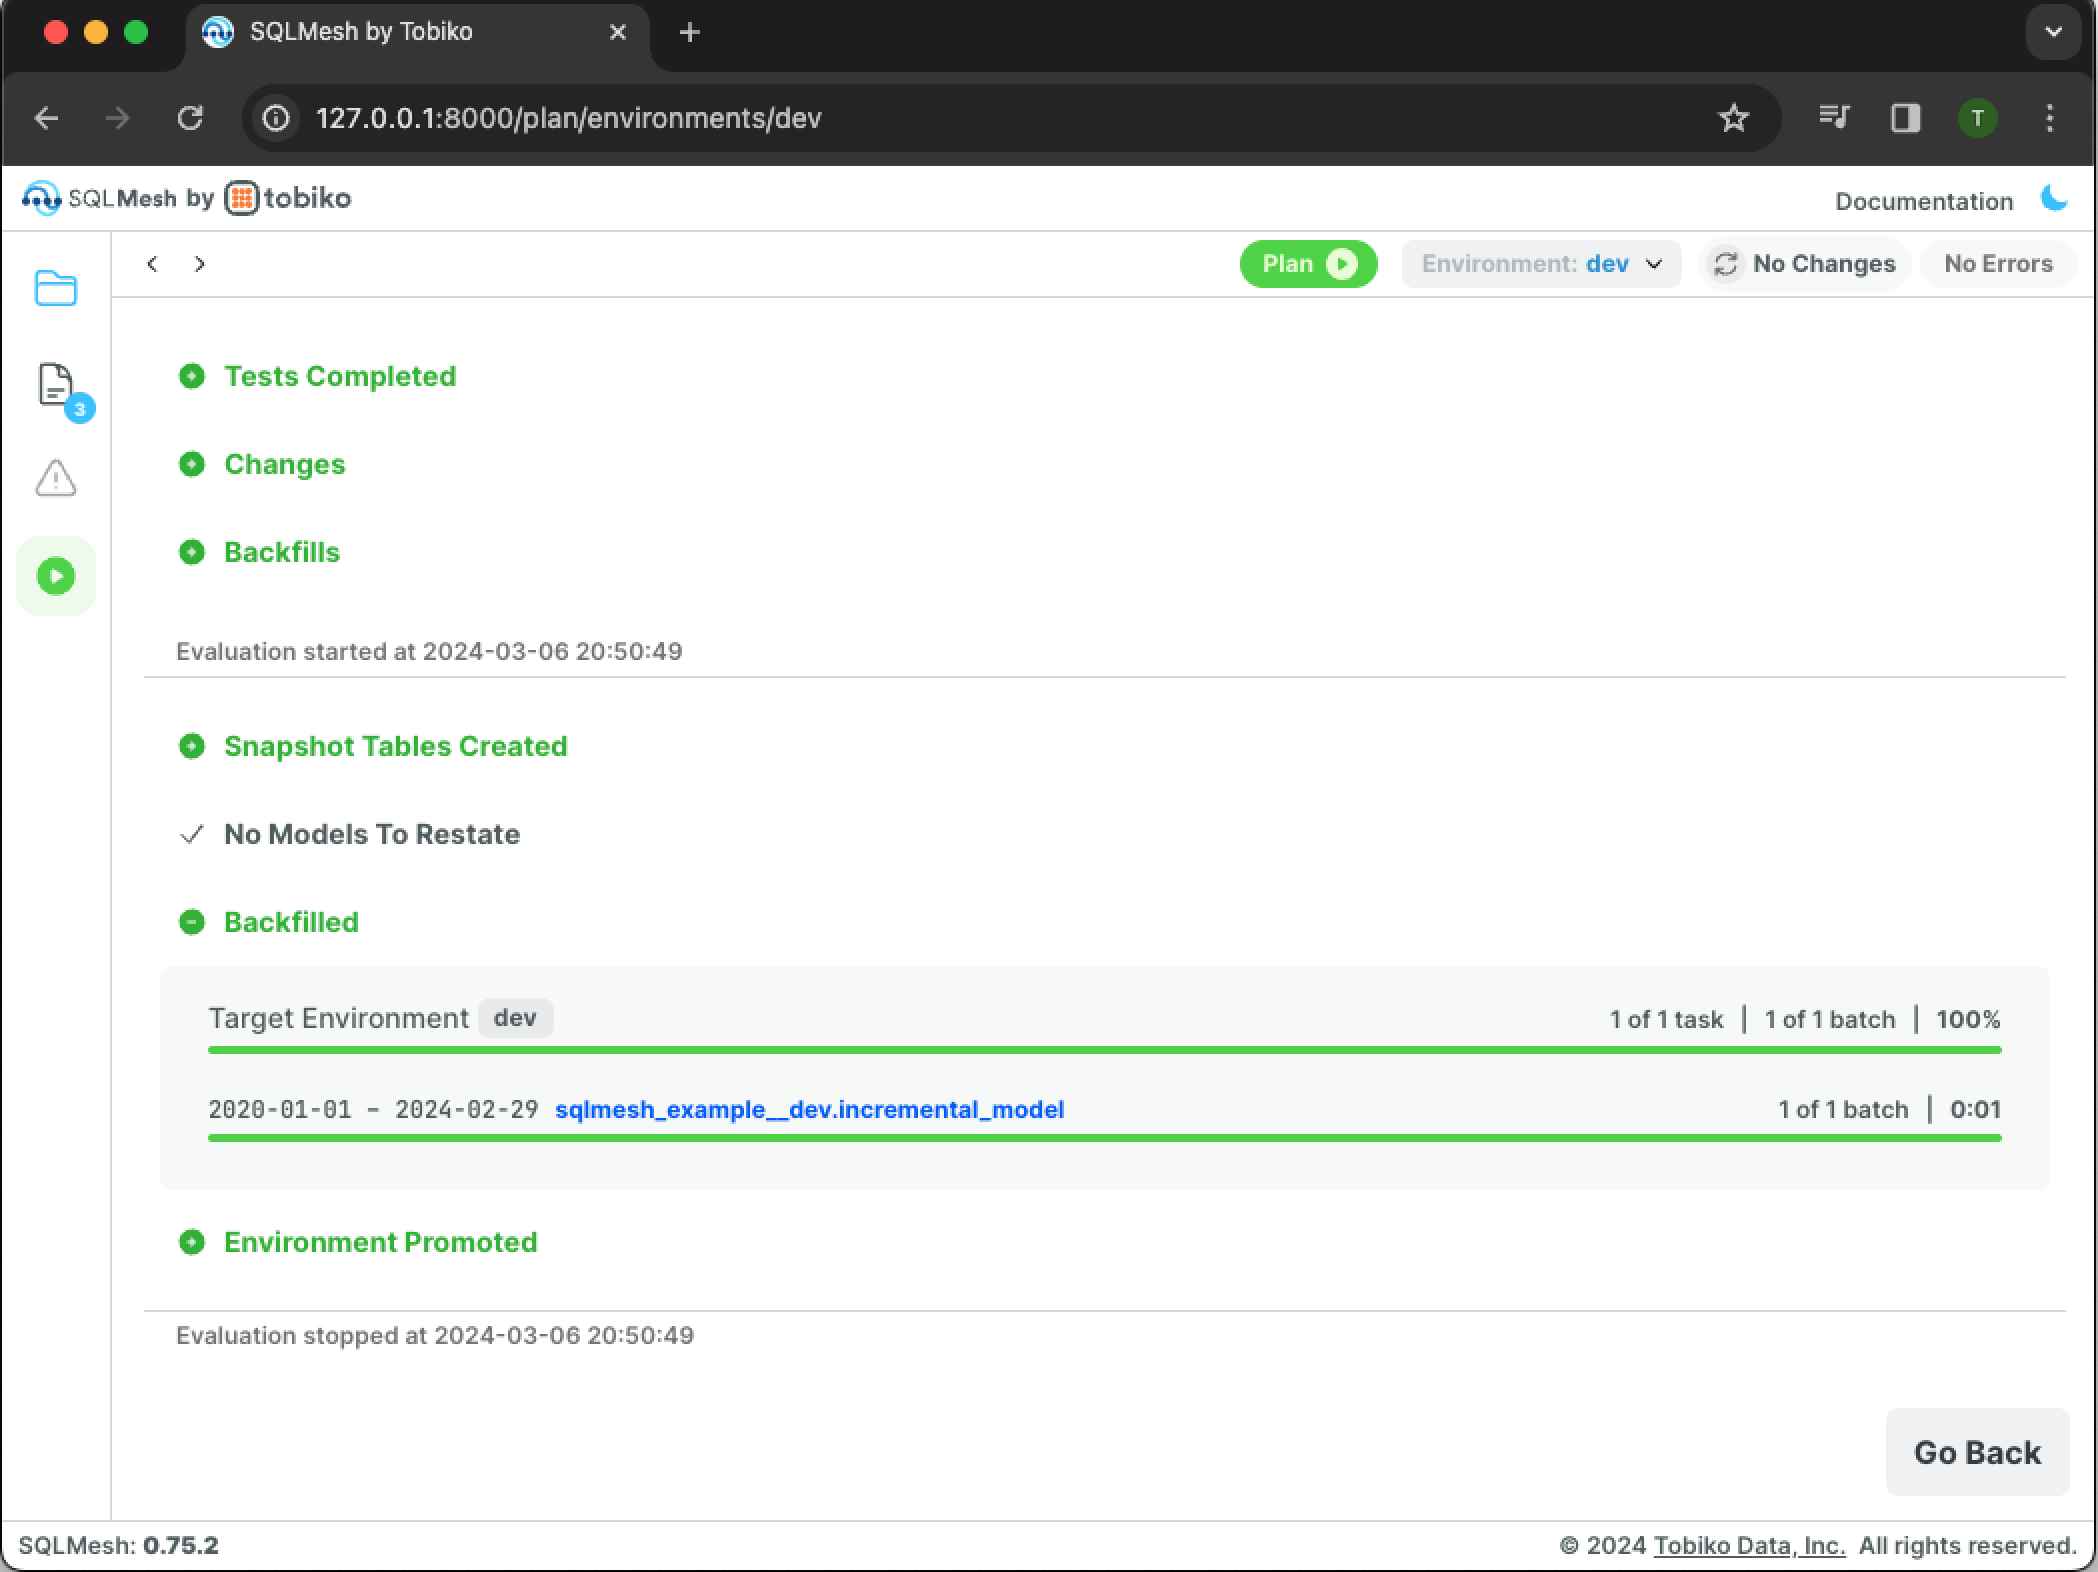
SQLMesh applies the change to sqlmesh_example.incremental_model and backfills the model. The Backfilled section shows that the backfill completed successfully.
4.1 Validate updates in dev
You can now view this change by querying data from incremental_model. Add the SQL query select * from sqlmesh_example__dev.incremental_model to the Custom SQL 1 tab in the editor:
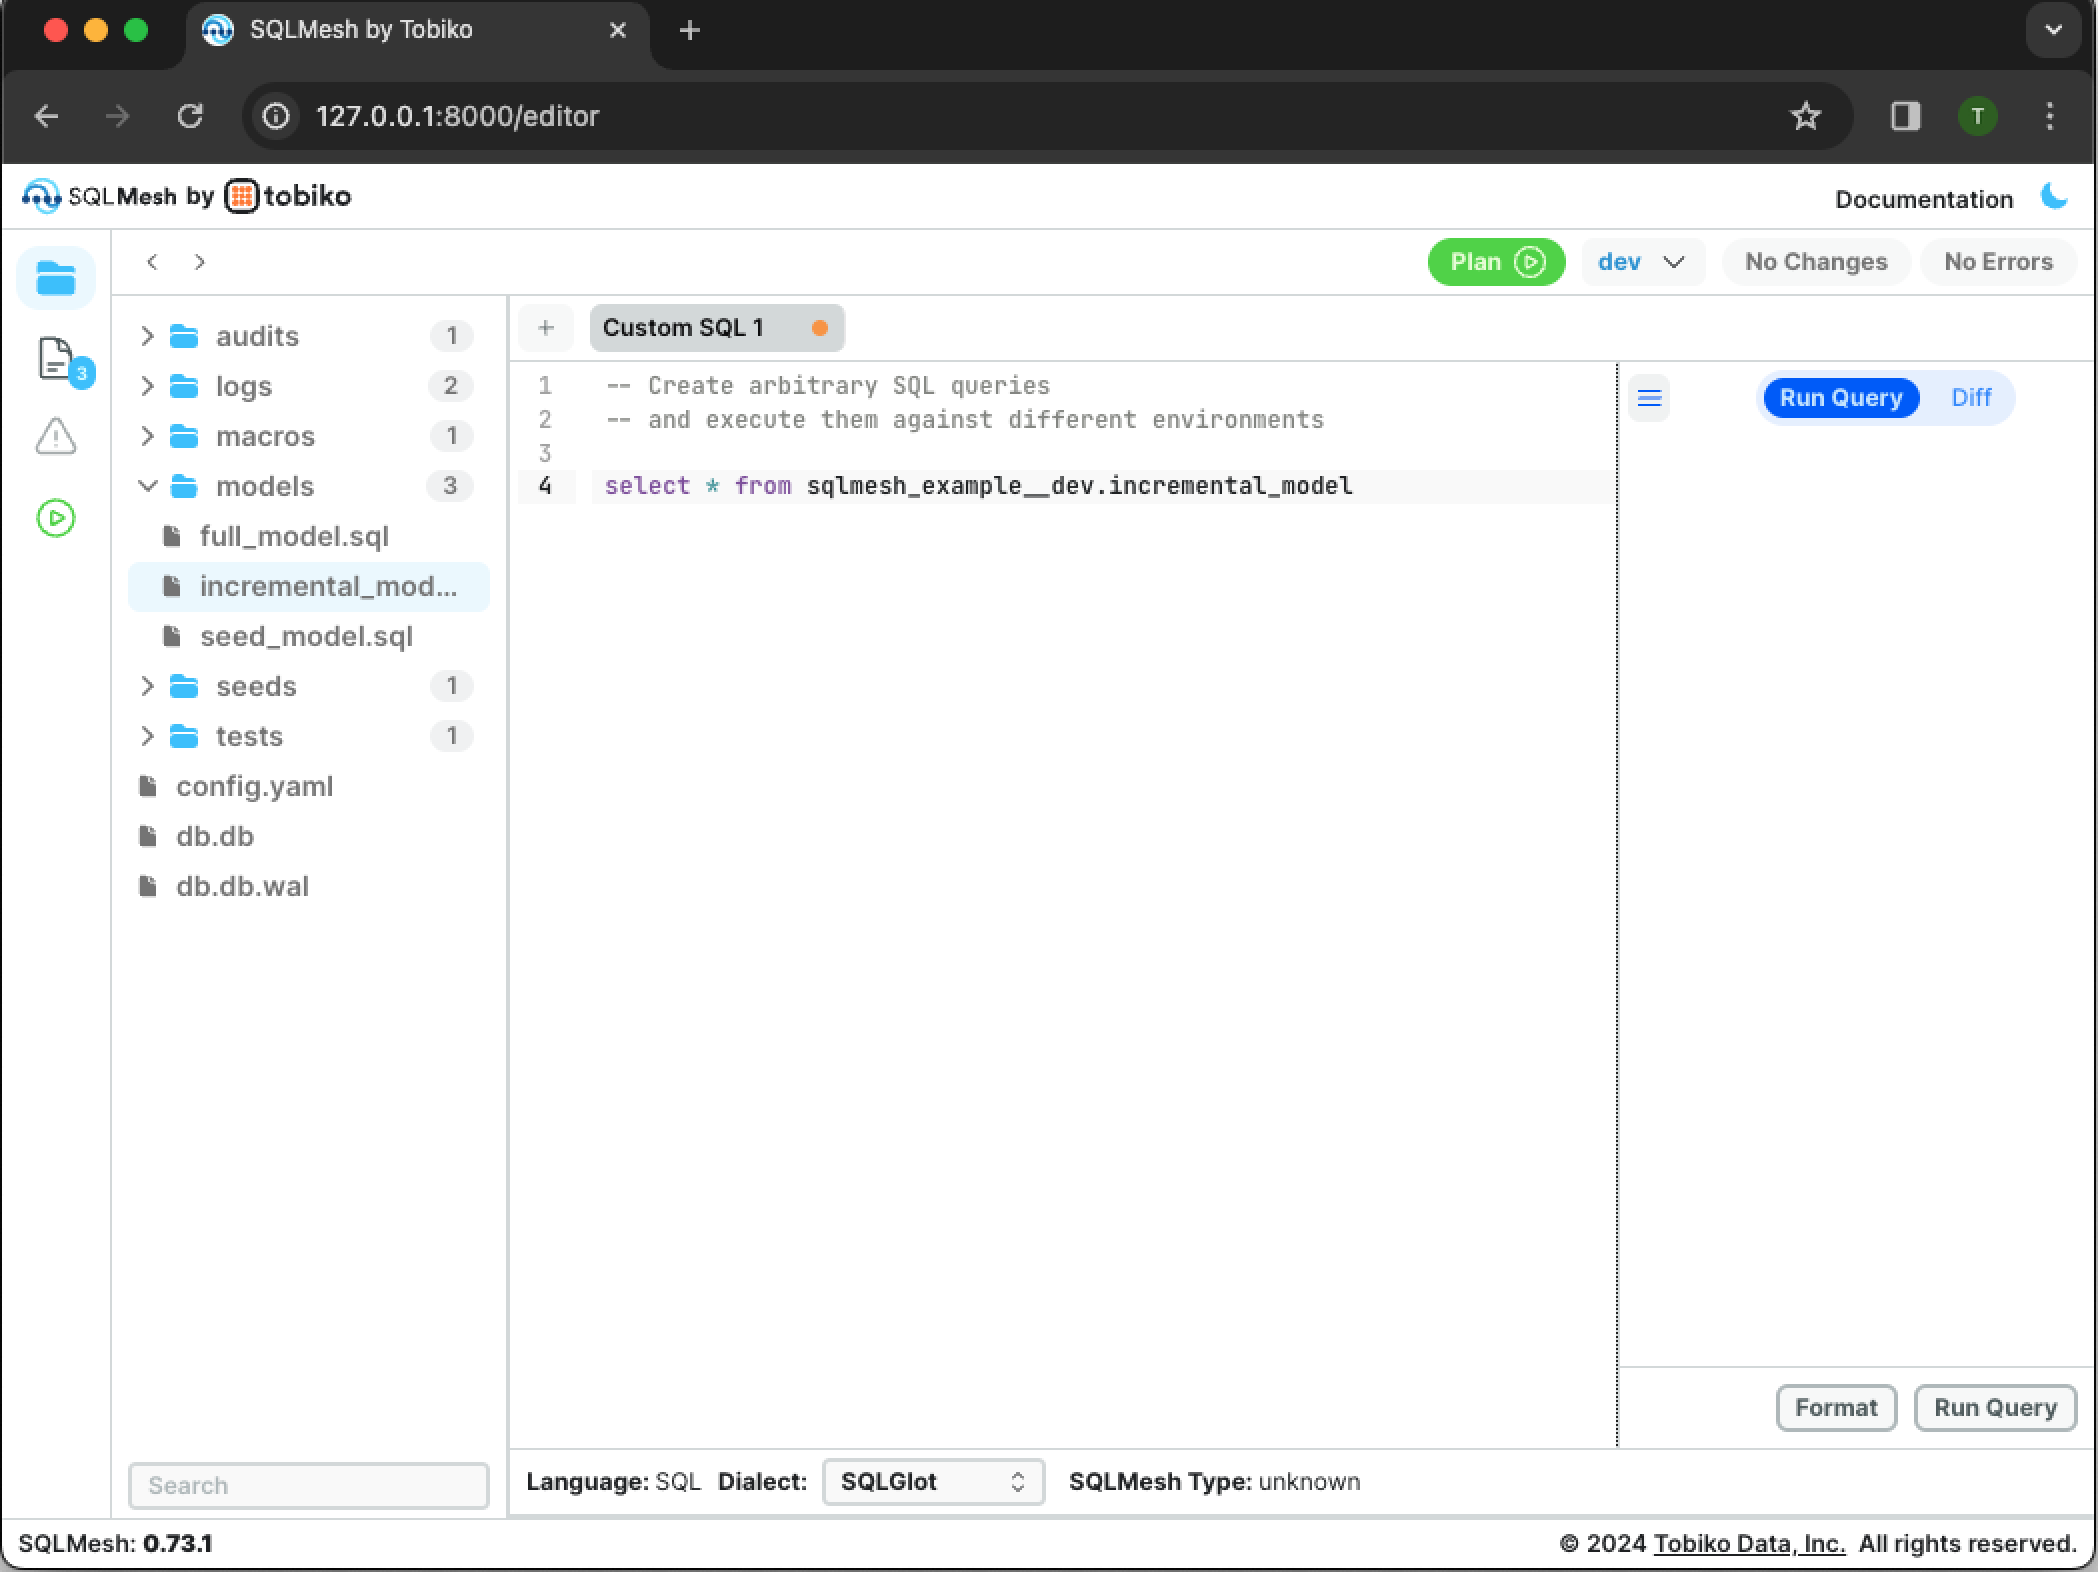
Note that the environment name __dev is appended to the schema namespace sqlmesh_example in the query: select * from sqlmesh_example__dev.incremental_model.
Click the Run Query button in the bottom right to execute the query:
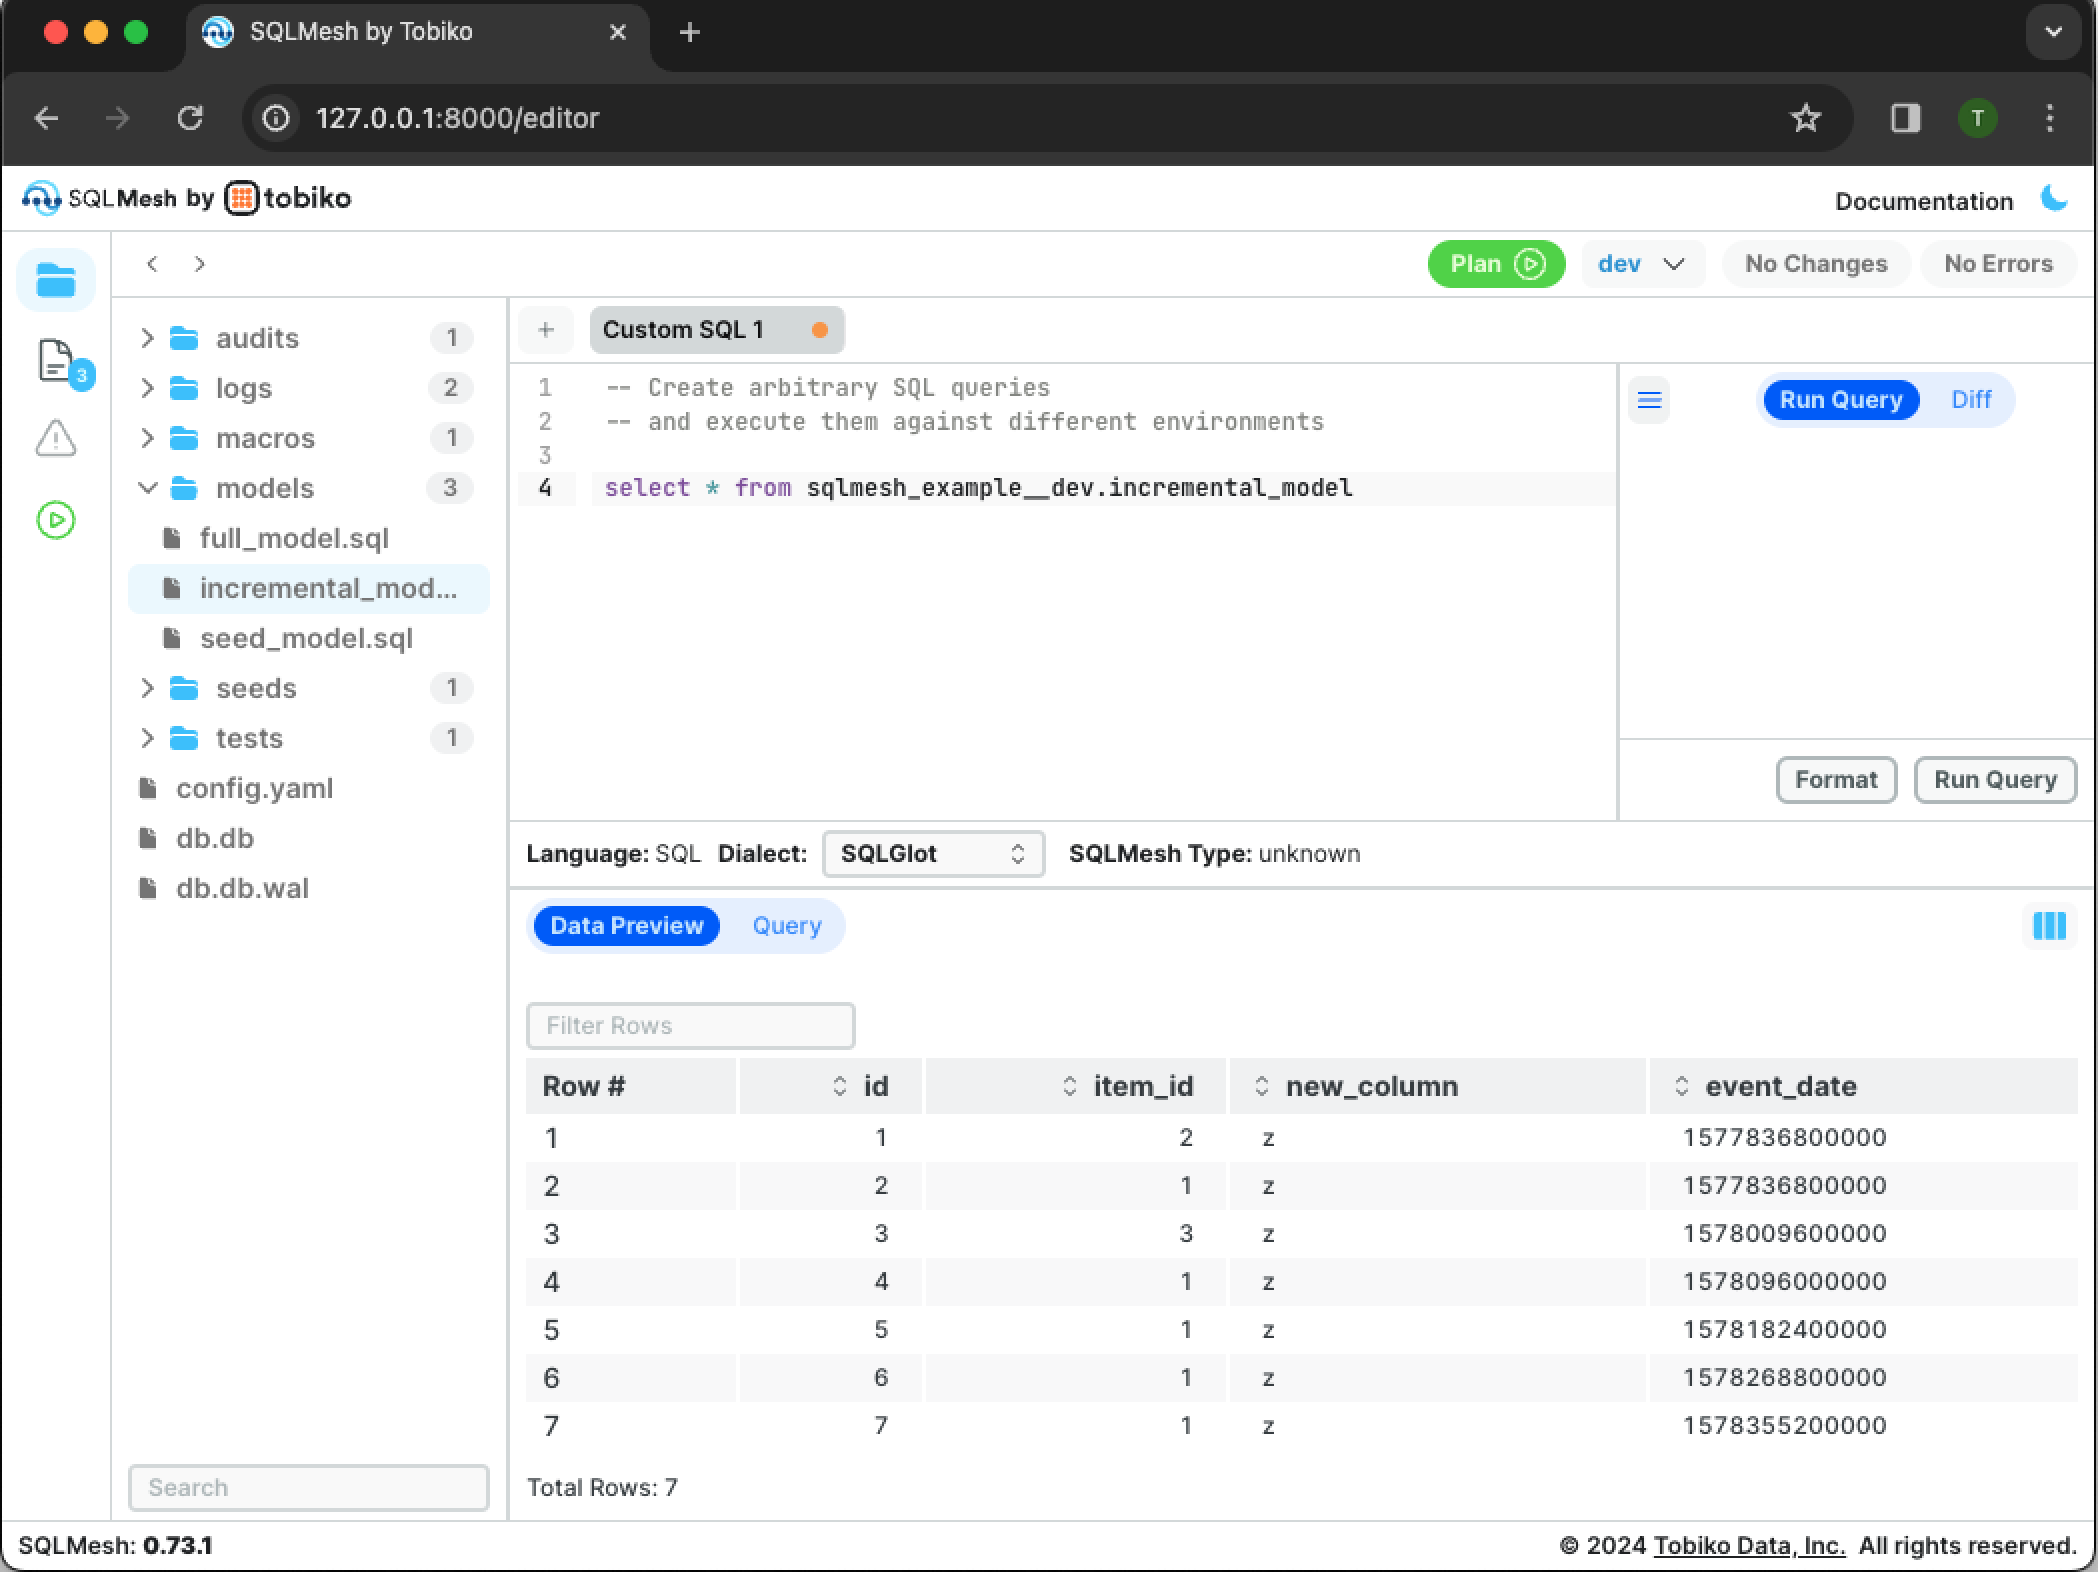
You can see that new_column was added to the dataset. The production table was not modified; you can validate this by modifying the query so it selects from the production table with select * from sqlmesh_example.incremental_model.
Note that nothing has been appended to the schema namespace sqlmesh_example because prod is the default environment.
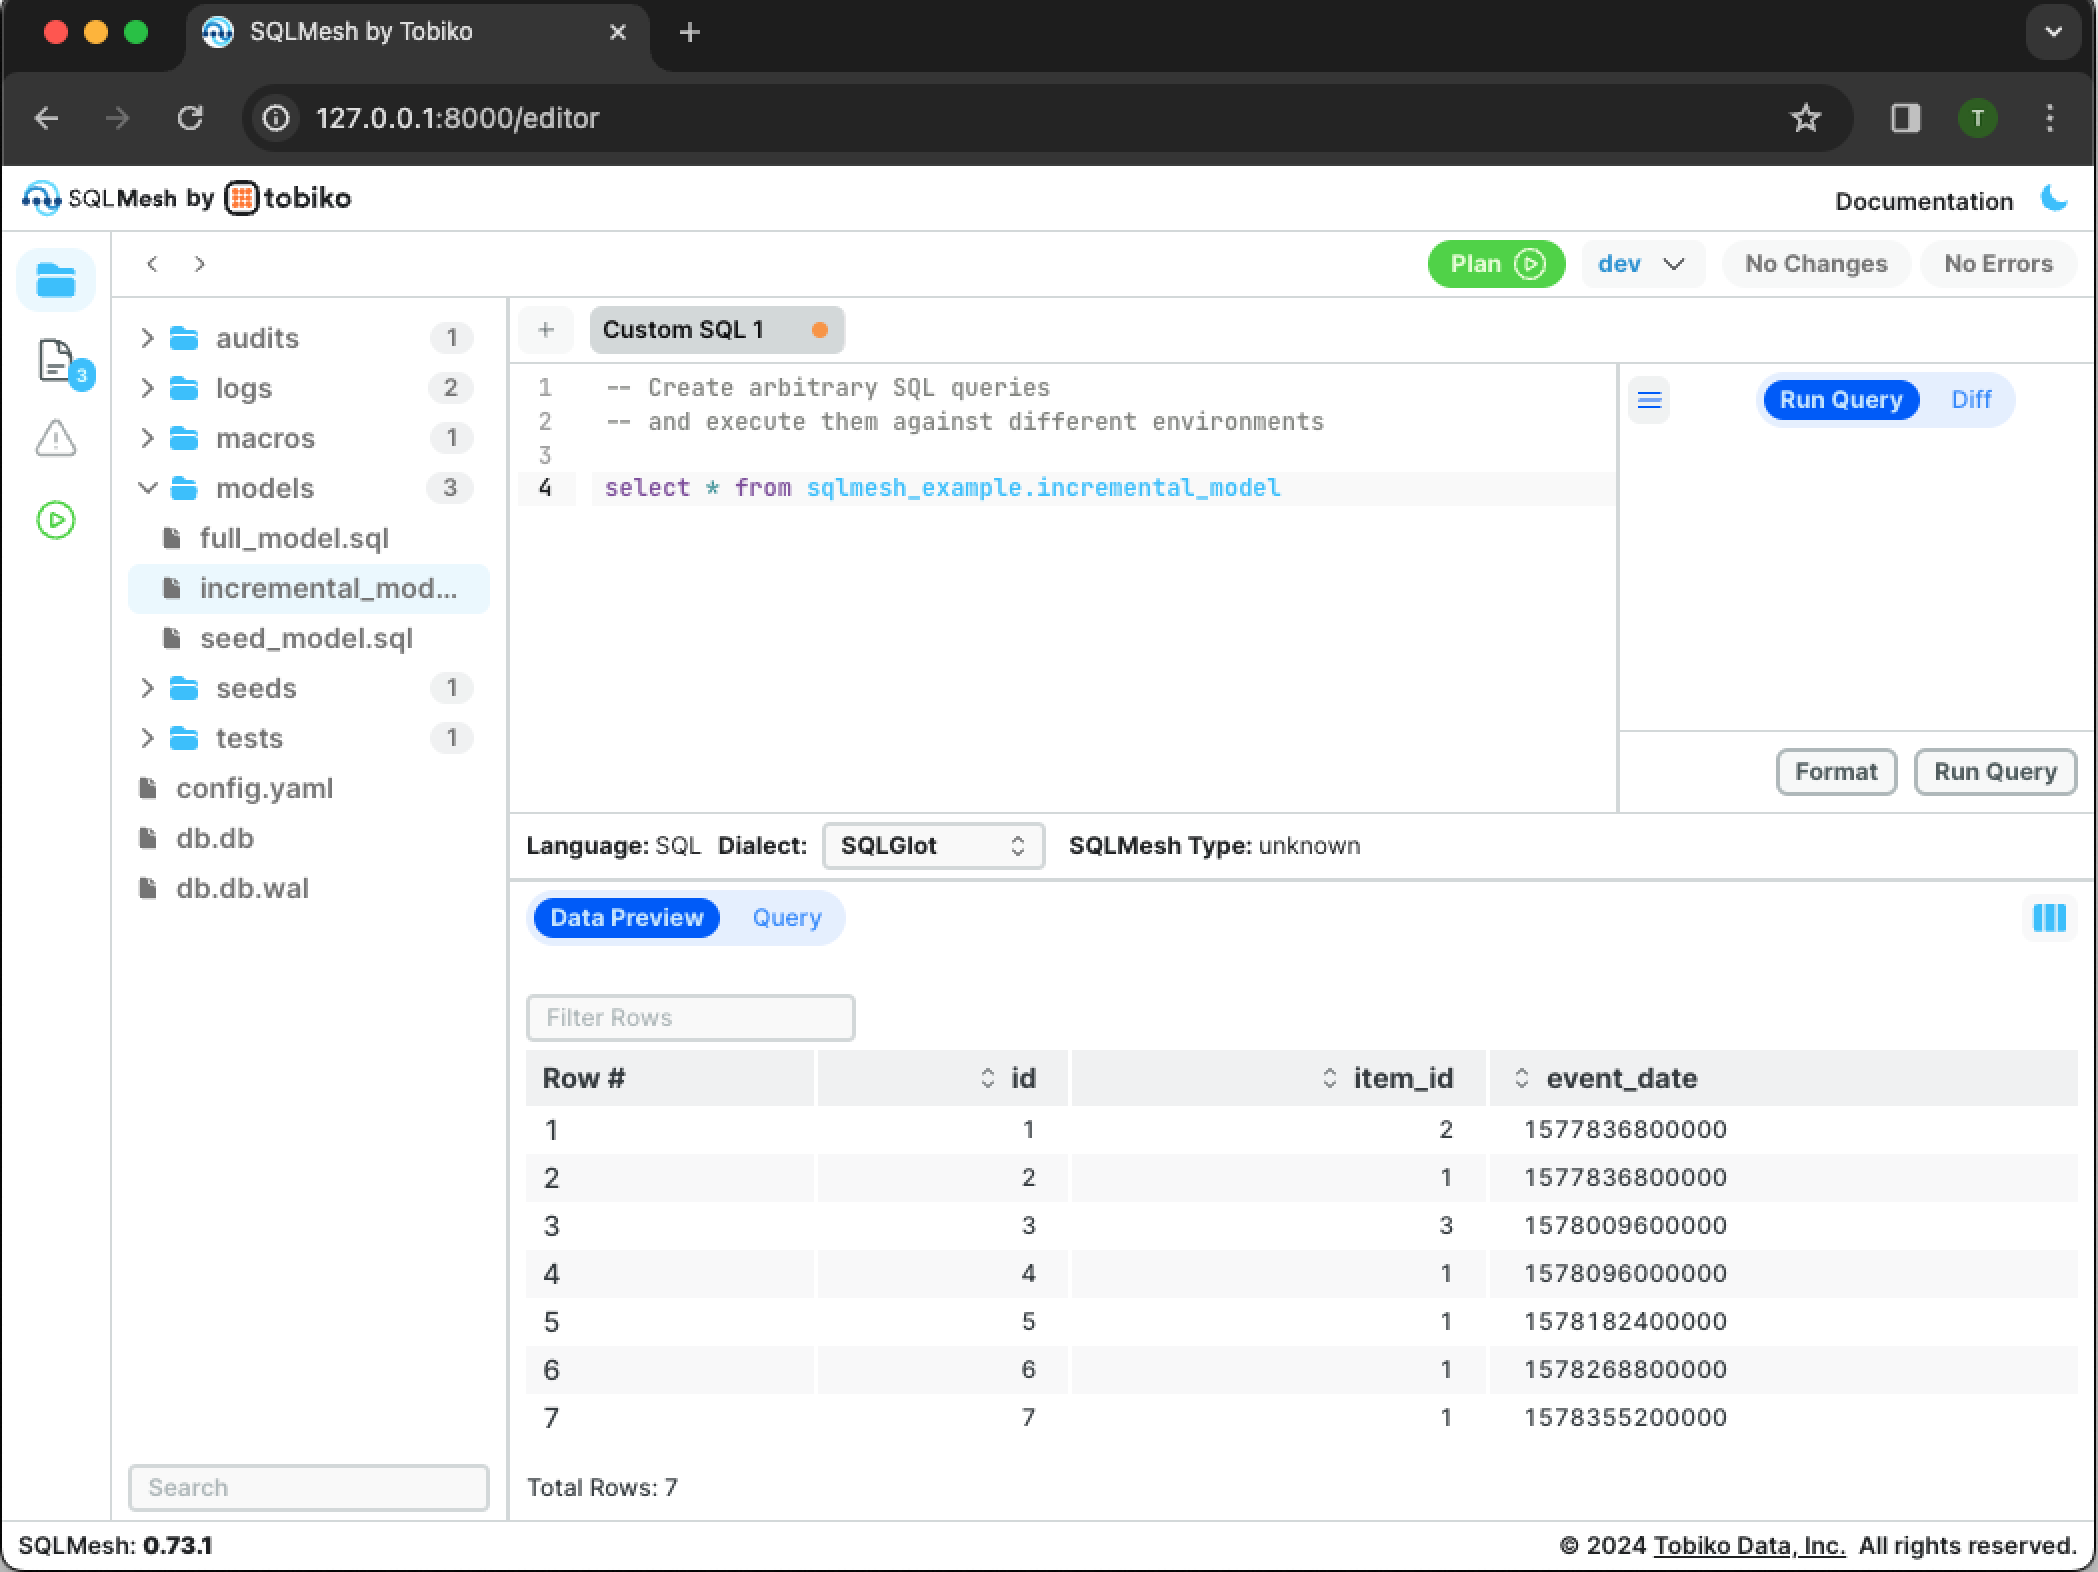
The production table does not have new_column because the changes to dev have not yet been applied to prod.
4.2 Apply updates to prod
Now that we've tested the changes in dev, it's time to move them to prod. Open the environment menu in top right and select the prod environment:
Click the green Plan button to open the run plan interface:
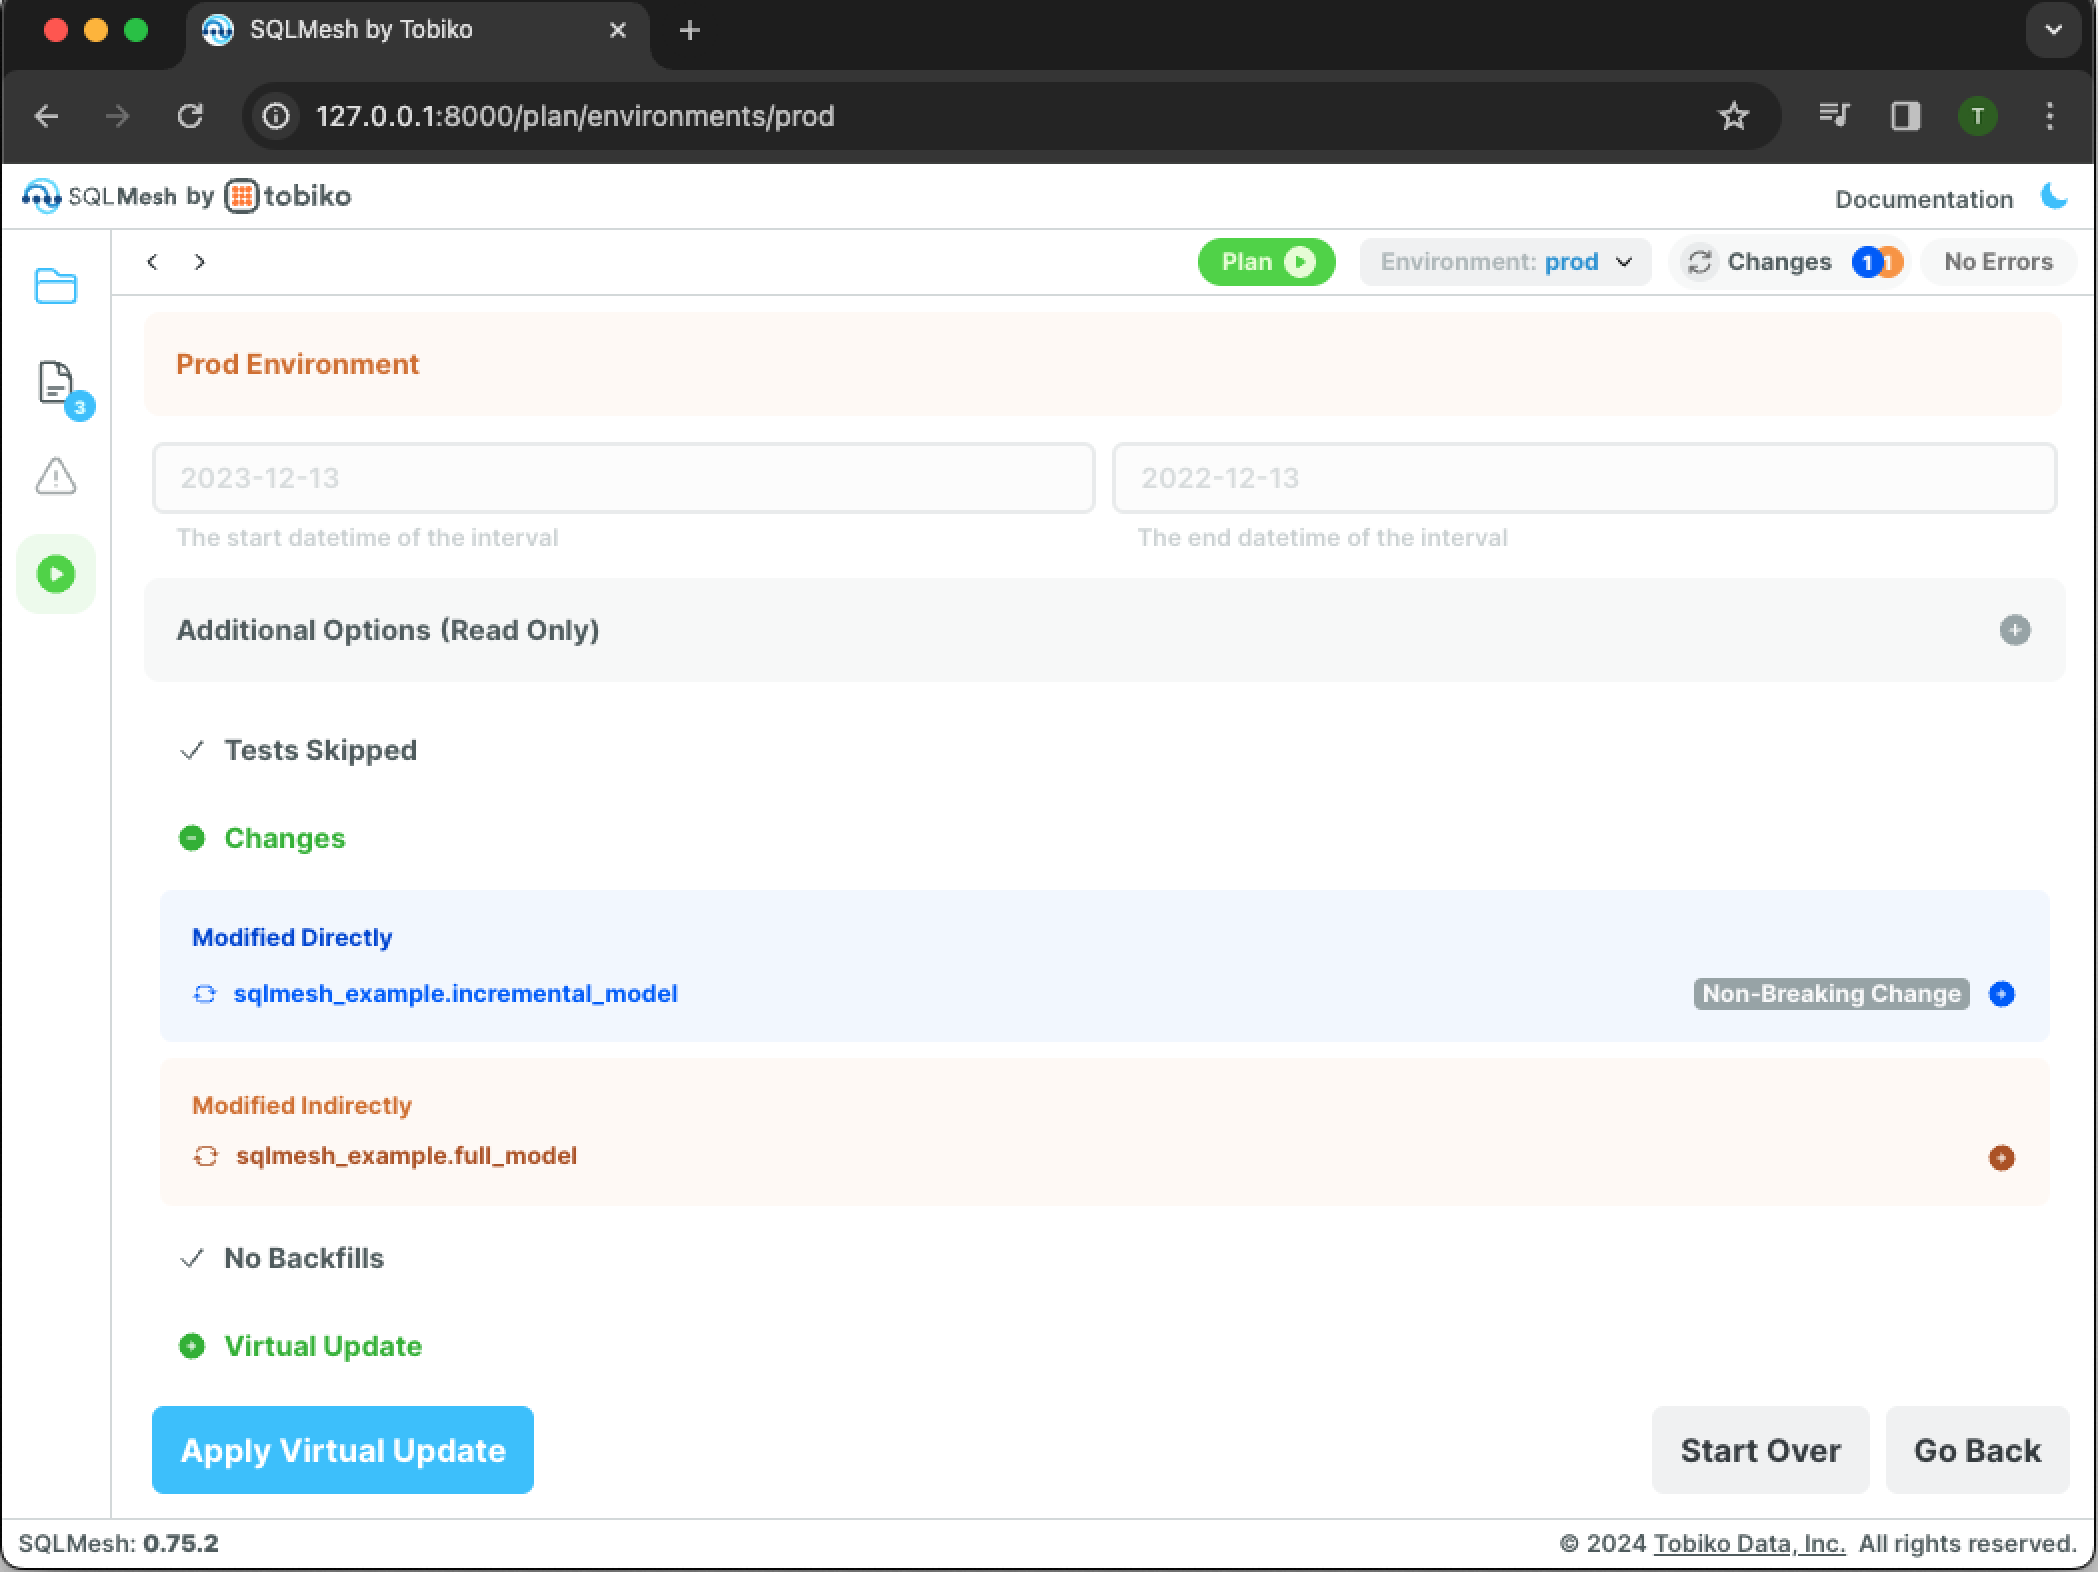
Click the blue Apply Virtual Update button, and a warning screen will appear:
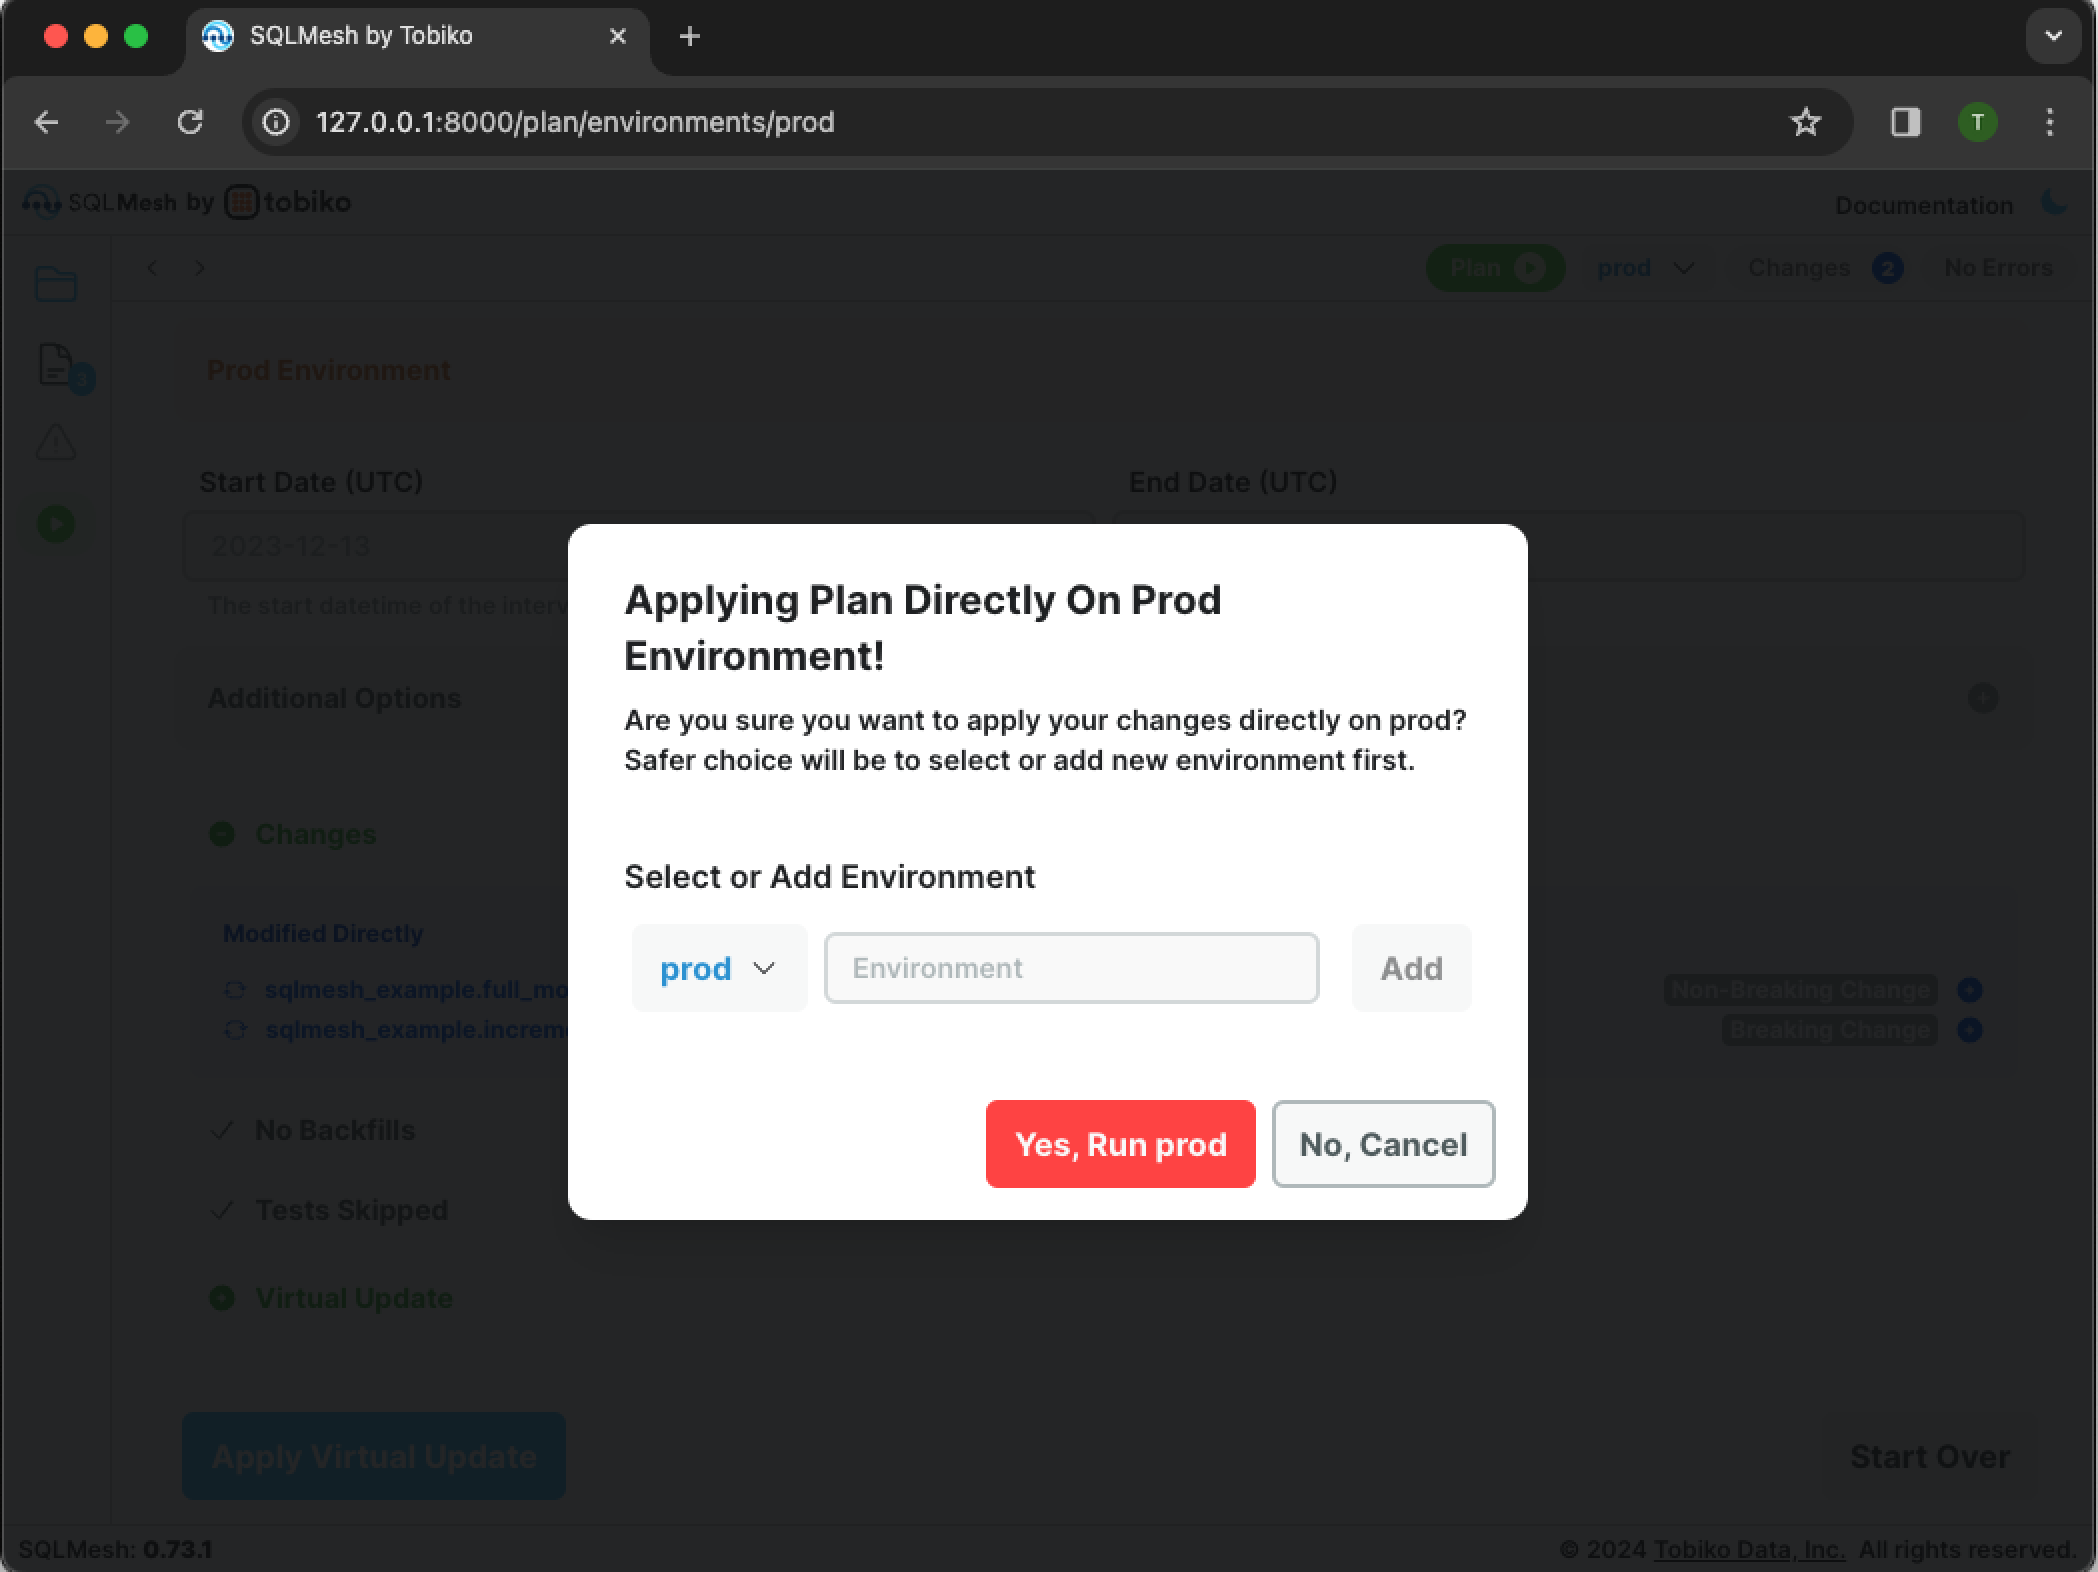
Click the Yes, Run prod button to proceed with applying the plan:
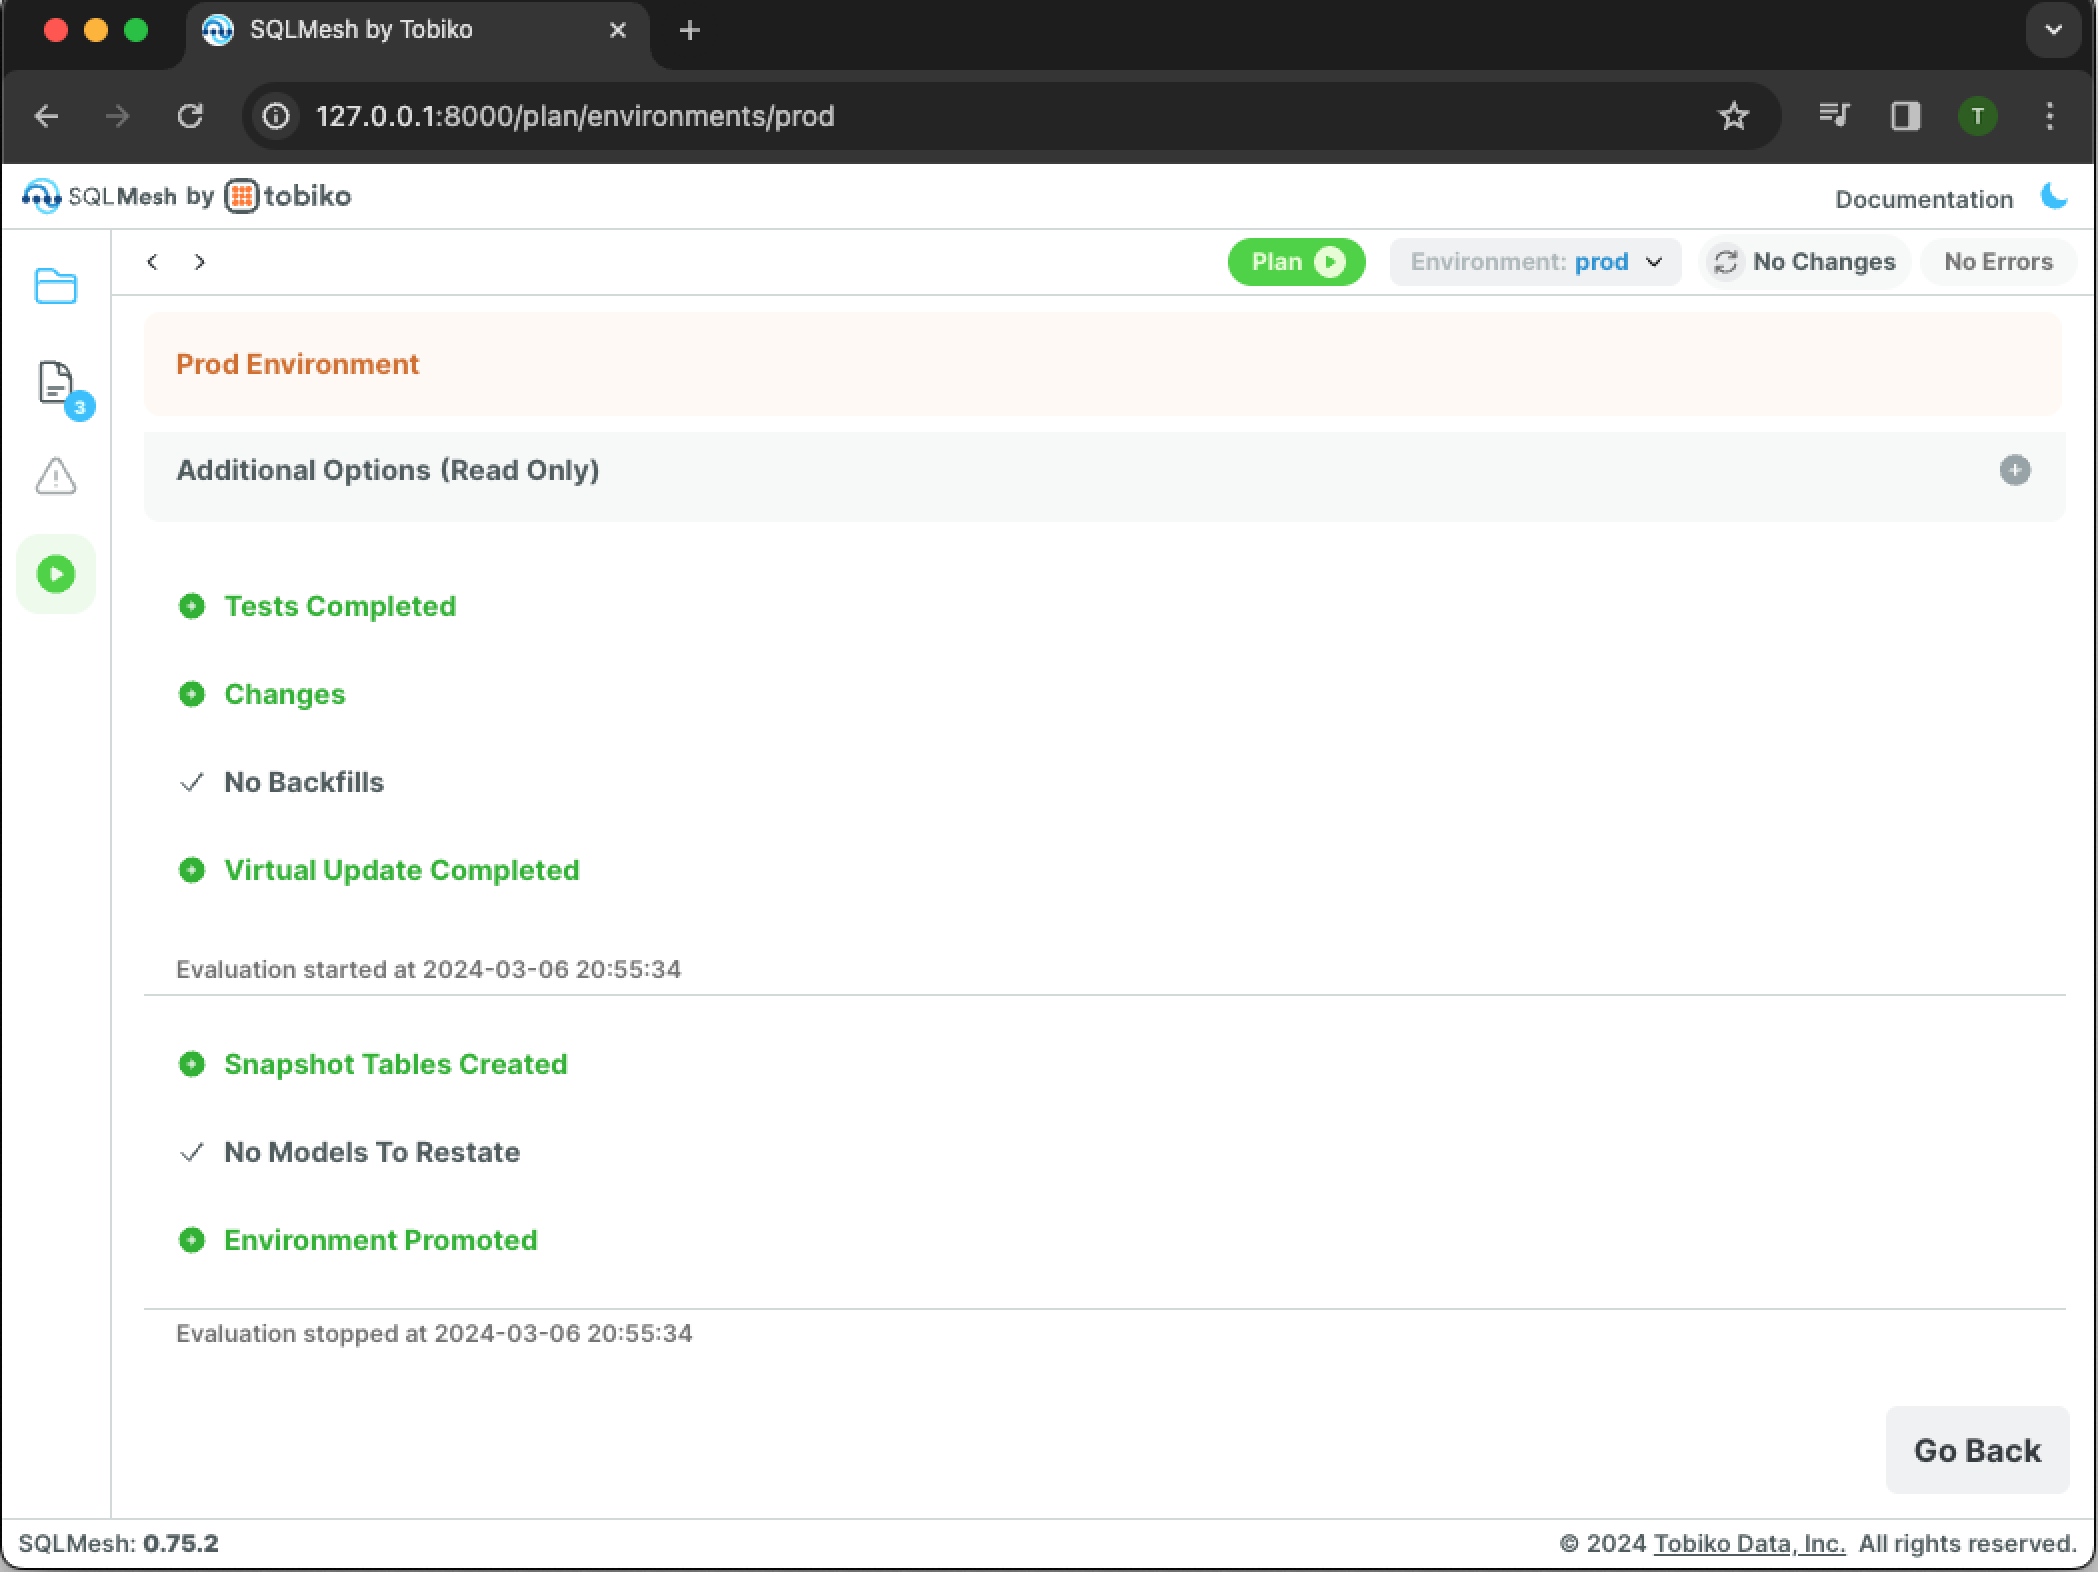
Note that a backfill was not necessary and only a Virtual Update occurred - the computations have already occurred when backfilling the model in dev. Click the Go Back button to close the pane.
4.3. Validate updates in prod
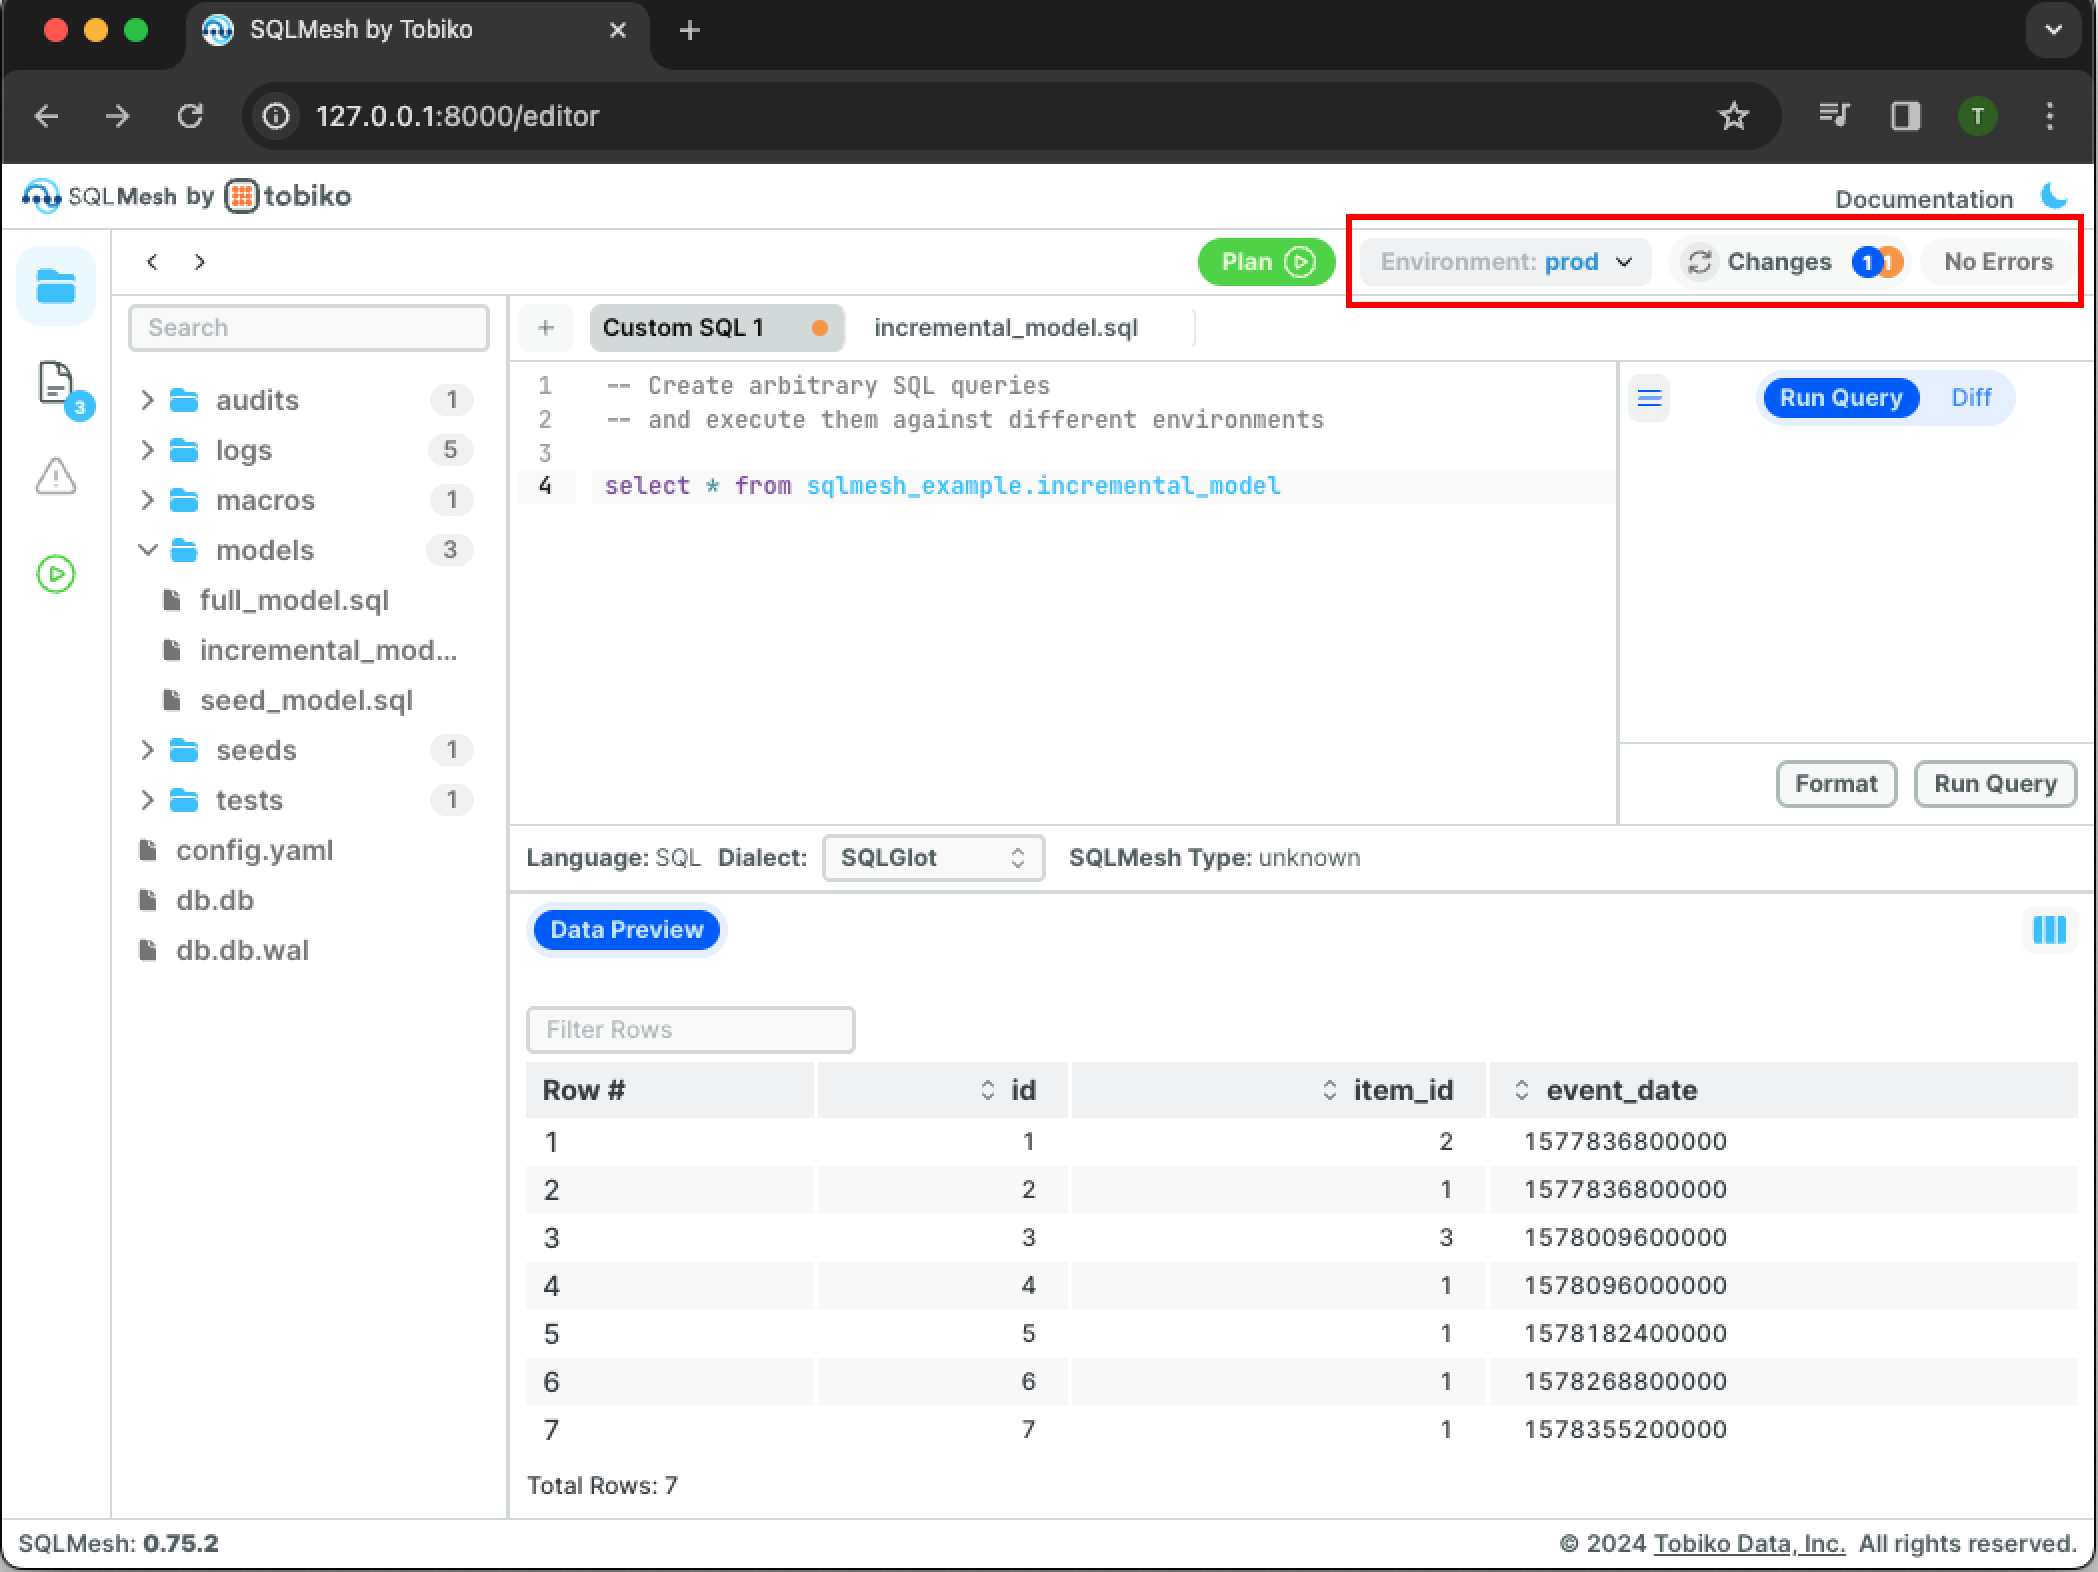
Double-check that the data updated in prod by re-running the SQL query from the editor. Click the Run Query button to execute the query:
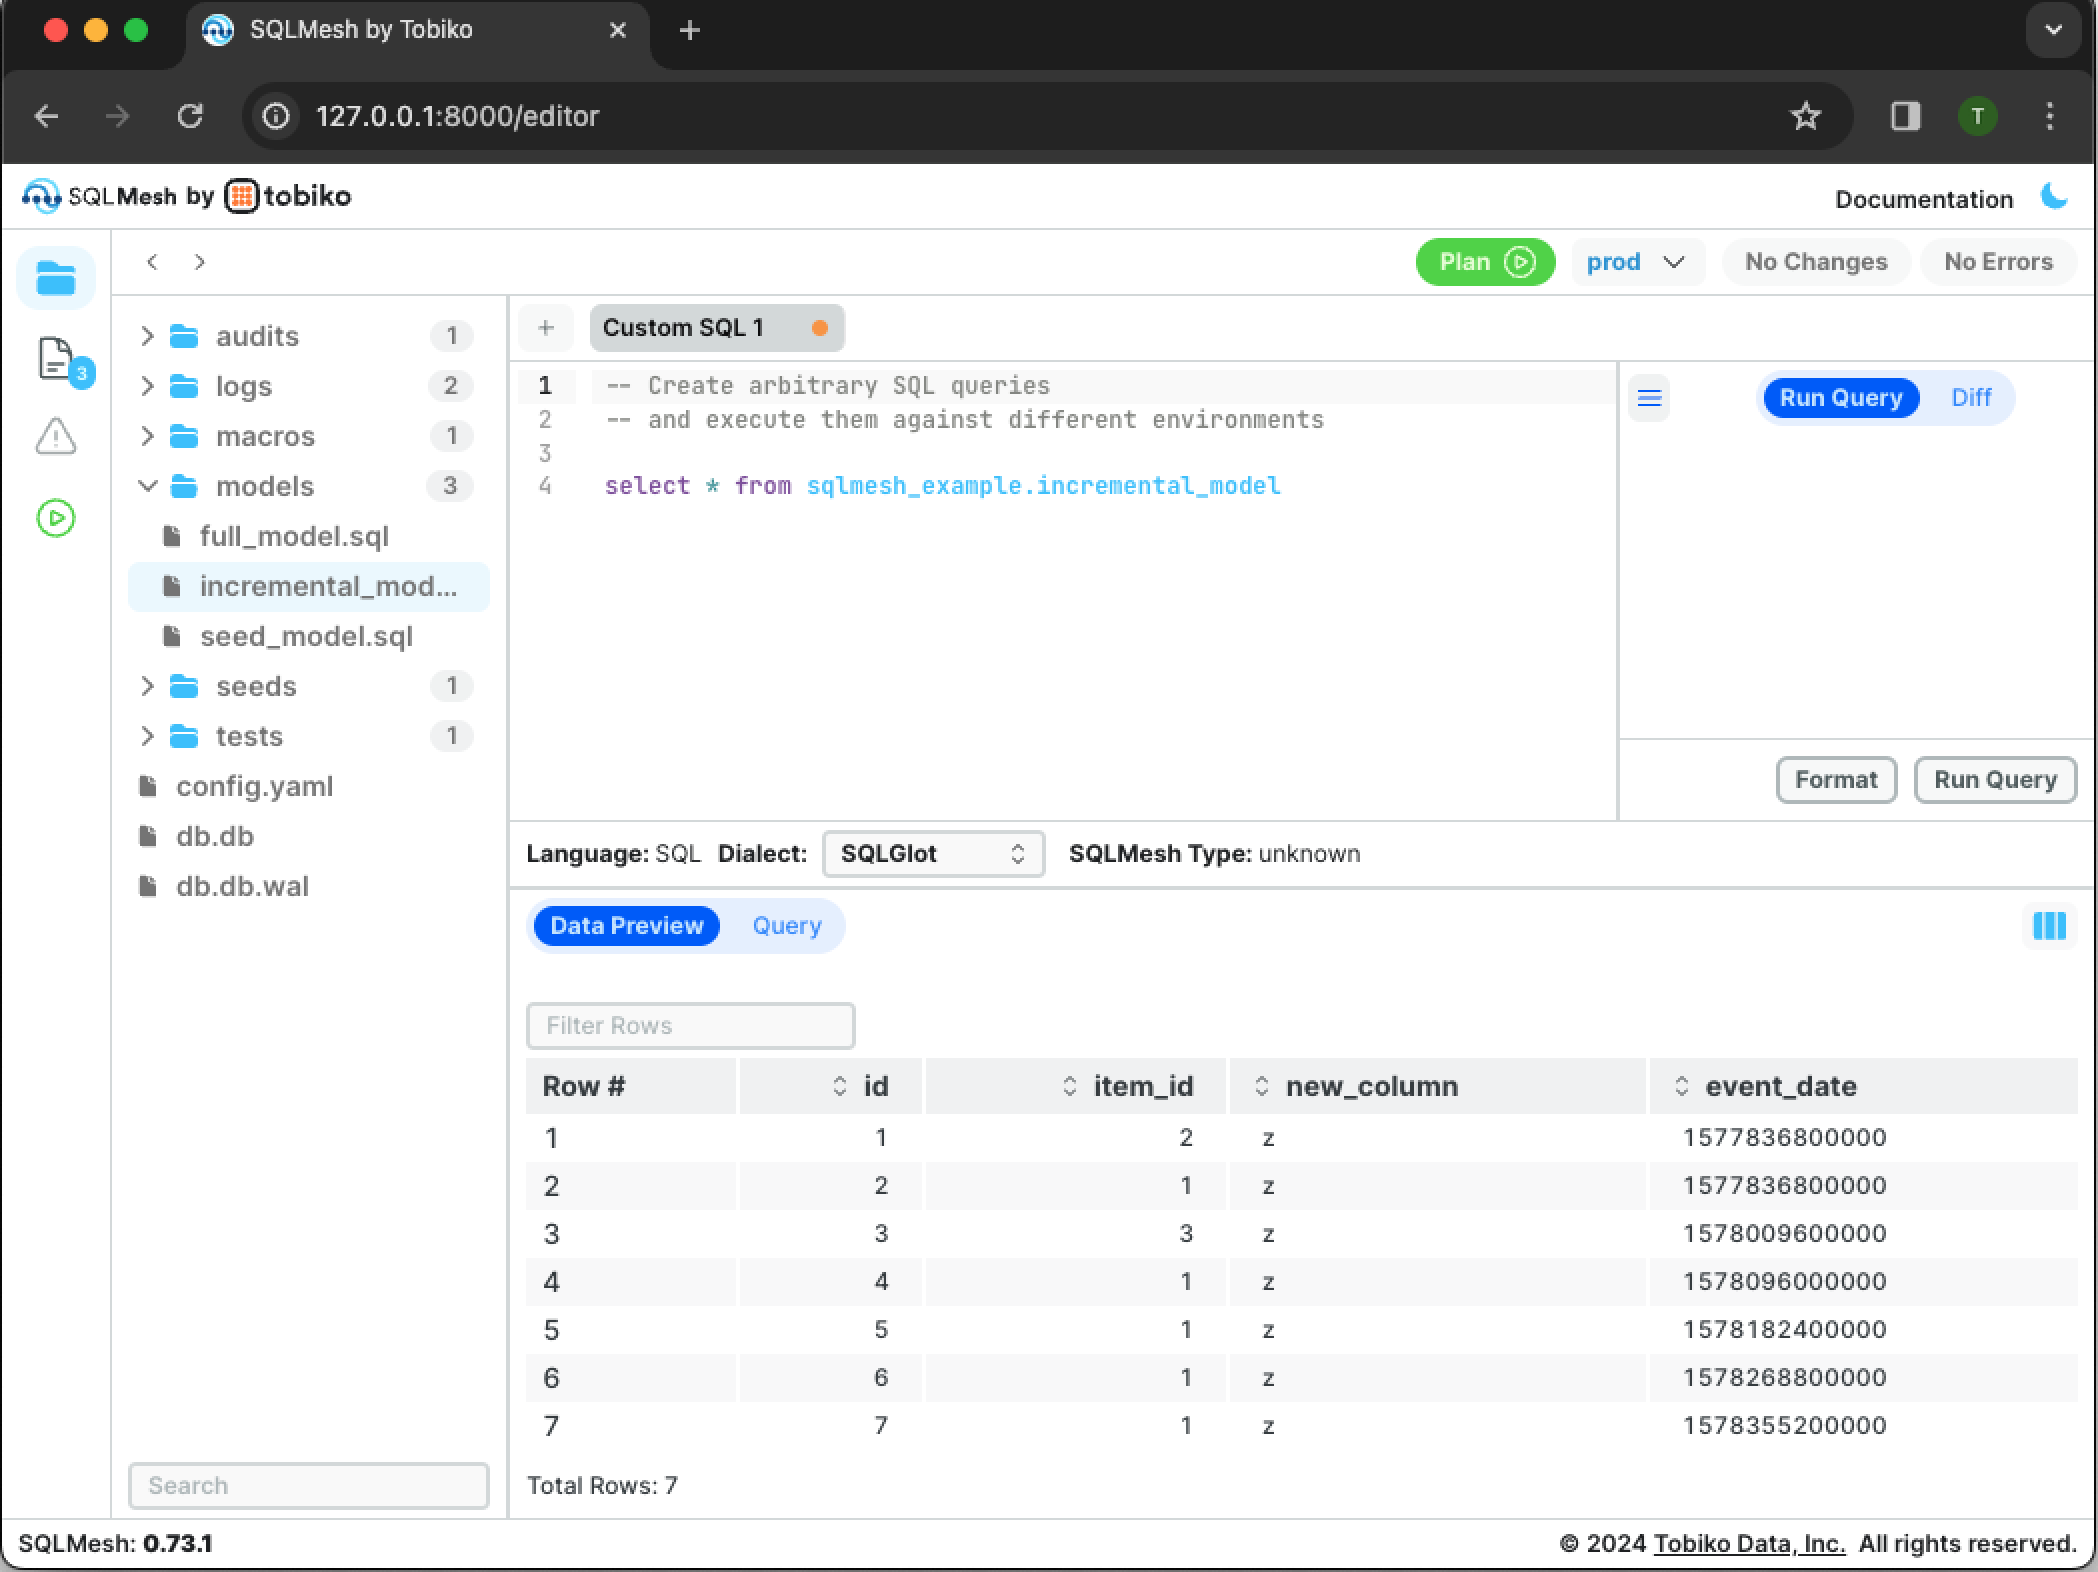
new_column is now present in the prod incremental model.
5. Next steps
Congratulations, you've now conquered the basics of using SQLMesh!
From here, you can: